 I picked up the Kacey Beauty Reflector for various reasons, first I’ve always wanted to experiment with a beauty dish. Second, the Kacey reflector is designed for small flashes as well as for studio strobe use, offering excellent adaptability in a photo world full of too many mounting systems and of course, it looks cool. The Kacey design comes off very similar to the Mola Demi dish, which is also a very cool beauty dish for the studio. However, like many good ideas, the Kacey dish offers an adaptation from a standard design. It was designed for small flashes and made of plastic to be light and therefore more portable for location shooting, hence fulfilling the desires of people like me, who are self-taught via the internet and highly influence by the Strobist movement. The Mola dishes look interesting, but they’re really outside the budget and needs of anyone but a full-time studio pro shooter. Like many photo startups (think RadioPopper) Kacey Enterprises is fulfilling the purchasing desires of a market, which the established companies have not been innovative enough to design and offer products for. Since I have no desire to acquire a standing as a full-time photographer, the Kacey design is the logical choice for me and my apartment studio, stocked with Metz and Sunpak flashes.
 My first experience with the Kacey dish was photographing my bookcase, complete with Bratz dolls, DVDs and an assortment of toys from California because, well – I’m a geek. What was I expecting and why did I want a beauty dish in the first place? Well, I like umbrellas for throwing a very large amount of light with spill going in all directions, I started using reflective and shoot-through umbrellas, and they have their place. When you’re starting out with lighting design, it’s the best way to go. Umbrellas are cheap, you can get a combined reflector-shoot-through design and it’s very easy to do basic lighting with an umbrella. But, they then become very limiting when one wants to start doing more precise lighting. To explore beyond the umbrella I bought some small softboxes in order to increase the precision of my lighting designs, because they are much more versatile than my 44in umbrellas. The softboxes can be placed on a boom, to the side, behind, where ever I desire around whatever it is I’m photographing. Umbrellas (at least the large ones I have) are not as easy to place, and give too much light spillage for my tastes. Softboxes can be gridded to further decrease light spill and sculpt light as one desires. However, the softbox creates a more diffused light source. What I wanted to achieve with a beauty dish is the ability to place harder light in a desired position. I like the look of photos I’ve seen with beauty dishes, and really I wanted the ability to place a large, even light source on a boom arm around models (ummm, and I’m generally the model). The Kacey dish represents a milestone for me, because it’s the first light modifier I’ve purchased which wasn’t made in China and bought because it was the cheapest option.
 So, how has the Kacey Beauty Reflector fulfilled my desires so far? First, I’ll note that this review is user, not scientific based, and focuses on my experiences using the reflector in the controlled studio environment of my apartment. The Kacey reflector was designed for location use in mind, but light is light and I was most interested in getting an excellent light modifier. Naturally, any light modifier is useless without light from a quality strobe. The Kacey dish is designed with the Speedlite in mind, like those standard uber expensive flashes from Nikon and Canon, which a person such as myself with a Minolta 7D finds to be over-kill. This is all well and good to design a dish for small flashes, but beauty dishes were originally designed with studio strobes in mind, those with bare bulbs instead of a fresnel lens to focus the light beam, like nearly all small flashes have. Nearly all, but I happen to love the Sunpak 120J bare-bulb cult-classic flash, and it fits perfectly with the Kacey Beauty Dish. Here’s why, most small flashes are designed to focus light directly forward of the flash head. A bare-bulb design throws light forward as well to the side of the head. So when you use a normal Speedlite in a beauty dish, you generally would also use a diffuser on the flash, to throw light to the side of the center reflector of the dish. This spreads out the light and would logically contribute to the nice uniform quality of light that beauty dishes are known for. Since the bare-bulb 120J already is throwing light in all directions, and the bulb is extending into the dish, it forms the perfect lighting combination.
The Kacey reflector was released along with a Speedlite bracket. The bracket costs a cool 150 USD, and some controversy has developed around this price. I picked up the dish for various lighting reasons, and I decided not to get the bracket for economic considerations. I figured I would just drill and modify the bracket from my Alzo softboxes. This required the purchase of a drill, which wasn’t that cheap and I don’t drill much stuff in my apartment, so in the end I don’t see how I saved any money. After modifying the adapter from my Alzo softboxes, I’m of the opinion that the Alzo bracket isn’t stiff enough to support the Kacey dish in the long run, and I’ll most likely buy the Kacey bracket, because it makes little sense in getting an excellent dish like the Kacey product and then using a sub-par bracket when connecting the flash. If the bracket isn’t stiff enough the dish will tilt, thus disrupting the light pattern, depending on how the dish is positioned. Plus, as illustrated below, the bracket and the position of the flash will have a very significant (depending on how much you care) influence on the light patterns coming from the dish.
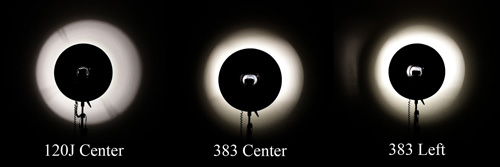
I did a quick comparison between a Sunpak 120J and a standard Sunpak 383. The 383 sports a normal small flash head, and therefore acts more like a normal Nikon or Canon flash, and is perhaps more representative of what people will be using the the Kacey reflector. As you can see from the above photo, the bare-bulb 120J seems to have a wide light pattern, and when you use a 383 with a head-directed light beam, the light spread becomes a tad tighter, especially around the edges, the light fall-off is significantly (depending on how much you care) influenced. Now, there are mitigating factors, the 120J is no doubt putting out more light than the 383 and the light spread shown above would therefore be dependent on the exact exposure of the flash. But the more interesting thing from my viewpoint, is how centering the flash is rather important to the light coming from the dish. Even if I center the 383, since I opted for a cheap mounting adapter for the flash, it’s off-center and I can’t center the 383 to get perfect light distribution with either the 120J or the 383. This concept is magnified on the last picture on the right, where I turned the head of the 383 to the left, and you can see directly how the light pattern changes. What can a perspective buyer gleam from all this? If you want really good light distribution, don’t skimp on the mounting bracket, by all accounts I’ve read the Kacey bracket is top quality and fully adjustable so you can precisely center the flash and support the weight of the dish. For these reasons, I’m looking for a new bracket solution, either from Kacey, or another source.
Test Shots
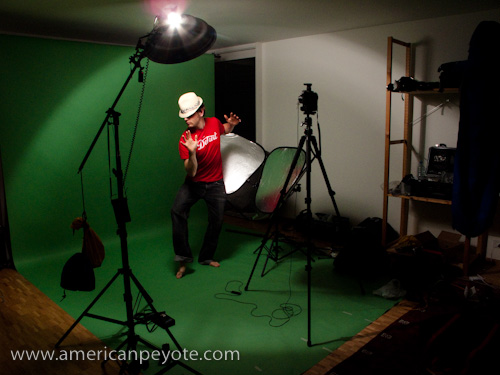 I ran a few test shots with myself playing the role of photographer, model, and art director, which feeds all the different parts of my creative brain. I wanted to get a feeling for the light I could expect from the Kacey Beauty Reflector both from a lighting and post-processing perspective. The setup was pretty basic, the dish went on a boom with the 120J above me and I setup my Lastolite Tri-Lite reflectors to get some fill. I did a few shots with my Minolta 7D and 28mm lens, Gadget Infinity radio triggers were used as well. I wore a shirt which says, “Enjoy Detroit,” because red is my color when shooting on a green background and Detroit is my city of eternal inspiration. I wore a hat I bought on the beach in San Diego and for some reason decided that the Katana would add a much needed element to the mix.
I did a few shots and then did some editing on them in Adobe Photoshop and Lightroom. The keen blog reader might protest, “No! You have post images straight out of the camera to give an accurate representation of what the dish can do!” Nothing is straight out of the camera anymore, and even with film it never went so smoothly. The truth is, you can try to imagine yourself as a Joey L or a Dave Hill, but if you don’t get the shadows you need from designing your lighting setup with purpose and determination, no amount of Photoshop alchemy will save your tones. I shoot images in raw, adjust shadows in Lightroom to get a good base, and them export to Photoshop to manipulate the lighting and tones in such as way that my art director brain waves stop and say, “That’s it! That’s the look!”
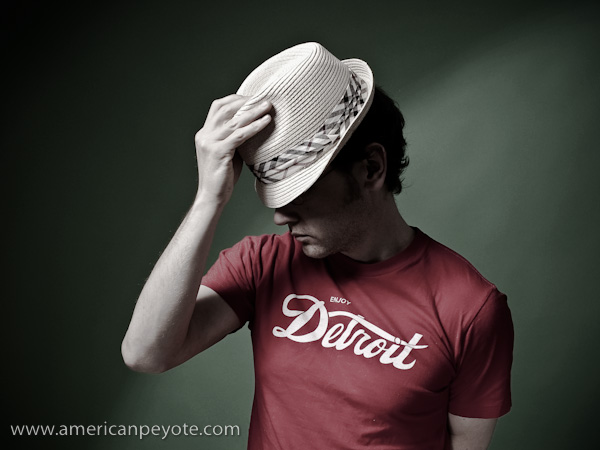
I’ll be blunt, I found the light from the Kacey Beauty Reflector to be nothing short of, exactly what I wanted. The tone and texture of the shadows are simply perfect. The texture of the skin and shirt are unique compared to what I was capturing with my umbrellas and softboxes, simply awesome. Even light distribution across the model, wonderful light fall-off on the edges. The shadows are deep where I want them deep and the transition from proper exposure to background shadow is excellent. This means that I have a very strong base image to work with when I define the final shadows in Photoshop. In the above image, the texture on the shirt has this almost wind-swept-mountain-ice feel to it after adding a Black-and-White layer and blending using Multiply (plus reduced fill on the layer), it’s like ski touring in the Swiss Alps in January and looking at the texture of a wind-swept snow ridge while wearing red-tinted glacier goggles. “Hells yes! I says in my heads.”
In the bottom Katana image, I was interested in getting some nice shadows on the hands and arms. What I love here is that the sword blade doesn’t get all blown out, even though the light is right above it. With my softboxes I would have a defined over-exposure with poor transition to the rest of the body. I’m pretty sure that if I had used an umbrella instead, the sword would have been blown out totally if I had attempted to get a decent exposure on the torso. The hat was another issue, it’s a light yellow tone, but you can see that it still has excellent texture in the weave of the material, the detail hasn’t been lost due to over exposure. And yet, I can still get excellent shadows to work with on the arms. This image didn’t have too much post, mainly just shadow work, some Smart Sharpening, and basic methods of defining shadow tones over the hands and arms.

Am I Happy
So, the inevitable question, is the Kacey Beauty Reflector worth $150? I’m going with a fully confident Yes. In my estimation and experience so far, the Kacey dish rocks, it produces excellent light, and has so far fulfilled my ambitions and desires for a beauty dish. Should you also get the $150 bracket? As I have no direct experience with it, these remarks might be less significant. However, I do wish I had bought the bracket. If you know how to make a decent bracket then be all means do it yourself. I modified a cheap bracket and it shows in the light patterns produced with different flashes. If this means something to you and you have the money, the bracket appears to be one of those high quality pieces of equipment which is sure to out-last your DSLR. I’m looking forward to using the Kacey dish on studio strobes in the future, either from Elinchrom or Alien Bees, depending on which ones I buy. A grid would also be an excellent addition, and I believe one is in the works from Kacey Enterprises.
8 replies on “Kacey Beauty Reflector – Review”
Nice review. Thanks!
I love your reviews. Keep up the good work. I learn so much from you.
Thanks for the review. Seeing you have the Orbis as well, can you explain what the main differences are? I know one's a beauty dish and one's a ring flash but I never quite understood how they differ as far as the quality of light and usage scenario. After all, they all throw a circular pattern of light and seem to be used primarily for portraits.
Thanks.
Hi Dan,
Hmmm, an interesting question. I think I'll write an article on this subject. But for instant knowledge here's my take:
Now, the true effect of a ringflash and beauty dish is highly connected to the distance from the light to the subject. When used around the lens from a close distance, the ringflash is directing light from multiple directions, creating the "shadowless" ringflash look, this is due to the absence of light at the center of the ring, and forms a key difference to the beauty dish.
The Beauty Dish produces a very nice wrap-around type of light, which is also directional. The main difference to the ringflash is that the dish is sending light directly forward from the face of the dish, but in a very directional sense, and without the ring effect where you have an absence of light coming from the center of the dish.
I'll work up some light distribution diagrams and do an article on the subject.
-mark
Mark,
Thanks! An article and some comparison shots will be very helpful indeed. Looking forward to it.
Thanks for the review. It’s an excellent read. I was hoping to see straight on photos of the light on the face to see the shadow falloff.
I do agree that the bracket for an additional $150 is a bit steep. The whole set, dish + bracket for an even $200 would sell like hot cakes.
The Beauty Dish produces a very nice wrap-around type of light, which is also directional. The main difference to the ringflash is that the dish is sending light directly forward from the face of the dish, but in a very directional sense, and without the ring effect where you have an absence of light coming from the center of the dish.
Thanks for the review 🙂 Keep up the excellent work!
Stefan