strobist

An American Ninja in Bern – Swiss Strobist

sarah-bratz-iii.jpgThere are probably very few reasons to walk through a Swiss train station with a sword slung around your body. Even if you are a Ninja, in modern times the Katana offers little to the needs of a hired killer, except to show-off and behead a target if paid to do so. If you’re a photographer en-route to a Swiss Strobist meetup however, it makes perfect sense, and is even acceptible in some ways, to casually stroll through the Bern train station with a Katana slung over your shoulder and a Kacey beauty dish under your arm. It’s unclear to me, the actual legalities of walking around a Swiss train station with a Katana slung over the shoulder. So it’s best to bungy a light stand to the Katana after wrapping in olive green farbic, now when you’re stopped by die Polizei you can say something like, “Ah, das is nur eine Blitz Stative.”

The Swiss Strobist meet-up in Bern was organized by Mark Howells-Mead. Traveling under the name Permanent Tourist on the net, he’s an aspiring photographer who’s taken some initiative to organize photographers in Switzerland around the Storbist philosophy of location shooting. I know Bern fairly well, but I’d never shot there, and when you’re presented with an option of staying in bed or jumping on a train to Bern with your Katana, the word “Yes” should dominate any other suggestion in your head at 6:30am on a Sunday morning.

Why take a Katana to a Strobist meetup? Mark said he was impressed by the Ninja shots from Chase Jarvis and my Urban Ninja images, and asked if I could swing by with my sword, as he had some idea of executing a modern Jack the Ripper photo on the streets of Bern. It seemed like a reasonable request, so I agreed to head to head to Bern on a fine Sunday morning for the Strobist meet-up. I had other motives of course, for me das Ziel of the day was to fool around with my new fantastic lighting combiation, a Kacey Beauty Reflector with a Sunpak 120J powered by a TR-II battery pack. Beautiful light, power, and long battery life in a mobile configuration. I’d just received a Kacey dish the week before and shot with it in my apartment. I love the light from the Kacey dish, and wanted to try it out on a location. So when my alarm went off around 6:30am, I set about collecting my things for the day. Minolta 7D, Canon G10, Kacey reflector, light stand, Doc Martens, Katana, Bratz doll…let’s roll.

The format of the Bern Swiss-Strobist meet-up was a bit more structured than I’m used to at these things. In the morning we broke up into groups including a model with a leader to run the shoot, then in the afternoon it was a free-for-all with photogrphers shooting models and experimenting. This offered a nice mix, letting some photographers teach, with the option of getting more interactive in the afternoon. The best way to learn with flash is just to do.

bern-strobist-setup-1.jpg

The Kacey Dish on Location

The Kacey dish is large. I realized this when a giant box was given to me by the nice woman at my local post office. I had ordered the dish along with the Kacey location bag. I figured, what the hell, if I don’t buy the bag I probably won’t take the dish with me when I leave my apartment, and that would a be a shame. The Kacey dish is marketed as a small-flash beauty dish, ideal for people like myself, who primairly uses small flashes and loves the idea of shooting with a dish.

The Kacey dish is actually very enjoyable to travel with. I took the train from Winterthur to Bern, and then walked around, went on a bus, walked around some more, did some shooting, walked around, blah, blah, blah. At the end of the day I was still skipping along the streets of Bern like a woodland creature from Narnia with my Kacey dish slung over my shoulder. I have no complaints on mobility. Even though the dish looks large and heavy, it’s rather light for what it is and travels extremely well. The Kacey reflector is made from plastic, no doubt some impact resistant formulation formed via an injection molding process. Is it a good idea to mold a beauty dish out of plastic instead of aluminum? Yes, without a doubt. As a Doctor of Science with a Master’s in Materials Science, I have full confidence in the durability and strength of the Kacey reflector, and plan to be using it till I loose interest in photography, or die.

I carried the Kacey dish with the optional bag, as a sometimes avid world travler and mountineer, I’ve developed sort of a bag fetish over the years. My adventure equipment room is stocked with everything from North Face to Lowe Alpine summit packs, multiple Mountain Smith lumbar designs, a Go Lite here, a Mammut there, and my favorite all around climbing/ski touring/mountaineering bags; my Osprey Exposure packs. I know packs, and from a materials standpoint I look for durability in the fabric and robustness in the zippers. The Kacey dish bag is no bullshit, one of the most well-made, highest quiality bags I’ve ever used for anything. The quaility of the $85 Kacey bag is bomb-proof, the stitching is exact, the materials are robust, and the zippers even surpass those on my North Face basecamp duffles.

bern-strobist-setup-3.jpgSwiss Strobists and the Kacey Dish

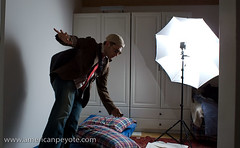
So, how did the dish perform, how was it received by the Swiss Strobists? Our first shoot was in the Wasserwerk, an industrial site-turned hip nightclub (like many nightclubs in Winterthur, Zurich, and Bern). Mark was trying to light the fully black interior of the club with our model Rahel sitting on a black lounge couch and some Nikon speedlights. Mark had been to the Strobist Cern Workshop, and he started to channel David Hobby, running around the place setting up a flash here, an umbrella there, taking test shots, checking the exposure…then we setup the Kacey dish with my Sunpak 120J (we later switched to one of Mark’s Nikon SB-something flashes so he could use his radio triggers).

I remember Mark saying something like (no, I’m not sure of the exact quote), “Wow, I don’t really need all these flashes, the light is just so perfect already.”

Yes, umbrellas are cheap and great, but nothing beats the light from a nice dish like the Kacey reflector. That’s why people like to use them, they just work, they produce beautiful light without much stress on the part of the photographer. Mark seemed to be impressed by the Kacey reflector, so much so that it was used as the main lighting source on the first two shoots of the day (including his new-age Jack the Ripper shot). He might have used it in the afternoon as well, but I took it back and was able to get a few shots with one of our other models, Sarah before my battery pack died.

sarah-bratz-i.jpg

Shooting Sarah with the Kacey Dish

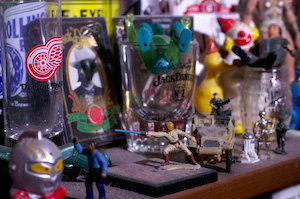
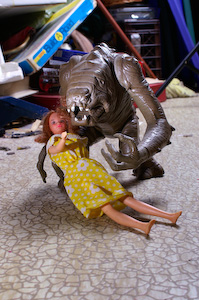
In the afternoon we photographers had a free-for-all setting up shots in various places. I chose to work with Sarah. I’d taken a Bratz doll with me (I take at least one every time I pack up my camera gear now) and had some ideas. I keep expecting people to look at me like a crazy person when I pull out a camera and Bratz doll, but everyone on the streets are continually amused at my antics. Sarah and I set up near the Aare, the river running through Bern. We were in a small alcove area, with a beautiful view of the river and some nice graffiti on the walls of the old city. I posed Sarah with and without a blonde Bratz doll. Sometimes I threw it up in the air, sometimes I just posed them against one another.

The Kacey dish was used on a light stand, and I leaned it in closer as needed to fine-tune the light. In the first setup the Kacey dish was acting more as a large light source from above Sarah, and the light here would probably be similar to that of an umbrella. I was able to get some nice light fall-off, lighting both Sarah and the Bratz doll with nice, even light. Soft yet directional, and was able to get a nice exposure on the wall as well, where you can see the fine texture near the graffiti.

sarah-bratz-ii.jpgI also posed Sarah against the backdrop of the city in the sun, and bumped up the power on my 120J to balance Sarah’s exposure with that of the background. I was able to get that fine type of light fall-off on Sarah’s face that I love, the type where the face has an even exposure and then the shadows just lightly surround the face. This is exactly why I bought the Kacey reflector, to get those fantastically beautiful shadows with the ability to move and direct the light to where I want it. It’s not something I can easily do with normal umbrellas, and is the reason the Kacey dish is now my favorite light modifier. For the post-processing I went with a graffiti grunge feel, high-lighting the natural graffiti of the walls, or combining Sarah with graffiti overlays from Zurich which I had shot earlier.

bratz-bern-1.jpgSo, brass tacks – the Kacey Beauty Reflector is light and nimble on location. I love the light from it, use a bare-bulb 120J, or just a traditional Nikon SB (or a similar design), and you just get fantastic light. No mess, less fuss, excellent light and you direct it where you want it. An enthusiastic thumbs-up, a vigorous affirmation of my affection for the Kacey dish. Now I just need to get it mounted for my in-the-mail Elinchrom BxRi flashes. If you ever find yourself in Bern and happen to look down only to find a Bratz doll standing next to a giant magic mushroom, don’t be alarmed, this is simply the natural order of things in the Universe, and if you keep looking, you’re sure to find stranger things along the path in this life or the next.

?

?

?

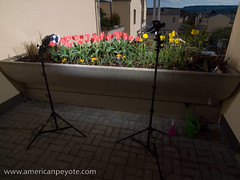
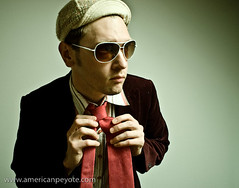
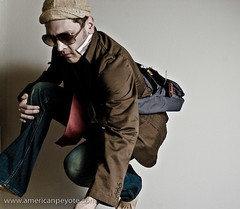
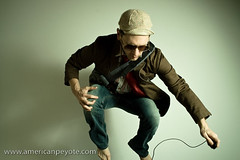
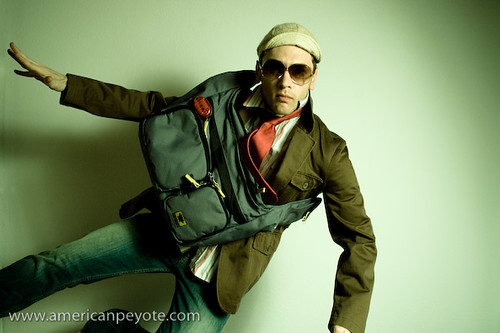
Shooting with the Kacey Dish in my apartment Studio

Kacey Beauty Dish Review – Bill Millios

Kacey Enterprises

Kacey Beauty Reflector – Review

kacey-bd-1.jpgI picked up the Kacey Beauty Reflector for various reasons, first I’ve always wanted to experiment with a beauty dish. Second, the Kacey reflector is designed for small flashes as well as for studio strobe use, offering excellent adaptability in a photo world full of too many mounting systems and of course, it looks cool. The Kacey design comes off very similar to the Mola Demi dish, which is also a very cool beauty dish for the studio. However, like many good ideas, the Kacey dish offers an adaptation from a standard design. It was designed for small flashes and made of plastic to be light and therefore more portable for location shooting, hence fulfilling the desires of people like me, who are self-taught via the internet and highly influence by the Strobist movement. The Mola dishes look interesting, but they’re really outside the budget and needs of anyone but a full-time studio pro shooter. Like many photo startups (think RadioPopper) Kacey Enterprises is fulfilling the purchasing desires of a market, which the established companies have not been innovative enough to design and offer products for. Since I have no desire to acquire a standing as a full-time photographer, the Kacey design is the logical choice for me and my apartment studio, stocked with Metz and Sunpak flashes.

kacey-bd-shots-2.jpg
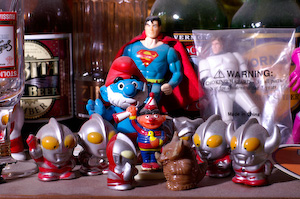
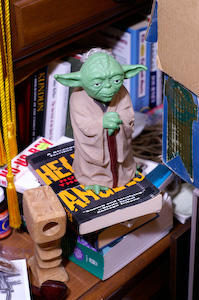
My first experience with the Kacey dish was photographing my bookcase, complete with Bratz dolls, DVDs and an assortment of toys from California because, well – I’m a geek. What was I expecting and why did I want a beauty dish in the first place? Well, I like umbrellas for throwing a very large amount of light with spill going in all directions, I started using reflective and shoot-through umbrellas, and they have their place. When you’re starting out with lighting design, it’s the best way to go. Umbrellas are cheap, you can get a combined reflector-shoot-through design and it’s very easy to do basic lighting with an umbrella. But, they then become very limiting when one wants to start doing more precise lighting. To explore beyond the umbrella I bought some small softboxes in order to increase the precision of my lighting designs, because they are much more versatile than my 44in umbrellas. The softboxes can be placed on a boom, to the side, behind, where ever I desire around whatever it is I’m photographing. Umbrellas (at least the large ones I have) are not as easy to place, and give too much light spillage for my tastes. Softboxes can be gridded to further decrease light spill and sculpt light as one desires. However, the softbox creates a more diffused light source. What I wanted to achieve with a beauty dish is the ability to place harder light in a desired position. I like the look of photos I’ve seen with beauty dishes, and really I wanted the ability to place a large, even light source on a boom arm around models (ummm, and I’m generally the model). The Kacey dish represents a milestone for me, because it’s the first light modifier I’ve purchased which wasn’t made in China and bought because it was the cheapest option.

kacey-bd-shots-4.jpgSo, how has the Kacey Beauty Reflector fulfilled my desires so far? First, I’ll note that this review is user, not scientific based, and focuses on my experiences using the reflector in the controlled studio environment of my apartment. The Kacey reflector was designed for location use in mind, but light is light and I was most interested in getting an excellent light modifier. Naturally, any light modifier is useless without light from a quality strobe. The Kacey dish is designed with the Speedlite in mind, like those standard uber expensive flashes from Nikon and Canon, which a person such as myself with a Minolta 7D finds to be over-kill. This is all well and good to design a dish for small flashes, but beauty dishes were originally designed with studio strobes in mind, those with bare bulbs instead of a fresnel lens to focus the light beam, like nearly all small flashes have. Nearly all, but I happen to love the Sunpak 120J bare-bulb cult-classic flash, and it fits perfectly with the Kacey Beauty Dish. Here’s why, most small flashes are designed to focus light directly forward of the flash head. A bare-bulb design throws light forward as well to the side of the head. So when you use a normal Speedlite in a beauty dish, you generally would also use a diffuser on the flash, to throw light to the side of the center reflector of the dish. This spreads out the light and would logically contribute to the nice uniform quality of light that beauty dishes are known for. Since the bare-bulb 120J already is throwing light in all directions, and the bulb is extending into the dish, it forms the perfect lighting combination.

The Kacey reflector was released along with a Speedlite bracket. The bracket costs a cool 150 USD, and some controversy has developed around this price. I picked up the dish for various lighting reasons, and I decided not to get the bracket for economic considerations. I figured I would just drill and modify the bracket from my Alzo softboxes. This required the purchase of a drill, which wasn’t that cheap and I don’t drill much stuff in my apartment, so in the end I don’t see how I saved any money. After modifying the adapter from my Alzo softboxes, I’m of the opinion that the Alzo bracket isn’t stiff enough to support the Kacey dish in the long run, and I’ll most likely buy the Kacey bracket, because it makes little sense in getting an excellent dish like the Kacey product and then using a sub-par bracket when connecting the flash. If the bracket isn’t stiff enough the dish will tilt, thus disrupting the light pattern, depending on how the dish is positioned. Plus, as illustrated below, the bracket and the position of the flash will have a very significant (depending on how much you care) influence on the light patterns coming from the dish.

Kacey_Sunpak.jpg

I did a quick comparison between a Sunpak 120J and a standard Sunpak 383. The 383 sports a normal small flash head, and therefore acts more like a normal Nikon or Canon flash, and is perhaps more representative of what people will be using the the Kacey reflector. As you can see from the above photo, the bare-bulb 120J seems to have a wide light pattern, and when you use a 383 with a head-directed light beam, the light spread becomes a tad tighter, especially around the edges, the light fall-off is significantly (depending on how much you care) influenced. Now, there are mitigating factors, the 120J is no doubt putting out more light than the 383 and the light spread shown above would therefore be dependent on the exact exposure of the flash. But the more interesting thing from my viewpoint, is how centering the flash is rather important to the light coming from the dish. Even if I center the 383, since I opted for a cheap mounting adapter for the flash, it’s off-center and I can’t center the 383 to get perfect light distribution with either the 120J or the 383. This concept is magnified on the last picture on the right, where I turned the head of the 383 to the left, and you can see directly how the light pattern changes. What can a perspective buyer gleam from all this? If you want really good light distribution, don’t skimp on the mounting bracket, by all accounts I’ve read the Kacey bracket is top quality and fully adjustable so you can precisely center the flash and support the weight of the dish. For these reasons, I’m looking for a new bracket solution, either from Kacey, or another source.

Test Shots

Kacey_BD_Shots-3.jpg 
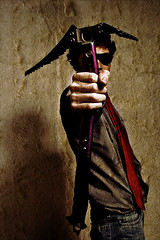
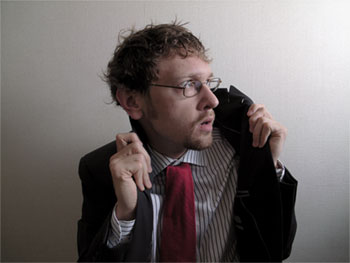
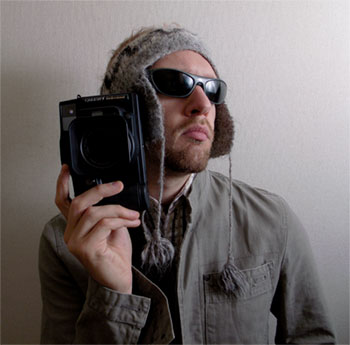
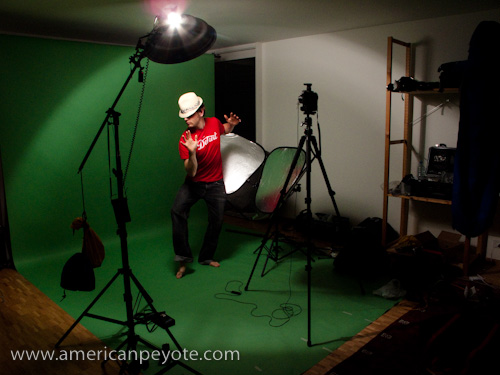
I ran a few test shots with myself playing the role of photographer, model, and art director, which feeds all the different parts of my creative brain. I wanted to get a feeling for the light I could expect from the Kacey Beauty Reflector both from a lighting and post-processing perspective. The setup was pretty basic, the dish went on a boom with the 120J above me and I setup my Lastolite Tri-Lite reflectors to get some fill. I did a few shots with my Minolta 7D and 28mm lens, Gadget Infinity radio triggers were used as well. I wore a shirt which says, “Enjoy Detroit,” because red is my color when shooting on a green background and Detroit is my city of eternal inspiration. I wore a hat I bought on the beach in San Diego and for some reason decided that the Katana would add a much needed element to the mix.

I did a few shots and then did some editing on them in Adobe Photoshop and Lightroom. The keen blog reader might protest, “No! You have post images straight out of the camera to give an accurate representation of what the dish can do!” Nothing is straight out of the camera anymore, and even with film it never went so smoothly. The truth is, you can try to imagine yourself as a Joey L or a Dave Hill, but if you don’t get the shadows you need from designing your lighting setup with purpose and determination, no amount of Photoshop alchemy will save your tones. I shoot images in raw, adjust shadows in Lightroom to get a good base, and them export to Photoshop to manipulate the lighting and tones in such as way that my art director brain waves stop and say, “That’s it! That’s the look!”

Kacey_BD-1.jpg

I’ll be blunt, I found the light from the Kacey Beauty Reflector to be nothing short of, exactly what I wanted. The tone and texture of the shadows are simply perfect. The texture of the skin and shirt are unique compared to what I was capturing with my umbrellas and softboxes, simply awesome. Even light distribution across the model, wonderful light fall-off on the edges. The shadows are deep where I want them deep and the transition from proper exposure to background shadow is excellent. This means that I have a very strong base image to work with when I define the final shadows in Photoshop. In the above image, the texture on the shirt has this almost wind-swept-mountain-ice feel to it after adding a Black-and-White layer and blending using Multiply (plus reduced fill on the layer), it’s like ski touring in the Swiss Alps in January and looking at the texture of a wind-swept snow ridge while wearing red-tinted glacier goggles. “Hells yes! I says in my heads.”

In the bottom Katana image, I was interested in getting some nice shadows on the hands and arms. What I love here is that the sword blade doesn’t get all blown out, even though the light is right above it. With my softboxes I would have a defined over-exposure with poor transition to the rest of the body. I’m pretty sure that if I had used an umbrella instead, the sword would have been blown out totally if I had attempted to get a decent exposure on the torso. The hat was another issue, it’s a light yellow tone, but you can see that it still has excellent texture in the weave of the material, the detail hasn’t been lost due to over exposure. And yet, I can still get excellent shadows to work with on the arms. This image didn’t have too much post, mainly just shadow work, some Smart Sharpening, and basic methods of defining shadow tones over the hands and arms.

kacey-bd-1-2.jpg

Am I Happy

So, the inevitable question, is the Kacey Beauty Reflector worth $150? I’m going with a fully confident Yes. In my estimation and experience so far, the Kacey dish rocks, it produces excellent light, and has so far fulfilled my ambitions and desires for a beauty dish. Should you also get the $150 bracket? As I have no direct experience with it, these remarks might be less significant. However, I do wish I had bought the bracket. If you know how to make a decent bracket then be all means do it yourself. I modified a cheap bracket and it shows in the light patterns produced with different flashes. If this means something to you and you have the money, the bracket appears to be one of those high quality pieces of equipment which is sure to out-last your DSLR. I’m looking forward to using the Kacey dish on studio strobes in the future, either from Elinchrom or Alien Bees, depending on which ones I buy. A grid would also be an excellent addition, and I believe one is in the works from Kacey Enterprises.

Yeahhhh Baby – Swiss Strobist – CERN Workshop

strobist_cern-3
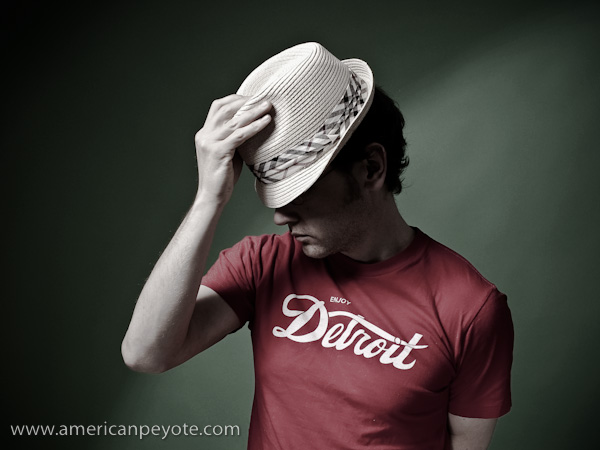
Over the weekend I headed down to CERN in Geneva to check out the Strobist seminar on February 21st, 2009. I went down on Friday to shoot Geneva graffiti and ended up doing coverage of a Tamil Tiger demonstration at the United Nations, but those stories wait for another day. I’m the sort of person who doesn’t like spending money on photography education, mainly because there’s nothing really complex or technical about taking pictures which seems to justify the cost of advertised offerings like the Luminous Landscape workshops. A camera is a lightbox, you add light with flashes or manipulate natural lighting, what’s there to learn? You take the vision in your head and make it a reality. But I do occasionally drop money here and there, a Joey L Photoshop DVD, a book on Skin, a book by Michael Grecco, and I figured it was time to join a lighting workshop.

The Strobist workshop was all day on Saturday. We started around 9am, and finished at 5pm with a few breaks in between. In the morning we listened to David explain lighting design and methodology, and in the afternoon we watched David setup and execute four different lighting setups.

strobist_cernThe morning focused on lighting basics, the thought process for designing lighting in different environments. Lighting concept takes a few minutes to describe in every possible detail, but the morning was filled up on designing lighting for different environments, shooting outside in the shade, lighting an interior room by starting with the ambient light and then adding flash where needed. By the end of the morning I had a good handle on the method, which I hadn’t really used before. I finished the morning with one key process in my head:

When shooting a portrait outdoors, find a shaded location, under expose the ambient environment light, add light to paint the final picture using the strobes. Use the same basics for interior portraits.

That’s it, like I said, photography isn’t exactly complex, so there’s no reason to take away confusing tidbits on lighting ratios. If you write up a business plan and ask for $500,000 from an Investment Angel for your startup, they will want to hear your idea described in 2-3 sentences (Swiss StartUp Camp 2009). That’s it, keep it simple. I see no reason why lighting design should be any different.

strobist_cern-9Aside from having the basic process of lighting design, the afternoon exposed us to how to “execute.” Using the seminar room, we talked about four different locations to use for portraits. Then David set about the room with umbrellas and his Orbis ringflash, photographing participants. From a certain perspective, David Hobby is like the kid who got all the toys he wanted for Christmas, and spends every day rediscovering their amazingness. This was the impression I had watching him setup the different portraits. It seemed like each light setup was like finding a rocket in the backyard and getting to set it off. This is the corner stone, getting a sense for the energy and problem solving method of the man at work – the message which I took away from the afternoon. This aspect which is more difficult to communicate on a website like Strobist, and a good reason to attend a workshop. The technical aspects are of course – trivial. Flashes are not complex, neither is lighting design, it’s how one executes the shoot which matters.

When photographing, be a kid at play and you’ll have fun and take away cool photos. That’s it, nothing too complex.

strobist_cern-4Yeahhhh, Baby. That’s what we heard every five minutes, David’s way of pulling an emotional response from his subjects. It made me think of Platon asking Bill Clinton to “Show me the Love.” By channeling Austin Powers, David pulled a smile from everyone in the room, every time he said the same line again, and again and again, it got a positive reaction. Apparently he has other lines, but since “Yeahhhhh Baby” worked every time, there wasn’t any need to bring out the reserves.

Basically much of the technical information I took away from the Strobist seminar is covered on Lighting 101 and 102 on the Strobist website. Of course, pretty much all knowledge is available on the internet, you can teach yourself JAVA programming, electrical engineering, and quantum physics if you’re disciplined. The question I always ask in my head, “was this really worth it?” Yes, in the end I left CERN happy that I’d dropped 150 CHF on a Strobist lighting seminar, plus travel between Zurich and Geneva and a sound-proof hotel room on Friday night, just as I’m still happy I dropped some 200 odd dollars on the Joey L Photoshop DVD.

And that’s the key to having a successful StartUp, give people something which they feel they need, and which they find value in, and you’ll be successful.

If you’re in Switzerland an interested in Strobist stuff, check out Swiss-Strobist. There’s a post about the CERN workshop and info on the 1st Swiss-Strobist meetup for 2009.

The David Hobby Free Photography Business Plan?

The blood thirsty photo blog sphere was set ablaze in a napalm storm over a simple post, Four Reasons to Consider Working for Free by David Hobby, the publisher of Strobist. The article was one of those long and well-written posts, the type which people like to read because it’s not a regurgitation of all the other photo blogs on the net. In his post David talks about the benefits of working for free, of offering free photography services to people who he wants to photography, and who wouldn’t have a budget for his services otherwise. Of course, he doesn’t mean shooting for free for people who could pay or giving content away for unrestricted commercial usage. Depending on who you are you’ll see the two words, Photography and Free and Professional and either, become enraged, become inspired, remain unaffected. Nothing is free, a pitch is always given, a sale sometimes made, we’re all in an ever changing economic system.  You just have to know which game you’re playing.

If the idea of free photography from a professional photographer enrages you, there’s probably some underlying feeling that such a statement encourages people to devalue their work, give away a product for free, and depresses the economic value of the entire photography market. Those who are inspired might feel this way because they believe that photography is about art and expression and taking pictures of what you want to photograph despite not earning a direct financial payment is what life is all about.

Both reactions might require a few assumptions on the part of the reader. First, one might suppose that a professional photographer giving away a service for free, in the hopes of future financial returns is no way to run a business. There is an alternate view. When you perform a certain function and receive money for it, and do at a higher level than most of your peers, it’s called a job, a profession, or maybe even a career. If you do something on the side, that you don’t get paid for or doesn’t produce a sizable income but you do it because you find it more interesting than TV, it’s call a…hobby.

So, you could start with the perception that David Hobby is a professional photographer who writes about giving away photography for free. But it’s also true that sometimes people work one job, and work on their hobby in the off hours, and eventually bring their hobby to such a high level, that it becomes their job, a profession, or maybe even a career. Is it an insult to call a professional blogger a measly photographer? Should a newspaper-photographer-turned-blogger use a Web 2.0 business strategy to incubate their photography hobby and turn it into a startup business? If a professional blogger gives away free photography, does it help his/her blogging business model or does it bring their dreams of being a professional photographer closer to reality? What does it mean for a blogger to have to have a career in a Web 2.0, soon to be Web 3.0 world? How does a photographer market themselves in the blogsphere?

If a professional photographer simply gives away photos the case could be made that they’re devaluing the overall creative market of the world. But if a blogger who is also a photographer on the side publishes a post called…Four Reasons to Consider Working for Free, the purpose of the post isn’t necessarily about selling photos and finding future clients, or is it?

The web is a constant production-consumption, an economic system. Surpluses and shortages and the smart management of resources. Veil readers thirsty for blood soaked words to sink their teeth into are constantly hungry for a new topic to debate on blogs and webpages. There are a few ways to have a popular blog, give people what the want to read, develop an emotional connection to your readers, and/or create controversy for discussion.

The David Hobby Free Photography Business Plan could simply be a logical application of Wikinomics to a photo blogging business model and echoes the ethos set down by John Grant in his book “After Image mind altering marketing.”  The best way to market to a smart set of consumers is to teach them something.

In the web industry, producers produce and consumers consume. David Hobby writes about working for free in the hopes that this will bring a return for a future photo business, but Strobist.com reaps the benefits of web traffic and reactions in the present day. Of course, this improves the blog business (and related Strobist workshop spinoff), where any exposure is good exposure. Any reaction positively impacts the Google hits and more links mean more visitors equals more ad revenue (hopefully). It’s just the application of the Wikinomics model to photography. Remove the money from the equation, and the artist should be free to create as they like. Art and design is nothing more than reinterpretations of past ideas. And the David Hobby Free Photography Business Plan is what use to be called doing personal projects. You shoot what you want and organize the projects you want to organize because they interest you.

Some say that nothing which is free has any real value. And something which is useless can never be truly beautiful. Does giving PopPhoto permission to publish my Flickr photo devalue the cumulative impact of the creative industries? Is David Hobby working for free so he can blog about it and cause discussion on the Strobist blog and bring more hits to his page? This is what I did when I reviewed the Joey L Photoshop Tutorial DVD. I bought it to learn photoshop and as a bonus, reviewed it to bring exposure to my blog, to see if I could create – a reaction. I created content for web consumers who were, and still are hungry for info on the Joey L Look. Viewers find my Joey L post and consume that content. I just don’t have anything to sell them. That’s the big web-based circle of life and content distribution. Is giving away free knowledge on my blog providing a suitable career path on my way to being a movie director in Hollywood?

Perhaps, and then I’ll hire David Hobby to photography me.

BlogCampSwitzerland 3.0 Flickr-Blog Integration

I had the excellent opportunity to join in the third BarCamp in Zurich. BlogCamp Switzerland 3.0 was held on August 29th, 2008 at the Technopark in Zurich. ?This was my second attendance at BlogCamp Switzerland, I did a talk at the first one on March 24th, 2007 where I gave a talk called ?Photography and Writing for Blogs.

BlogCamp Switzerland 3.0 included a cool mix of people and ideas.  I listened to Cédric Hüsler (http://keepthebyte.ch/blog.html) talk about the impact of polling feed networks and how much traffic is wasted on checking if blogs have been updated.  In the afternoon I went to hear Patrick Liechti from Sun Microsystems talk about organizing a Startup BarCamp type conference to educate people on how to form and succeed with new startups.  This underscores the advantage of attending a BarCamp, lots of new ideas and exposure to new areas.  I’m looking forward to attending BarCamp Berlin 3, which will be the third for that awesome city.

This time I put together a talk centered on using Flickr as a way to integrate photography into a blogging workflow.  This sounds a bit technical and boring, but I tried to get all blogging philosophical and hit on the idea that photos can be used to instantly communicate feelings in invoke emotional responses in ways which aren’t possible by blogging just using text.

The fusion of text blogs with Flickr postings means you can market your blog content to a large number of people who are interested in visual stimulation.  If your images communicate an essential message, they can be used as ways to bring traffic to your site.  Furthermore, using the community aspects of Flickr enables very good interaction with blog readers.  David Hobby knows this, the author of Strobist has skillfully used Flickr to build a reader base that wouldn’t have been possible if he had only blogged using his Blogger account.  And after learning some things from David, I used Flickr to market my blog posts about photographer Joey Lawrence and his Photoshop DVD Tutorial with the Strobist Flickr group discussion board.  I also hit on how Flickr is currently one of the best solutions to the problem of finding photos on an internet when search engines are still all text based.

Anyways, since I’m exploring the transition from text blogging to integrated photo blogging I thought I’d add some video and audio to the mix.  This first one sort of sucks, but I’m looking to improve.  Below I’ve embedded a version of my talk entitled:

Marketing Blog Content with Flickr

Timing and Community

Santis – Mountaineering and Strobes

June 1st was a sunny Sunday in the Swiss-German land, and seemed like the perfect day to begin my return to the mountain environment.  On another sunny day in April, the 28th to be exact, I’d sweated through my dissertation defense, and after jumping from Zurich to Amsterdam, to Zurich to New Orleans to Detroit, to Boston, to Detroit, and finally back to Zurich, I found myself unemployed and in need of a mountain tour.

Santis-2
So on a sunny Sunday, the first of June, I headed out for a tour up Santis, the iconic mountain massif floating in the green landscape of Appenzeller, the heart of Swiss-German speaking peoples in Switzerland.

Santis is one of those mountains that people grow up with, starting with hikes as children and continue into old age.  This was something like my 5th trip up the mountain, and the first early summer ascent.  It was also an introductory trip for Matt Anderson, the Seattle mountain guide-turned Zurich-based commercial photographer.

I’ve photographed Santis in Summer and Winter, blanketed in snow and covered in wildflowers.  However, I’ve long since grown bored with basic landscape shots, the type perfected on postcards sold all over Zurich.  So to make the trip more interesting I packed along some off-camera lighting gear.

Route Up Santis
The essential problem with mountaineering and photography is the weight trade-off.  In the Swiss Alps every once counts, and as your desire to include cameras, flashes, and light modifiers goes up, your physical mobility in the mountains decreases.

A normal hike in the Swiss hills generally means a minimum elevation gain of 1000m, and by the time you finish the tour, the elevation gain over summits and passes adds up pretty fast.  So, in principle it’s ill advised to take more than a DSLR and a lens or two.  My photo and lighting kit included a Fuji GA645wi, a Ricoh GR Digital, Sunpak 383 flash and Gadget Infinity radio trigger.

The Ricoh GRD has proven itself many times as more than capable with it comes to off-camera, or Strobist flash techniques.  Choosing the Ricoh dramatically minimized the weight penalty as compared with packing my Minolta 7D DSLR with a macro lens.  The Fuji was used for basic landscape shots. 

Santis-7
Off-camera lighting on a mountain side isn’t so easy.  After you’ve ascended 1000m the body is shaking a bit, and when you’re on a rock ridge, it’s not like there’s any place to set up light stands.  I put a Gadget Infinity radio trigger on the Ricoh GR and held the Sunpak 383 at arms length from above the wildflowers growing on the mountain ridge.  In a few minutes and a little exposure management I could balance the landscape exposure with the flash lighting the flowers.  Wham!  Bahm!  And there we have a mountain photo I haven’t seen in the postcard stand.
 
Santis-5

In early June there are few people making the ascent up Santis, mainly due to the snow, which covers most of the Alpine route.  Many people will ascend with nothing in the way of mountaineering equipment, but I recommend taking crampons and an axe, because slipping on an exposed snow-covered 50 degree slope on a Sunny June Sunday is probably as stupid and just as deadly as putting a bullet in your brain.

Santis-13
Santis is a tamed mountain.  There’s a weather station at the summit and Steinbock have long since lost any fright-or-flight instinct.  The animals roam the Santis as they like and have no fear of humans, which means it’s pretty easy to make some of those iconic mountain wildlife shots.
Santis-14
Well, the Steinbock have one predator – avalanches.  And if you climb up Santis in early Summer don’t be surprised to find a decayed carcass or skull in the snow.

Lazy Sunday – Fun with Flower Photos

After too many days and weeks of rain and snow and late spring sleet the Sun shown bright and strong over Zurich on the second Sunday of April in the year 2008.  I took the opportunity to sun bathe and then set up flashes, picked up my Minolta 7D and Ricoh GRD and set about photographing the excellent garden on the terrace.

Flowers I

One of the coolest things you can do with off-camera lighting is balancing the power of Sunlight with the watt-seconds of your strobe.  Now, with powerful studio flashes from Alien Bees, Elinchrom, Profoto, and many others, this is easy.  But the technique is often overlooked by amateur photographers since normal camera flashes are too weak to balance, or to over-power the exposure from the Sun.

Flowers Setup

I set up two flashes, a Contax TLA280 and Metz MZ40-3i.  Gadget Infinity radio triggers were used to fire them.  I had to use direct flash, with both set to nearly full output, since the high afternoon sun made weaker flash settings and any umbrella diffusers useless.

This meant I could light the main parts of the garden and create a nice blue sky in the background.  The flowers take on a sort of unrealistic shine, a certain texture your eyes can’t perceive in reality.  Ah, but the magic of simple off-camera lighting makes the magic appear with little effort.

A number of photos were taken during this session with the Minolta 7D and 20mm lens, but the best were produced using the Ricoh GR Digital with a 28mm lens.  The near infinite depth of field of the Ricoh GRD coupled with the with wide angle of view of the 21mm and 28mm lenses produced nothing short of perfection for capturing the cool colors of the flowers to contrast against the deep blue sky.  The Ricoh GRD rendered excellent saturation and sharpness of the flower petals and sharp green stems.

Flowers V Flowers IV

The setup for this shot took all of 10 minutes and there was no real concept I was trying to communicate.  The motivation was keenly contained within a desire to play around with my cameras and flashes and produce an image I’d never seen before.

Flowers III

There’s little doubt that flash photography and flowers has been around for decades and countless photographers will produce more countless generic flower photos with deep blue skies and saturated petals.  However, these will stick in my memory for a while, mainly because I was just playing around, and that’s when all the really cool things are done, when we don’t mean to do anything beyond killing the time we find on our hands.

Translating a Vision into a Photo Concept

I’m somehow drawn to photography – not to necessarily document an interesting or unique view of the world, but to get the picture that I didn’t know existed.  That concept, that image in my head which sits there till I try and make it for real.  This is generally means combining bokeh, focus, and wide angle lenses with a subject to get that certain “look” which the eyes don’t intuitively capture.  And few things are harder for the eye-brain connection to interpret than motion.  That’s why the use of off-camera strobe flash was developed by Harold Edgerton in the first place: to capture motion in ways never before possible.  Adding motion to a static subject can add a certain “something” it’s unexpected and generally produces an image that sticks in my head.  So, I took the concept in my head and set about translating it into a viewable form.

Red Tie and Velvet

Creating a Dramatic Motion Image

When you live in a place that doesn’t include a vast studio space, improvising and designing a shoot becomes important.  It’s the best environment to learn in because you’re challenged to make things look “cool.”  Cool is easy when you’re shooting a Swatch Watch commercial with a full staff and art director, but I don’t do these things – and need to organize things like models and locations and wardrobes on my own.

For the concept, I wanted the images to have movement, some sort of dramatic character, and to look “cool.”  “Cool” is at best a meaningless relative term and I don’t profess to having my finger on the pop-culture pulse of the trend setting world…but I went for the concept in my head anyways.

Floating in the Air

Having no budget or creative vision, I decided to go with my only available model, myself – and capture myself in a dramatic fashion: Flight (jumping through the air).  The apartment has wood floors, so first I set about setting up crash pads (guest beds) to land on and then added wardrobe elements and props which would add motion effects to to the final images.

Wardrobe: Shirt (BC Ethic), Tie (H&M), Jeans (Levis), Olive Jacket (We), Messenger Bag (MountainSmith)

Equipment: Crash Pads, 1 Flash w/umbrella, Radio Trigger (Gadget Infinity), Minolta 7D, 20mm lens, Remote Trigger

Crashing in Action

The crash pads were setup in front of a white wall and the camera went on a tripod.  I started out using the 2 sec. shutter delay function on my camera, but coordinating my jump with the delay wasn’t’ working so well.  Instead I opted for using a wired cable release.  My hand was often out of the frame, instinctively trying to break my fall – but the trigger release could eventually be Photoshopped out of the picture.

Jumping with a Trigger

The wardrobe seemed to work, the jacket and tie floated in the air when needed and a stack of paper added another element, a main focus for the eyes to lock onto and juxtapose against the main subject.  The Mountain Smith courier bag was, well, one of those Urban elements, suggesting the subject is “going somewhere” and has “things to do” – people to see.  I love my MountainSmith bags like I love my ice tools, and try to integrate them into shots whenever possible.

MountainSmith in the Air

Post processing of the images was done in Lightroom and Photoshop, sometimes using some processing elements I picked up in the Joey Lawrence Tutorial DVD.

In the end, I fell short of achieving the vision in my head, mainly because I didn’t have a trampoline and the cielings were too low for one anyways. This meant jumping on my own, and since I don’t jump very high I had a very short time to pose while in freefall.  The jump and freefall where rarely timmed correctly to the camera shutter and my head statred hurting from the impacts after a while.  Still, achieving 1/4 of your vision is far more productive than 2 hours of watching TV.

Drama in the Air

Jumping looks easy, and it is twice in a row, but if you’ve spent the previous day ice climbing and every other photo sucks because the timing is off and you’re out of the frame, well…the jumps add up and the photos session quickly turns turns into a workout fast.  I think of Michael Grecco’s book The Dramatic Portrait – he’s shooting Jet Li doing a flying kick at one point, and the translator says, Jet Li doesn’t need a trampoline.

Velvet and Glasses

Engineering for the People – Radio Triggers

One of the great possibilities the current digital age is the revolution in photography and off-camera flash, an often over-looked aspect is the development of radio triggers to activate off-camera flashes. There are currently two known projects from non-corporate entities developing radio triggers for off-camera flashes, RadioPopper, and the open source Strobit Trigger project.

The RadioPopper P1 and P8 are devices that goes on standard Canon and Nikon flashes and turns their IR light-based triggered TTL functions into radio-based ones.  By "goes on" we mean as in "stick on" no permanent modifications to the flashes are needed.  In some Geek circles this is the equivalent of combining Voodoo and Witchcraft into one compact religion to dominate the position and intensity of the Sun.

If the RadioPopper works, it means that the high technology tied into crazy expensive flashes like the Nikon SB-800 and Canon 540 can be combined with the awesome convenience and reliability of the most popular flash trigger available, the Pocket Wizard.  The RadioPopper is supposed to be an add-on for Canon and Nikon flashes, but it’s impossible to discuss any radio triggering device without bringing up the industry standard Pocket Wizard.

As a photographer who generally uses only manually enabled flashes like the Fuji GA, Contax TLA-280 and Metz 40, I’m more excited about the third trigger device from Radio Popper, a basic radio trigger – higher quality, greater range, and more reliable than those fantastic Chinese models from Gadget Infinity, but at an only slightly higher price.  Of course, part of the reason I use manual flashes is that I use a Minolta camera, which has only recently been saved by Sony.  Rumor on the RadioPopper blog is that Pentax, Olympus and Sony flashes will be included in the P1 and P8 compatibility list.

Getting down to brass tacs, the Radiopopper is a slick example of engineering being taken into the hands of the people – filling the void that big business has failed to capitalize on.  A fantastic idea coupled with innovative drive and the motivation to serve a niche market with a product that’s in demand and staying in tune with your potential future customers from design to product realization.  Early on the RadioPopper developers were seeking feedback from Strobist readers on Flickr.  It’s a pretty kick-ass example of how to go from concept to product without the benefit of a research and development department.  This is basically how Apple started, and in these days of Wars and hard economic times, it’s fantastic to see this dream of Radio TTL coming to the market from a start-up company.

However, even more over looked than the Radio Popper is the Strobit Open Source Trigger project.  The open source trigger was bound to happen eventually – the natural curiosity of photographers coupled with the Do-it-Yourself mentality fueled by David Hobby’s Strobist movement was bound to eventually give birth to a DIY radio trigger project.

The advantage of the open source Strobit project isn’t just the idea of manufacturing a low cost alternative for the off-camera lighting enthusiast, the Strobit platform would be open for add-on mods to the firmware, and by using an expansion bus incorporated into the circuit the Strobit now harbors some fantastic development potential, like firing strobes in different sequences and other custom functions like sound triggering.

The Strobit project is a banner example of the power of open-source.  The camera product world is littered with proprietary cables, lens mounts, and flash accessories where the large camera makers like to control the profits for add-ons to the DSLR market.  The Strobit project is ultimate Engineering for the People, because it means that normal non-electrical engineering folks will be able to build and modify their off-camera strobe triggers to fit their needs, not their needs as projected by the profitability of electronics manufacturers.

Let’s end this madness by noting that 2008 is going to be a banner year for digital photography Geeks of every skill level.  PMA is coming up in a few weeks, and the safe money is on Canon to drop a new body like an upgraded 5D – look for the K20D from Pentax – and the hope of an A900 announcement from Sony.

Essential Links:

RadioPopper

Strobit Project

Digital Style – The Joey L – Jill G – Dave Hill Look

Editor’s Note:

The following is a collection of thoughts on Digital Style, an elusive element of Digital Imaging, an extension of Photography.? The author has already admitted during our last project meeting that he “has” no style, nor any particular story to tell – which made him the logical choice for this article.? This is a Style piece, and logic therefore need not apply.

The Writer's Hand

Photoshop is a great big beautiful doorway to the realization of any creative genius that the Devil can conjure up.? For a generation of digital-born image makers it’s the go-to in creating a digital style – that illusive look that sets one image apart from another and defines the distinctive qualities of an Artist.

Millions of poor fools are locked in the cult-mindset that their crap photos can be saved by the Photoshop high Priest-magic of our time – the Photoshop Action.? Load a photo, run the action, Photoshop does all the changes to your image – and there is your masterpiece.? The object of their obsession is getting “the so-and-so look” the high dynamic range of Dragan, the cartoon-like softness of Dave Hill, the gritty power of Joey Lawrence, or even the emotionally engaging elements of Jill Greenberg.

Photoshop, like any unchecked religious fascination quickly becomes a short-cut to thinking if the “program” is placed before the “story.”? Some would say it’s all down to plot and the story line.? Most everything worth reading, watching or looking at has it.? You check out a photograph and there’s a message, something there, a story that pops into your mind and pulls you in.? If there’s no story in your photos, no amount of demon-inspired-bastard Photoshopping will save your blunder.

Relax Hand Hard Shadow

You can spend hours searching for a top-notch Dave Hill action script, or you can spend about 30 minutes on Strobist, StudioLighting.net, FlashFlavor, and any number of free-learning websites where a sheep can shave the wool from their vision and learn to use light to paint a story on a digital imaging sensor.? Photoshop can enhance and manipulate, but it’s not a creativity creation machine – and it doesn’t need to be.? Creativity is just the Artistic neighbor of Quantum Physics, terms used to things which are not fully understood by the people who use them.

The simple truth is that there’s no secret to Jill’s emotionally charged images or Joey’s gritty grung work.? Lighting and subject, with Dave and Jill and Joey, they are awesome.? Awesome subjects and lighting.? Sure you can imitate Jill’s style, just call up Gwen Stefani or your local bear handler and set up a shoot.? Get the lighting right and you can copy her look. No Photoshop action needed.

“No, no, I got it, Jill and Dave use RING LIGHTS.”

It’s true, many photographers such as Jill G and Dave Hill make sensible use of right light flash heads, but dropping $400 on an Alien Bees head won’t make your images “good” if you have no story to tell.

The limited edition White Stripes Meg Diana with ring light accessory is a different story.? If you drop $180 on this cool camera you’ll space-jump to Hollywood lighting pimp in the span of 5 seconds.

4…3…2…1…take off

Climber I

Seriously, if you’re looking for digital style – quit Photoshop.? There’s no point in wasting time with the program if you haven’t a clue what look you want or what the story should be.? Take a walk, pick up a Japanese ink pen, build a house of cards, and come back when you have something to say.

The story doesn’t have to be anything special, profound or engaging, but if you simply manipulate your photos in Photoshop trying for that special look and post photos to Flickr messages boards looking for accolades from the web community, your sheep mind will never rise above the level of a second-rate snap shooter.? But is doesn’t have to be, it’s cool just using new tools to be Creative.? However, with new tools comes confusion, consider leaving the digital sanctuary, turn your back on the Photoshop cult and tell your story as it exists in your mind.

Of course, if you have no desire to – keep doing what you were doing.

Looking to the East

Trust me, I’m a scientist.

Excellent Photographers:

Jill Greenberg
Joey Lawrence
Dave Hill
Michael Grecco
Andrzej Dragan

Further reading:

A drawn-out Flickr discussion – the Dave Hill Look
A useful Flickr discussion – the Joey Lawrence Look

Flickr Photos without a Style or a Look

Ricoh GRD – Tokyo Strobist and Shoestring Lighting

There are many thing to do in Tokyo, but on a Monday night after riding the metro one needs to relax. One of my favorite relaxing activities is the impromptu self-portrait session with a digital camera. This session focused on using off-camera flash with the Ricoh GRD. But here’s the problem, while checking in for my flight to Tokyo I was made aware of the fact that I was 15 kilos over weight, I’d either have to dump half my baggage or pay great fool-damned weight penalty.?While tossing things out of my luggage at Zurich I tried to cut it down to the essentials. The crampons and ice axe had to go, but perhaps a bit more regretful was leaving behind my light stand. Yes, I’ve made a habit of taking various cameras and at least one flash everywhere I fly to. As a compromise I kept the umbrella and flash bracket, thinking I’d find a solution in Tokyo.

Shooting in a cramped dorm room in Tokyo can be a bit limiting. With a desk, bed, and bookshelf there’s pretty much no room to do anything. I wanted a clear background and that meant setting up in the hallway. The cramped hallway presented an interesting shooting situation.? At only four feet wide, there was really no room for a normal camera to focus and capture the subject (me). Ah, but I had in my possession the fabled and non-standard wide angle Ricoh GRD digital camera. I setup a tripod and decided to go with the GRD and the 21mm add-on lens. This gave me a wide angle setup perfect for the cramped hallway.

For the lighting, I had a set of Gadget Infinity radio triggers to trip my old Contax TLA280 flash. The Contax flash was fired on manual mode into a 40 inch umbrella, in the narrow hallway this provided a rather large body of light, perfect for the random portrait session. However, without a stand, it’s pretty hard to set up an umbrella anywhere. To solve this problem I borrowed from my climbing mind and decided the best course of action would be to suspend the umbrella and flash (with bracket) using two shoelaces from my running shoes.

In my experience, the Ricoh GRD has been awesome for mountaineering and city shooting, but I’d never used it with off-camera strobes before. One difficulty with self-portraits is triggering the camera. The GRD has a nice interval timer, I set it for a 5 second delay and started shooting after a few test shots to get a nice exposure setting. Doing off-camera flash with the GRD was totally painless. Using the interval setting the GRD refocuses for each shot and will keep shooting till the battery runs out or the SD card is full. Five seconds is perfect for changing poses and waiting for the camera to focus.

Compact digital cameras are generally ignored with it comes to flash work, and usually have horrible small flashes that create unnaturally ugly images. The Gadget Infinity radio trigger is very small, and fits extremely well on the GRD hotshoe. It means you have the freedom to take a small flash wherever you’re going and bounce it or diffuse it for awesome lighting on the fly and create excellent flash photos, even with a point and shoot digital like the GRD, Canon G9, or any digital with a hotshoe.

The extreme wide angle of the GRD was very cool to work with. The GRD has an awesome lens, and worked extremely well in the tight confines of mine small dorm room. I took to shooting myself in various combinations of the clothes I brought to Tokyo. It’s not rocket science, the images aren’t fantastic art or crazy creative, but I like them and plan to expand on the wide angle portrait technique.

Traditional portrait guidelines call for a camera with a focal length around 85mm (in 35mm format). Wide angle lenses are generally not used since distortions in the face can be considered unflattering. I found the 21mm GRD lens just awesome for portraits. The advantage is, with a few movements forward or backward and left or right, you can control which parts of your body are slightly distorted, made larger or small due to the distortions inherent in the lens. This means you can easily modify the subject of your portraits by making parts of the body larger or smaller, distorted or normal. Positioning various parts of your subject in the distorted range of the lens can dramatically increase how the subject is communicated to the viewer of the images.

I had an awesome time shooting with the Ricoh GRD and off-camera flash for the exposure. The wide angle 21mm lens gives the brave photographer a number of creative opportunities to portray your subject in ways not possible with traditional mid-telephoto lenses. The compact size of the GRD means you can set up anywhere, and break the myth that flash and small compact cameras doesn’t work.

If you found this information helpful and would like to experiment for yourself, check out Strobist for lighting info with off-camera flashes.

Toy Vault

In his keynote talk at the 2006 EMPA PhD Symposium, 1991 Nobel Chemistry winner Richard Ernst said that if you want your children to grow up with a creative mind, then they should grow up in an old house full of rooms to explore filled with things to discover. It’s cool that my parents still live in the house that I grew up in. Cool because when I come to visit, as I did over Thanksgiving 2006. I can walk the paths I used to follow and explore perspective, the contrast between where I was and where I am. Part of the reason that I am as I am is due to the toys I grew up with. Just as most of my clothes came from second hand stores, probably 90% of my toys were procured from the half-off bins and church rummage sales. This meant that I had at least three times as many toys as anyone else I knew. And while I had a plethora of the standard Legos, I also had a lot of G.I. Joes, Star Wars, as well as random things most Michigan kids had never heard of, like Playmobil.

Toys large

My walk down contrast lane lead to me photographing various toys, still sitting on shelves in my room and haunting the shadows of the basement.

Star Wars et. alMask close up

 First, I should say that while much spunk is made about violence in toys and on TV, it’s a sad pathetic short-cut in thinking to say that these things directly lead to violent children. Because by all accounts, if you really look at what I grew up with, I should, by that logic, be some sort of CIA mercenary. While the thought did cross my mind once or twice, I must have just gotten it all out of my system playing with "toys" like a belt of dummy .50 caliber machine gun ammunition.

50 Cal toy

Star Wars toys just look cool, you can replay every scene from the movies and make up storylines that include G.I. Joe. Or you can mix the Star Wars miniatures with the Vietnam era plastic warriors that are driving a WWII era German truck.

Micro imaginations

And who didn’t want plastic army guys to fight miniature wooly mammoths while getting accosted by Muscle Men?

Plastic universe

My room is an interesting place, because it’s present form was set up after college. The alcohol influence is apprent, and fits quite well with the childhood day dreams. She Ra was always hot, and standing in front of an empty Jim Beam bottle she just drives Hawk Eye (from Mash) crazy. Probably the reason he was laying back in the Beam shot glass.

She Ra and Sesame Street

I don’t know the connection between Superman and Papa Smurf, but Ernie seemed to be inciting a confrontation between the Japanese super hero dudes and their tiny monster.

Superman and Papa Smurf

For some reason the Flash was sitting in a shot glass and my teddy bear was chilling beside a tank that used to be commanded by my 1967 vintage 12 inch G.I. Joe.

The FlashTeddy and Tank

In the end the Rancor hooked up with Barbie, she was turned on by the soft side of the beast inside.

Rancor and Barbie

Two of my most influential virutal role models were also represented, the cool headed badass Yoda sits atop a copy of Hell’s Angels, written by the eternal Gonzo demon, Huter S. Thompson.

Yoda a-la Thompson

Toys Star Wars Barbie Rancor