Margarita contacted me via Stylished.com (she’s also on ModelMayhem: #1243386) and we setup a quick photo shoot in the urban area of Winterthur, just outside of Zurich, Switzerland. What follows is a break-down of the shooting process.
I conduct my photo shoots similar to the way one might assemble a portfolio of research projects. See, some research topics like Smart Materials can be rather revolutionary with a large potential pay-off, but risky. If you design a mechano-bioreactor using Electro-Active Polymers, you can (theoretically) grow and at the same time mechanically stimulate layers of skin or bone cells to engineer artificial tissue. But if you put all your energies and financing into such a risky topic, you run the risk of spending five years developing something which might not – in the end, be completely successful. So instead, you might also include less ambitions projects like active-mechanically conformable sensors for remote surgical robots and control gloves.
What’s the connection from biomedical research to photography? In short, when planning a photo shoot you balance out the shot concepts. Start with ones you know will be cool and work out as intended, and then experiment and spend some time with new poses or lighting scenarios.
The Shoot Setup
I met Margarita in the industrial area of Winterthur to do some Urban Location shooting. I’ve shot here before when I was playing around with Urban Dry Tooling concepts. I picked the location and worked up a few location ideas in my head, but I knew this shoot would be more spontaneous than, for example my previous studio shoot with Alexandra. Margarita came in a car with herself, a small wardrobe, and her cousin on a cool motorcycle. Since the shoot would be more flexible and off-the-cuff, I planned for a small location lighting setup. The weather was beautiful with strong afternoon sunshine, and I just needed lighting to be mobile and produce the desired effects.

Camera:
Sony A900
Minolta 7D
Sigma 70-200 HSM
Lighting:
Sunpak 120J
Sunpak 383
TR-II battery pack
Kacey Beauty Reflector
Orbis Ring Flash adapter
Gadget Infinity 16 channel radio triggers
Margarita brought three or four different clothing combinations. So, essentially she defined the initial visual concept via the wardrobe and I placed her in the right urban location to full define the shot. We ended up with four strong looks including: Jeans and T-Shirt, Elegant Dress, Form Fitted and a Fox Head, Urban Chair, and Urban Cowgirl (woman).

Jeans and T-Shirt
We started with a jeans and T-shirt look in an old factory-turned-parking-garage. The simple wardrobe would work well with the processing I had in mind and let Margarita be the focus, not her clothes. This would give me an idea of how she posed and carried herself, and make subsequent shots come out better as I would know more how to direct her, already having a feeling for how well she could direct herself. For lighting I setup a 120J in the Kacey reflector on a stand, this produced a nice directed, slightly hard light source, placed 3-5 meters away from Margarita. First we shot against the cinderblock walls, some of which had cool scribbles. Then we did a few shots backlit by the sun from the large windows. I shot with the Sony A900 and Minolta 7D. The 7D with the lower pixel count (6 megapixels) produces files with a different shadow texture, and can work better than the 24 megapixel A900 for certain looks. These shots leant themselves well to grunge texturing in the post-processing stage.

Long Elegant Dress
After the first set Margarita chose a long, elegant dress. This was perfect to contrast against the large steel columns which support the roof of the old factory. We did a few distant headshot captures, then I posed Margarita against one of the steel columns. The 120J-Kacey combination was used in both instances, first to add just a tad of fill on the head shots, and then to illuminate the scene from the side. This allowed me to capture the texture of the steel and also give excellent light on Margarita’s face and upper torso. As I was using a lot of natural light, so I could open up my aperture and diffuse the background behind the steel column. This added a nice dimension to the final images.
 Form-fitted and a Fox Head
For this shot, we were really experimenting. Margarita came out dressed in a form-fitted top and leggings. Additionally, there was a fox handwarmer. This had a certain strange appeal, so naturally I approved and we used it. For lighting, I setup the 120J-Kacey dish, as well as a Sunpak 383 in the Orbis ring flash. I wanted a hard sort of steel look. Generally convention dictates that the photographer should know what they want and direct the model in a specific way to produce great results. But to be honest, the foxhead was unexpected and we set about experimenting with different looks. Fox head on her head, to the side, is it the main focus of the image, is it a concept, does it “mean” something? I don’t know if anyone can answer these questions, and probably they require no clarification.
 Sitting on the Chained Chair
Winterthur is like a giant kick-ass photo studio. Next to the old factory-turned-parking-garage there are some very posh apartments, which have chained chairs sitting on the rocky courtyard. This location gives a nice feeling with the desolate gravel ground and random chairs, it makes me think of a Pink Floyd video. We did two more sets in the setting sun and shade of the buildings, which stretched across the courtyard. In the first set Margarita sat in a chair and I bumped the 120J up to full power and placed it just out of frame in the Kacey dish. Naturally I wanted to balance out the exposure of the dying sunlight in the background. Again, I can’t say enough about the awesomeness of the Kacey dish, it’s a tad large to take around but well worth the inconvenience. It’s awesome on location, and when you use it with a Sunpak 120J and TR-II battery pack it’s a flexible, very powerful and fantastic lighting tool. But we were not finished, Margarita had a final look she wanted and ran off to change.
 Classic Urban Cowgirl
Margarita came back dressed in white with fun cowgirl boots and the same fantastic smile from the past two hours, undaunted by the time we’d spent posing. For this set I left the flashes standing at a distance and used natural sunlight, which was being reflected off of the floor-to-ceiling windows of the posh apartment buildings where I wish I had a place. In the gravel courtyard were a few shallow pools, and I used the full capabilities of my Sigma 70-200, shooting images of Margarita posing across the water. Here I got down low to the ground and pick up Margarita’s reflection in the pool.

Post-Processing
The combination of Margarita and the industrial background worked nicely with my imagination and visual tendencies to blur the divide the line between visual reality, painting, and graffiti. When processing photos from a location shoot I generally use textures from that specific location. I’ve spent a few days shooting around the old industrial walls and cracked concrete in Winterthur and have a nice library of low-rez 6 and high-rez 24 megapixel texture files to work with. The post-processing philosophy included blending concrete layers with Margarita and manipulating the shadows of the images.

Wrap Up
Margarita is a pretty awesome model to work with. She has a dynamic personality and has a good sense of form and posing. Margarita’s cousin came along for the shot. Some photographers shy away from the idea of a model bringing along a friend, but I think it’s great. Margarita and her cousin discussed poses and she could watch from the back and throw out suggestions in Lithuanian while I was shooting, it was awesome.
My Sony A900 User Review
My Kacey Beauty Reflector Review
Kacey Beauty Reflector – Kacey Enterprises
Kacey Dish on Location – Swiss Strobist
 I picked up the
  My first experience with the Kacey dish was photographing my bookcase, complete with Bratz dolls, DVDs and an assortment of toys from California because, well – I’m a geek. What was I expecting and why did I want a beauty dish in the first place? Well, I like umbrellas for throwing a very large amount of light with spill going in all directions, I started using reflective and shoot-through umbrellas, and they have their place. When you’re starting out with lighting design, it’s the best way to go. Umbrellas are cheap, you can get a combined reflector-shoot-through design and it’s very easy to do basic lighting with an umbrella. But, they then become very limiting when one wants to start doing more precise lighting. To explore beyond the umbrella I bought some small softboxes in order to increase the precision of my lighting designs, because they are much more versatile than my 44in umbrellas. The softboxes can be placed on a boom, to the side, behind, where ever I desire around whatever it is I’m photographing. Umbrellas (at least the large ones I have) are not as easy to place, and give too much light spillage for my tastes. Softboxes can be gridded to further decrease light spill and sculpt light as one desires. However, the softbox creates a more diffused light source. What I wanted to achieve with a beauty dish is the ability to place harder light in a desired position. I like the look of photos I’ve seen with beauty dishes, and really I wanted the ability to place a large, even light source on a boom arm around models (ummm, and I’m generally the model). The Kacey dish represents a milestone for me, because it’s the first light modifier I’ve purchased which wasn’t made in China and bought because it was the cheapest option.
 So, how has the Kacey Beauty Reflector fulfilled my desires so far? First, I’ll note that this review is user, not scientific based, and focuses on my experiences using the reflector in the controlled studio environment of my apartment. The Kacey reflector was designed for location use in mind, but light is light and I was most interested in getting an excellent light modifier. Naturally, any light modifier is useless without light from a quality strobe. The Kacey dish is designed with the Speedlite in mind, like those standard uber expensive flashes from Nikon and Canon, which a person such as myself with a Minolta 7D finds to be over-kill. This is all well and good to design a dish for small flashes, but beauty dishes were originally designed with studio strobes in mind, those with bare bulbs instead of a fresnel lens to focus the light beam, like nearly all small flashes have. Nearly all, but I happen to love the Sunpak 120J bare-bulb cult-classic flash, and it fits perfectly with the Kacey Beauty Dish. Here’s why, most small flashes are designed to focus light directly forward of the flash head. A bare-bulb design throws light forward as well to the side of the head. So when you use a normal Speedlite in a beauty dish, you generally would also use a diffuser on the flash, to throw light to the side of the center reflector of the dish. This spreads out the light and would logically contribute to the nice uniform quality of light that beauty dishes are known for. Since the bare-bulb 120J already is throwing light in all directions, and the bulb is extending into the dish, it forms the perfect lighting combination.
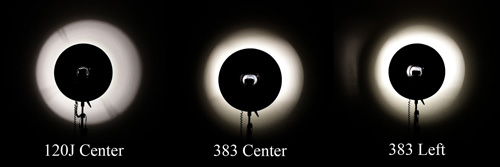
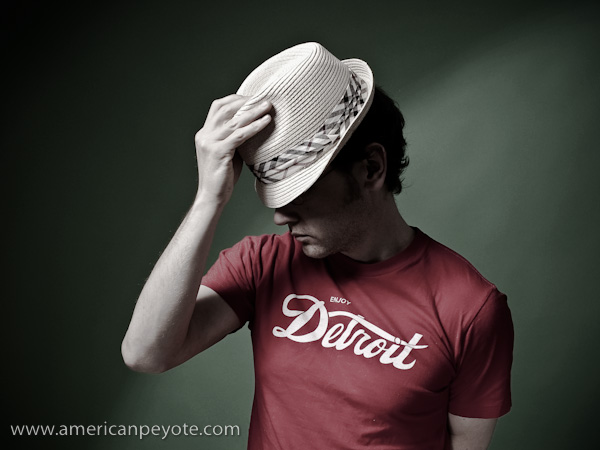
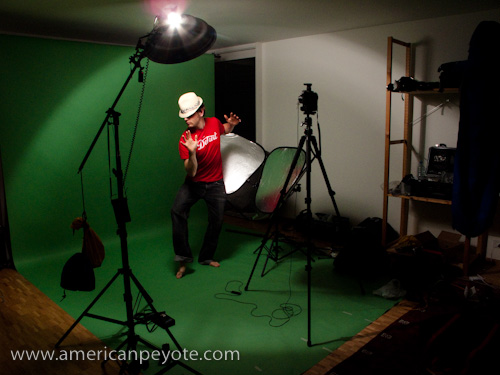 I ran a few test shots with myself playing the role of photographer, model, and art director, which feeds all the different parts of my creative brain. I wanted to get a feeling for the light I could expect from the Kacey Beauty Reflector both from a lighting and post-processing perspective. The setup was pretty basic, the dish went on a boom with the 120J above me and I setup my Lastolite Tri-Lite reflectors to get some fill. I did a few shots with my Minolta 7D and 28mm lens, Gadget Infinity radio triggers were used as well. I wore a shirt which says, “Enjoy Detroit,” because red is my color when shooting on a green background and Detroit is my city of eternal inspiration. I wore a hat I bought on the beach in San Diego and for some reason decided that the Katana would add a much needed element to the mix.