How was that image created? What was the workflow from the initial idea to the finished product? Concept to Photo is a growing collection of articles detailing how various images were produced, starting from the initial concept stage through to the final image. What worked, what didn’t, could the concept be translated to an image, and how successful was the experiment? This installment includes the development of the Urban Dry Tooling Concept: the perfect mix of climbing coolness and the industrial edge.
The Concept:
I’ve been moving towards combining climbing and urban concepts for a while. It’s a natural result when you have little time to climb and too much camera equipment combined with a night of self-portrait experimentation. Everyone knows what the generic city mountaineer looks like: jeans, fuzzy hat, fleece gloves, cool sport sunglasses, Teva or Chaco sandals in the summer and hiking boots in the winter, all topped off with an expensive Gortex jacket fit for Nepal but mainly used to fend off the wind in front of Starbucks. I’m not an exception, except that I keep the boots at home in favor of Dr. Martens. Anyways, I wanted to take the Urban Climber/Mountaineer look a bit further than the coffee shop.

The concept started with a sketch and was simple, take the best parts of Urban and combine with the edginess of mountaineering. I wanted something sort of dramatic, I wanted movement (or the sense of it), and I wanted it to look cool (at least to my eyes). For the Urban part this meant that dark industrial backdrop only available from a circa 1940’s sky scape or an old factory. It also meant fashion and not just taking a mountaineer and putting them onto the side of a building.
I wanted the coolest elements from mountaineering: ice tools, quickdraws, well-fit jacket, cool hat, and sunglasses – and then combine with a clean hip urban look. Unless you ice climb you probably know what an ice axe is but don’t have any idea what an “ice tool” is supposed to look like. Ice tools are short and meant for climbing frozen waterfalls or hanging from rock edges in winter. They’re curved, wicked and stylish.
The clean hip Urban look was realized by integrating jeans and super-fly Dr. Martens into the mix. The location was an old industrial area, in conjunction with a zuerichflickrdrinks Flickr group outing.
The Location:
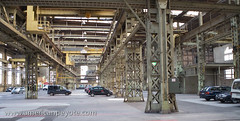
The old industrial Sulzer-Areal complex in Winterthur, just outside of Zurich, Switzerland. Originally a manufacturing complex, since transformed into an ultra-chic locale with apartments and one fantastic parking garage which is largely unused on the weekends.
The Wardrobe:
Mountain Hardware Jacket
Levis Jeans
Dr. Martins wing tips
Bolivian Hat
Trango Captain Hook Ice Tools
Random Accessories (quickdraws and ice screws)
The Execution
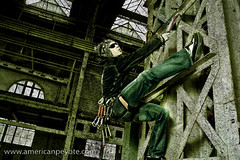
The original idea was to hang on to the columns of the parking garage with the ice tools and be pulled by a rope attached to the harness. Then the model could have his legs pulled out into space or jump out. This actually seemed a lot more dangerous in real life with actual steel and concrete to bash his head into – and hence was scraped as an option. After killing that notion static posing on the steel column in classic climbing fashion became the main focus. Assisting with the camera was done by ubiquity_zh.
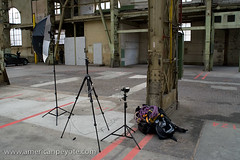
Sometimes the lighting dominates the subject and other times very simple lighting is paired with a subject. There are a number of things which could have been done better, like lighting the steel column or mixing soft overhead light with some hard lights for contrast, but in the end a simple (somewhat pathetic) one umbrella setup mixed with the natural light filtering through the ceiling was used. A Contax TLA280 was reflected into an umbrella high camera left and a 20 mm lens was used to get some slight distortion and bring out the Dr. Martens when the feet were properly positioned.

The Processing
Dodging and burning was used on the jeans to bring them out. Then various curves, high-pass and levels adjustment layers were used to stylize and a deep green color was added with a fill layer. Layer masking was used where appropriate to bring back facial features lost in the layers. A grung texture was produced from the concrete in the factory and used as the final step.
The Debrief
The images from the Urban Dry Tooling shoot were ok, more or less what was wanted, but in many ways don’t really pop in the way intended. On the one hand this is good, it means the photographer is not egotistical to the point where he’s fooled into thinking that crap photography is fabulous because he designed it. On the other hand it means one can see the road of improvement.
One main problem is the poor separation between the black Mountain Hardware jacket and the background. A light grey jacket or T-shirt would have absorbed less light, and would’ve rendered better defined shadows. Furthermore, a diffused light from the right would have illuminated the torso of the model better. Of course, adding some back-lighting would have helped as well to improve separation, and grid spot to light the ice tools probably would have prevented them being lost in the shadows of the steel framework. What comes next? Only the Shadow knows.
 Photography and text-based web publishing are fantastic tools for communicating ideas across the world. However, they have their limitations. I think in a 3D moving picture mindset, and therefore, it made sense to start communicating using moving pictures and spoken words. Concept to Photo – Urban Dry Tooling is a video tutorial about starting with a concept, and then translating that inspiration into a final photo.