Concept-Photo

The World Is Sick – We Are the Doctors – Iron Sky

The world is sick, but we are the doctors. The basic plot is that the Nazi government has been hiding on the dark side of the moon for the past 70 years and is now ready to take over the world. It’s been described as Sin City meets Inglorious Basterds plus, I don’t know, some measure of insanity and a healthy dose of sci-fi Philip K. Dick extravagance, and I can’t wait for Iron Sky to be released in the Zurich area.

Viewing the teaser material triggers in my mind the pioneering work of Metropolis, a silent masterpiece that blends well with techno remixes and stands the test of time. I get that awesome visual feeling of a black and white silent masterpiece, but beautifully interpreted for the current century. Personally I’m looking forward to this new emergence, resurgence of the European-Germanic cinema, and hope some of the abandoned factories around Berlin get converted to studios instead of posh apartments (Fuck Media Spree).

Iron Sky isn’t a German film, but it sort of invokes the analogy in my mind, that Germanic cinema has had an interesting history, pioneering film production and then withdrawing into a troubled post-world war purgatory where it wasn’t possible to make movies because of politics, resources, money, or probably everything in between. Getting quality movies made in Europe seems to be generally difficult (near impossible to get funding in Switzerland), and what I love is that the funding model of Iron Sky is showing how movies should be made. This film couldn’t be produced in a Hollywood studio, it just wouldn’t have been given a greenlight. It’s not from one studio or country, it’s a total collaboration with funding also coming from crowdsourcing and individual support.  The film is a collaboration-production including Blind Spot Pictures & Energia Productions from Finland, 27 Films from Germany and New Holland Pictures from Australia, with filming in Germany and Australia.

I get a sense that the humor here is a sort of part of an evolution, it reminds me of TRaumschiff Surprise, an excellent mockery of Star Wars meets Star Trek meets the German form of the Love Boat (Traumschiff)…and the teaser for Iron Sky reminds me of that type of humor, but mixed with visuals beyond Aliens and violence beyond Inglorious Basterds. No doubt, countless youtube remixes of Der Untergang and Iron Sky will hit the internet when Iron Sky is released on DVD (actually they’ve already started).

Iron Sky is a cult success before the release, the trailer teaser stands on it’s own as the most unique and absurd plot I’ve ever heard of, and come next Halloween I foresee an pleathura of politically compromising Nazi space-trooper costumes heading to Berlin dance parties and filling in the dark shadows of the Cathedral (my favorite Goth club). The visuals of Iron Sky are almost more amazing than the plot. The released images of Nazi space ships, giant space Zeppelins rival the work seen in Aliens and in my mind near surpasses the cinematic visuals of HR Giger. If you’d like to learn more, buy war bonds or invest in the film, check out the main website, http://www.ironsky.net/.

Piotr Soluch – Web Portraits Zurich

The latest addition to the Web Portraits Zurich project is Pitor Soluch, he just opened his web design business in Zurich, and I photographed in my new studio space in Hedingen. I hadn’t worked many projects lately, between moving out and moving in and running a few marathons I didn’t find a lot of time to organize any shoots or projects this summer. I met Piotr at a few web gatherings in Zurich like Web Monday, and we also ran into one another at the 2011 Swiss Startup camp in Basel. He’s an intricate designer with that required attention to detail that makes the difference between a professional site, and the ones that I throw together. For the shoot be came by with cookies and Polish beer. This was a fantastic combination and the shoot went smoothly for both of us.

I wanted to get back to fine painterly shadows and images with a dramatic feeling. This included lighting Piotr with some CreativeLight strip boxes from behind either shoulder, a Metz MZ40 in a beauty dish from the front and LastoLite TriLite reflectors from the front. I then pulled in some textures from Rome and the abandoned hospital of Beelitz, just outside of Berlin. There’s no substitute for fantastic texture images. I’ll walk around a city for hours shooting walls and the streets and then maybe not use them till a year later. They add something you never expected when the shoot started.

Dynamic Color Portrait Photoshop Tutorial

Here I present a workflow for creating a dynamic image using layers in Photoshop. Why? Well, because I like to share and because I got some requests on my Google+ album asking how it is done. To illustrate the process, I’ll use a set of images I created for Scaramanga Bags, a cool company in the UK that sells vintage leather bags and other things like journals and vintage suitcases and trunks (see the Scaramanga Concept Images here). On their website Scaramanga already has nice urban portraits with their bags, so I wanted to go in a different direction. I wanted to create portraits that convey a feeling of abstract motion. Something to invoke a feeling of movement and action. I love photography and painting. I began with photography looking for image perfection, and then moved to painting after developing a color palette in Photoshop. I like to light an image in layers, and in Photoshop I layer colors and backgrounds to add a sense of visual movement to an image. I look at a scene, put on a pair of rose-colored glasses, and I have a layered image (because at the base, this is all Photoshop does). When you can do this in your mind you then just need to translate that to something other people can see, and for that we have Photoshop. The aim of this article is to show you how to combine images together to create unique, balanced color combinations, which add a desired character to the original image.

The Basic Recipe

I generally apply this concept to portraits, where I want to add a certain character which complements the person photographed. First, begin by realizing that the person is a person, not simply a subject (A Person is not a Subject) for academic study. I start out with a base portrait image, generally shot in a studio environment with a two or three light setup using softboxes and maybe a beauty dish. Why? Because we need a decent (well exposed) portrait to start with. It should be something that speaks to you and has the look and pose you want. The layers in Photoshop are just there to modify the intention of the original image (otherwise just go ahead and create an image from scratch and render it in 3D).

I always start with a well-exposed base image that defines the main textures, tones, and colors of the person. In the Scaramanga Flight Bag images I used a Sony A900 and Elinchrom lights with a CreativeLight softbox. You don’t need an expensive camera and equipment, but you do need to know that a properly focused image with proper exposure will give you the largest amount of information to work with. If your initial image has high contrast or deep and dark shadows, then you just need to know that you can’t modify those areas of the image very much, and they will not blend so well when we layer a new image on top of it, since the very dark areas contain very little color to modify. So, let’s start from the base image.

The Base Image

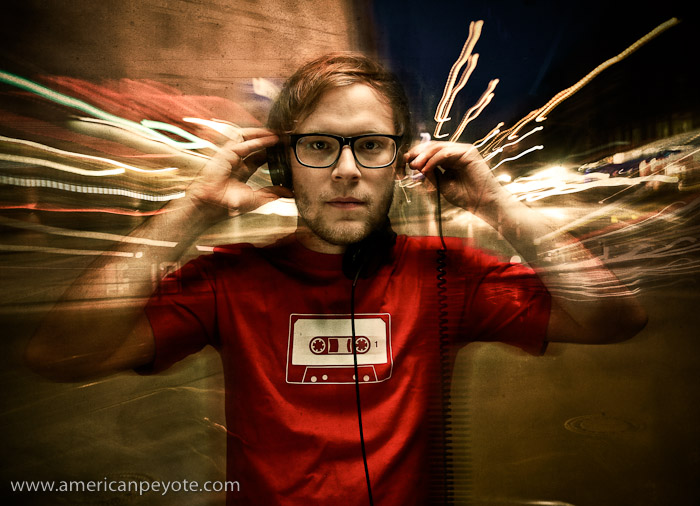
In reality we’re mixing static image layers one on top of the other. In my mind I’m painting on layers of color movement to complement a portrait. I began with images produced in my apartment studio, and posed in such a way as to communicate the idea of running or of standing still, with motion in the background. This is my base, a strong pose which will be modified (enhanced) by a new layered color environment. For more info on creating a dramatic pose portrait check out my post on this subject (Urban Ninja – Dramatic Pose Tutorial). In short, I take my inspiration for poses like this from comics and graphic novels such as Conan the Barbarian, 300 and Watchmen.

After importing the images into Lightroom I chose the best and then increased the Fill Light to reduce the contrast in the image, and then exported to Photoshop for layering work. When exporting from Lightroom I don’t want deep and dark shadows, but rather a lot of information to work with and which will respond well to layering. Once in Photoshop I will often start by adding a Black and White and High Pass layers to the base image (although I didn’t need to do that for this image set). I first copy the original layer, add a High Pass filter, and set the blending on that layer to Soft Light. This has the same effect as increasing Clarity in Adobe Lightroom, but in a more controlled way. I reduce the Fill value on this layer so that everything blends well together and the image doesn’t look gaudy or like it was just run through an actions industrial meat grinder. I will often also create a Black and White adjustment layer, and then set the blending to Multiply. You can then adjust the values for reds and greens and blues. This desaturates the color while intensifying the shadows of your base image. It can darken the image a lot, but the goal here is to modify the tones of different parts of the image (such as skin tones). Again, I will often reduce the Fill of this layer so as not to totally kill the base colors.

Choose Layers

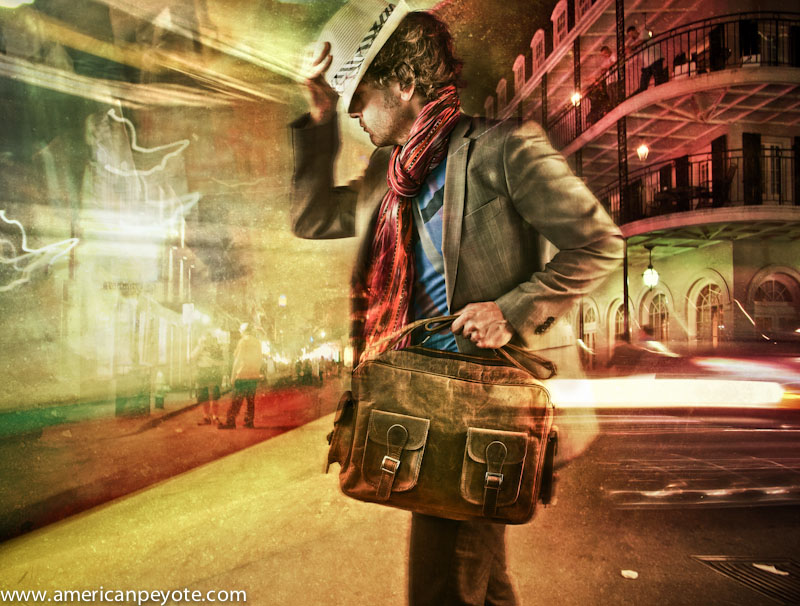
I always start from the base portrait and then choose layers on the fly. For the Scaramanga images I wanted a lot of bright colors with movement. So, I opened up Adobe Bridge and looked for long-exposure night scenes with lots of color and light streaks. To achieve this abstract motion goal, I picked a few images that I had shot in New Orleans, Zurich and Berlin. The key here was to have images with long light streaks and pockets of intense color, which would blend in with the form of the person in the Scaramanga portraits. By blending well I mean that the lines of the night scenes would coincide with the lines of the runner (think of drawing lines over his body and comparing it to the flow of the layer images – check out my Dynamic Pose Tutorial for clarification). There’s no formula here, you just need to pick images that work well together. Aside from light streaks, these images also have very interesting pockets of color, and also recognizable object elements such as a tram or street scene, which then defines the background environment of the final image. The night images from Zurich give the feeling of running through a city of lights, while the one of Bourbon St. gives the idea of a person standing still while the environment is exploding in color around him. Now that I have chosen the layer images, I just need to blend everything together.

Blending Layers

After picking the layer images in Adobe Bridge I opened them in Photoshop, and automatically set the blending mode to Overlay. This allowed me to preview how the different light and color elements of the layers would work together, and how the flow of the lines of the layers would mix with the base portrait. At this point, the image just looks like a couple of images stacked on top of one another, and that lazy sort of image production just doesn’t do it for me. To properly blend the images you need to play around with the blending modes, like Overlay, Softlight, etc. and also change the Fill and begin masking individual areas with a paint brush or gradients. To mask a layer by painting simply select the layer and then choose the layer mask icon. When you now paint with black, the layer will be masked (or hidden). You can change the Opacity of the brush to mask the layer gradually with each new brush stroke (the recommended method). When masking in this way I usually use a brush Opacity between 3-20 with a soft brush. This is where I act more like a painter than a photographer, masking and blending the layers uniquely together. I rarely use the entire layer image. Often I use a gradient to mask out half of it, and also paint away most of the layer over the person. I will also add full Color Fill layers (usually set to Overlay blending) to tweak the overall color. Eventually, the final image will then start to come out. To illustrate this process, you find here the secret goldmine of any Photoshop artist, the screenshots of my Layers window on my two favorite images from this set, the Runner and Bourbon St. You can clearly see how the different layers were masked, and what the original layer images looked like before blending.

That’s All

If this sounds complicated don’t be deterred. Essentially all I do here is to mask out the parts of the individual layers which don’t flow well together, and in the end I have an image with all the flow and color vibrancy I desire. The main idea is that the character of the layers complements the base portrait. I save the image and open it up in Lightroom. From Lightroom I play with the colors further, adjust shadow and highlight colors, Vibrance, Clarity, etc. until the final color tones are correct and then I export.

For more info on layers and portraits, check out my Hyper-Realistic Portrait Photoshop Tutorial. This covers the main topics I addressed in this post, but you get to see a screen cast of the whole process.

Photo Shoot Planning With Cacoo

Like many things on the net, I have no idea where I first heard about Cacoo (via a link from somewhere sent by a someone I suppose), but it’s one of the most uniquely useful websites I know of. A startup from Japan, Cacoo is like an online diagramming tool, like an online version of OmniGraffle, which is the best diagramming software for the Mac. With the free version of Cacoo you can create complex and beautiful diagrams, mindmaps, wireframes, page layouts, etc. and share them with a few clicks to people, and even do real-time collaboration. With the paid version, you can do exactly the same, just with more diagram pages (free version is limited to 25) and exporting options.

I started using Cacoo for photo shoot planning as a way to communicate with clients and collaborators. This seemed like an ideal use, as it allows the photographer/creative director to keep a history of project concepts to communicate directly to the client, and to be able to access and modify whenever desired. For photo shoot planning the workflow is like this: I have a concept meeting with a client where I get to know them – we toss ideas around, and basically just brainstorm. Then I take my notes from the meeting and create an idea map on Cacoo, detailing the type of portraits I want to create, and how the shoot will come together. You can view your diagrams directly on Cacoo, or export as a .png, .pdf., etc. The diagram can be shared securely with collaborators on Cacoo (with a Cacoo id) or via an open web link.

Why Plan?

For creative projects, often you want to communicate how an image will look like to show models/clients/collaborators what to expect during the shoot. With Cacoo clients can review your proposal, understand your thinking, and provide direct feedback on their desires. This allows photographers and clients who don’t have a lot of time to meet face to face to share ideas and give direction to a project any time of the day. It also builds confidence, because your clients see exactly what you want to do with them, and they’ll have confidence that you know what you’re doing. This helps to establish Trust – and there are few things more important during a shoot. If the MUA doesn’t trust that the photographer believes that the models know that they trust what they’re doing, then people become unsure of themselves and the end result can be lame. There’s nothing worse than going into a photo shoot without a clear idea of what to produce and just trying to throw something together in the moment under the guise of being creative. In the studio I create my decisive moments, I don’t wait for them to randomly happen. I find it’s 100x better when the clients, models, and makeup artists all know what will happen (or at least have a good idea) before the shoot starts. Photo shoots are collaborations, and the more input you have from the folks you’re working with the better the final images will be.

Planning With Cacoo

Cacoo is basically a large collection of wireframe objects and stencils that can be connected to one another while text and images can be easily added. With photo shoots clients often have an idea of what they want, and they can upload images that they’re inspired by via a weblink or direct upload to a Cacoo diagram. This makes it very easy to communicate with models or makeup artists so they know what will be expected of them for the photo shoot. Upload images of a shirt you want a model to wear, upload a hair or makeup style for the MUA/Designer to create, everyone can get everything ready before the shoot. I now use Cacoo anytime I need to communicate with models, clients, makeup artists, etc. It’s probably one of the most powerful free tools on the internet, and if you choose for a paid account, it’s probably the highest return on investment you’ll get anywhere on the web. Will Cacoo help your communication with clients? Hard to say, but it works brilliantly for me. Clients who are more web savvy will love it, and it’s a great way to get feedback from everyone involved in a potential photo/video project. Other folks, who aren’t so web savvy probably won’t be so into it. But, at the very least you can use Cacoo to show your clients exactly what you plan on doing before they step in front of your camera. Here are a few examples of how I used Cacoo on two different projects: Web Portraits Zurich and The Formers.

Case Study: Web Portraits

 With the Web Portraits Zurich project, I wanted to create cool portraits of people in the startup community around the Zurich area. I used Amazee.com to setup a group for the project and to communicate with members who were interested in participating. For each person we would have a brainstorming meeting, and then I would create a Cacoo diagram. This would often include sample images from my side so they could see what to expect from the shoot. Again, this gives people who likely have never been on a shoot before the ability to see what will be coming and to mentally prepare for the event. It also let them provide feedback to me on what they would like to have. On the main project page on Amazee (Web Portraits Zurich), I include Cacoo diagrams with portraits from each shoot, showing what we had in mind during brainstorming, and then you can check out the resulting images. Having these project diagrams also allows me to form a nice time-line, showing how the portrait project evolved. As a photographer it’s very helpful to look at what we had planned originally, and then compare it to what we ended up doing during the shoot, and what I ended up producing for the final images.

Case Study: The Formers

The Formers are a band from Zurich that I was contracted to do some portrait/video work for. They had some ideas for the overall feeling of the portraits they wanted, and we used Cacoo extensively in the pre-shoot planning process. First I made a Cacoo page for them and they uploaded imagery that they liked. Pictures from Johnny Cash and clowns, urban cityscapas, this showed me the way they wanted to represent themselves. This was a huge help for me as the photographer, because defined a direction, which was in line with the wishes of the band (we didn’t have time for meetings with the whole band before the first shoot). After our first portrait session Cacoo was used to get feedback on some composite image ideas I had, and also as a sounding board for new ideas. We liked the grittiness and sort of darkness of the images from the first session, and I dropped by their jam session to do another round of portraits. The results were tack sharp and exactly what I wanted. Cacoo allowed us to do a lot of this collaboration work on the fly, and reduced the time needed for organizational face to face meetings. I love meeting to brainstorm ideas, but it makes less sense when you’re just reviewing images or setting a date for the next shoot. Cacoo helps build trust with the people you’re working with, helps pre-visualize the results, it’s basically just awesome.

Amazing Value

Cacoo is really a fantastic value. By comparison, a standard license for Omni-Graffel costs $99 and isn’t on the web anytime you want to use it (although in a sense they address different user needs). The only drawback of Cacoo is that it’s not HTML5 based, and therefore doesn’t fly on the iPad (but I have high hopes it should work now or eventually on Android devices like an Asus Transformer). If a Cacoo app ever comes out for the iPad/iOS it’ll be a big hit. Aside from photo shoots, Cacoo is really great for anything where ideas need to be visually communicated from one person to another. For UX/UI design feedback it’s a great tool for creating wireframe designs of software or web applications. There are pre-made icons for Android and iPhone app design mockups, and you can now create your own stencil libraries for custom diagrams. For UX feedback, you can take a screen shot of a webpage and annotate it, showing what changes should be made in a conversation with your designer. Many new applications have been launched in the past 3 years, but Cacoo is by far one of the most valuable. I highly recommend it if you’re into online collaboration and idea sharing.

Voting Open! Collaborate On a Video Poetry Project

Voting is open on the video poetry creative invite at Talenthouse.com! To recap, I have a creative invite running on Talenthouse, where the winner will have the opportunity to work together with me on a video poetry series of short films. I wrote about the contest previously, and now this wonderful experiment in online collaboration and general creativity awesomeness is coming to an end. Well, the first part, then will come the video poetry series. For the contest, I provided some images of inspiration, including images of Bratz and War, and the participants then needed to create a music track to submit to the contest. The highest voted songs will get the first listens from me, and I’ll then work with the winner (whoever created the best mix in my mind) if they’re interested. For the video poetry part, I’ll create some poetry concepts and shoot the needed video, and the winner can have their music featured as a component of the final videos.  It’s all very non-linear and experimental, but when you challenge people, excellent things always happen. The voting is open here on Talenthouse:

Voting Open: Collaborate with American Peyote on a poetry short film series

Scaramanga Large Flight Bag Concept Images

I don’t know how I found out about Scaramanga, but they’re just, basically my favorite vintage bag company in the world. Based in London they ship vintage bags, journals, cases, and other things around the world. They sent me this large version of the vintage Flight bag and I put together an image concept. I wanted to do something dynamic, something that combines the motion of the world with the bag concept. I had all the background images already in my head, I just needed to find and arrange them all together. I shot stills in my studio and then did some compositing in Photoshop to blend everything to my liking. You could say, this is how I imagine I feel like when I’m strolling through the street with the flight bag, naturally, my reality is a bit less dramatic. Enjoy. If you’re looking for a cool vintage leather bag or chest, check out Scaramanga Bags.

Bratz War Images

On my last trip back to Detroit I marched with the Nain Rouge, and then had a little buying madness toy-spree at Toys R Us. I also picked up a Cleo de Nile doll at Meijer one night after playing trivia at a bar during some low-level Thundersnow. Anyways, I then raided the toy chest that is the basement at my parent’s place and put together some small war sets with the various objects/subjects/toys. I took what I had to work with, that included a super old Estes model rocket, some plastic army soldiers, a landscape, a .50 cal sniper rifle from a G.I.Joe, some tanks, and, I guess that was about it. This is sort of an ongoing project. Every time I head back to Michigan I find another collection of toys to use, I setup a small stage, do some shot arrangements, and then bring the images back to Switzerland for post-processing in Photoshop. In these images I’ve added a lot of overlays from Rome, Zurich, Tokyo, and Detroit. Images of concrete and walls were added as well to texture the images, and the odd-sun flare is thrown in as well when needed. I’ve since picked up a copy of Strata Foto 3D, and am investigating the possibility of creating 3D models of the Bratz, Cleo de Nile, and various toys, and doing the images or a short movie all in the computer, but I need to learn me some 3D skillz first.

Anyways…enjoy…Bratz War

The Formers Band Portraits

The Formers are a local Zurich band that I’ve been working with lately. It started with their show at Zak in Rapperswil, and I dropped by their jam session in Zurich to shoot some portraits. The Formers are the type of band I love working with. They’re motivated to play their music and you feel the passion they have just by walking into the same room. I also like their music, this might seem irrelevant for a portrait project, but it’s a powerful motivator for me as a photographer. When you can identify with the people you’re shooting you have a much better base for creating images which combine and communicate all the essential elements of those people.

The Concept

We wanted to go with something that combines the band members and also had a sort of gritty texture. I wanted to start out with individual portraits, because it gives you the ability to relate to each person as an individual, before figuring out a concept for everyone together. I decided to go with a ring flash and post-processing concept, which would give gritty portraits with a certain edginess, but allows each person to be focused on. So my concept was to put the portraits together in a classic square compilation. This is ideal since you can view and relate to each image, but see them together in one image. I like this because each member of the band has distinct features in their face and hair, and it would be a shame if we had highlighted the singer and left the drummer in a shadowed background, or simply lined everyone up in front of a brick wall (the worst cliche in band photos).

On the processing side I went with a high-definition look and desaturated everything a little bit. This makes the features of the face like cheek bones and beards stand out strong and gritty. I used my Sony A900 with a Sigma 24-70mm set on like f/3.5 for the aperture and my Sony F58 flash off-camera in an Orbis ringflash adapter. I then focused on the eyes and this makes the eyes sharp in focus with a nice defocused area around the rest of the face.

I’ve had a fabulous time making images of the Formers at their show and portraits at their jam session. If you’re in Zurich I can highly recommend checking out their next show and their music on  The Formers MySpace. Their next show is at Abart in Zurich on February 27th.

Blankpage Portraits

I was introduced to Blankpage through one of the team members, Lukas, who I met through Web Monday Zurich. Blankpage is an expanding startup in Zurich focused on B2B content distribution solutions. Blankpage was looking to be a part of the web portraits project, and this offered an opportunity to shoot a full startup team. I visited the Blankpage offices in Schlieren to discuss a shooting concept and get a feeling for the startup. Getting to know new people and hear about their startup ideas is one of greatest benefits of being part of the Web Portraits Zurich project. Blankpage is working on stuff I’m working on in the back of my mind, so it was great to see the iPad version of Das Magazine that they’re coding. Essentially, businesses like newspapers and magazines can come to Blankpage, and they offer solutions for getting that content onto mobile devices like iPhones and iPads, but this is better said on their website:

Design, build and customize electronic publishing technology to maximize business and usability impact for our customer solutions.

This was also my first location shoot for the web portraits project. All the previous shoots were done in my studio, and this offered the opportunity to see the company and get mobile with my lights. I brought a few lights to their offices and setup by a wall with enough space for a large softbox, reflectors, and a fill light.

For the concept, we wanted a certain uniformity between the shots (since it’s a team series), with a certain edginess, but not totally overdone with textures (like I normally do). I decided to go with some simple lighting, one large gridded softbox from one side to get some nice structure on the faces, another normal medium box from the other side, and some fill in the front reflectors.

One of the most interesting portraits from the shoot is Bero, the Linux Guru of Blankpage. He came to the set with a box and a sketch of a face tapped to the front. This sort of humor is simply awesome. We shot a few portraits with the box and then pulled it off, Bero has that perfect mix of hippy and high-tech code warrior and I could easily do a whole series with this concept.

http://blankpage.ch

A Person is not a Subject

It’s been a fun year of photography so far, and running the Web Portraits Zurich project has given me reason to reflect on the process of making cool portraits of interesting people. I’ve contrasted my findings with the ramblings of professional photographers and teachers of the internet (where I learned a lot abouot photography), and have come to the conclusion that most internet sources don’t really have a handle on the portrait process, or they simply like to focus more on gear and dehumanizing people into subjects with gear talk rather than having a conversation on who is in front of our lenses.

Now, understand, it’s not their fault. It’s not embedded in their DNA. It’s just part of the mystique of this easy-lazy-art-form called photography. Cameras and photo gear became popular because it’s easier to click a shutter on a device than painting a canvas or doing a detailed sketch of what ever it is you’re looking at. When you shoot with a big camera it makes you feel important, but there’s a reason I don’t take myself too seriously. There’s this romanic ideal of photographers being like painters and artists delving with their whole soul into the artistic expression of the portrait. Photographers are expressing the inner soul of humans for all to see in the printed or screen viewed image…however…

A person is not a subject

Simple, and to the point. A lot of folks get into photography because it’s cool – like I did. I drew things in math class because it was interesting, I started with photography and Photoshop because the gear makes it easy. There’s a romantic notion embedded in the collective history of photography of capturing emotions and elements of people, which would otherwise be lost forever as the second-hand ticked over and the present becomes the past and that look is lost forever (unless captured by the photographer). But a person is not a subject. Even models have names and personalities, but photographers sometimes like to ignore those humanizing notions and instead focus on the technical process of focusing light onto an image capture surface (like film or a digital sensor).  Afterall, we’re all engineers and poets, painters and scientists. But I like photography because it opens a door to the non-technical side of life. Models are not Barbie dolls. I know of what I speak, for I shoot pictures of Bratz dolls when I just want to photography plastic people. However, this gets boring quickly, and is a subject best suited to those moments when you’re looking for a way to till time but don’t want to sit in front of a television.

Photographing people is distinctly different than taking snapshots of Bratz dolls because with people you now have the opportunity to interact with the person. If you’re into photographing people, then just think of the process as an extended conversation with some visual elements thrown in. When you start saying things like, “I lit my subject with this and that camera and photographed them with an 85mm f1.2 lens…” Well, you’ve lost the point of the conversation. If you listen to professional photographers they’ll tell you to talk to your subject. Get to get to know them, make them feel comfortable. But here’s the thing, small talk like, “what do you do” “what’s your favorite color” “where are you from” is just filler talk. You’re probably doing it so the person doesn’t feel ignored but not because you really want to know who they are. This type of small talk simply says, “I’m just interested in my camera and making an image and you’re just a body…so smile.” This technique can be effective given the right situation. But is that the more interesting way to shoot? Is it more interesting to shoot a Bratz doll (who can’t speak) or to listen to a person and make a picture of them as well?

A Portrait is just Conversation

A photo session is just an extended conversation in my mind, and if you start out talking with people with an authentic voice, then the photo session will just be an extension of that initial, real, emotional connection. If you starting shooting like a pornographer and only start talking when you notice your subject is looking uncomfortable, then the whole positive momentum of the conversation has already been lost and you need to sort of start over. Tripping the shutter is the  shortest and least important part of a portrait photo session. But it’s the part that defines the final image. The question is, how does one get up to that point? I Think of the photo session in this way:

Conversation – Lighting/Set – Picture

The more time you take in getting to know a person before you light them with a million-gazillion photons, the more natural the resulting image will be. Or more unnatural, it depends on what you’re trying to achieve, and sometimes every photo session is full of suprises. Once you understand something about the person you’re planning to shoot you can design the lighting (some call this subject driven lighting), build a set or pick a proper location, and then being planning a post-processing philosophy, all before taking any pictures. I like to spend the least amount of time possibly on actually shooting and setting up lighting. The reason is simle, the shutter trip is the most insignificant part of the process if the process was done correctly. Now, maybe you’re going for the whole Stanley Kubrik, make-the-actors-feel-uncomfortable-to-illicit-emotion-from-them deal, but that’s a whole other level of person-photographer interaction. An authentic portrait session starts (and ends) with a conversation.

Most of the technical things about photography I’ve learned from the internet. It’s been a fun time and I’ve learned a lot about light control and lenses and cameras and strange terms like gobos and brolley. But my mind became exhaused and bored with this conent, and I’ve started wondering what else is there. However, when I watch things like creativeLive with Zach Arias or attend a Strobist workshop, I’ve started to notice how technology and lights are always at the forefront, and the whole emotional connection thing is thrown in afterwards, even though people generally admit it’s one of the mose important aspects of the whole process. Those conversations are there, but they’re not focused on in blog articles like David’s article On Assignment: Caleb Jones. Technical side of the shoot is all there, but what was the emotional connection between David and Caleb?

That’s a key element that a photographer like Joey L communicates extremely well in his DVD tutorial (Sessions with Joey L). In his tutorial Joey Lawrence pushes the ideas of trust and emotional connection as being primary, and lighting and camera technology as the secondary elements of a photo shoot (or photo career). This isn’t meant to be a negative critique of Zach Arias or of David Hobby (but it could be viewd as an encouragement or suggestion). The latter two (and internet icons like Chase Jarvis) are just responding to what sells. People love the technology of photography, the lenses, bodies, radio triggers, flashes, etc. People drop big bucks on technology and then wonder why their pictures look lifeless and ordinary when they know the person has a soul and interesting story to tell (like we all do). The thing I love about the Vincent Laforet CreativeLive workshop is that he started out talking about the philosophy behind movies, the story telling and emotional elements, and then got into the gear talk. It sets your head in the right mind-set, to tell a story and to make a connection to the viewers or consumers of the media product you’re producing. That’s not to say I miss the gear talk, it just gets boring after a while.

I love photo gear. I have more cameras than Onitsuka tigers and picked my last apartment based on how I could setup a photo studio. One reason I started the Web Portraits Zurich project was to do emotionally-driven portraits of people (I know that sounds a tad pretentious). I wanted to setup a process of including the emotion of the person in their portrait. I wanted to portray people including elements of how they perceive themselves. I shoot the web portraits based first around the person, and then as a secondary condition around lighting and Photoshop. For each portrait set we start out with a concept meeting, the people I’m shooting get to know me and I start to understand how they see themselves. This is the grounding for the whole photo session, and I see the whole process as one long conversation with some camera equipment and photoshop thrown in as an after-thought.

A person is not just a subject

A photo shoot is just an extended conversation


Amazee Gothic – First Cut

The latest participants of the Web Portraits Zurich project were Dania and Gregory, the folks behind Amazee.com and help organize events like Web Monday Zurich and the Swiss Startup Camp. Before the shoot I sat down with Greg and Dania for a brainstorming session (after presenting some ideas to them online), which included Amazee Gothic. The purpose of Web Portraits Zurich is to give people a platform to be photographed, to challenge their ideas of themselves and be a part of how their images are created and portrayed.

Amazee Gothic

There’s an iconic image from Americana called American Gothic. It’s an image of a man and woman standing beside one another. The basic interpretation is that they’re married and have labored hard to build the barn, which dominates the background of the painting. The man holds a pitchfork, and you get a sense that hard work and family come together to build a life for the two of them and for the future. I love thinking philosophically about images, and tracking the origins of ideas. With Dania and Greg, the analogy was perfect and obvious. The two are married and have labored hard in the startup land of Switzerland to build their barn, Amazee.com using the tech tools and business sense of modern times. This was the central theme I presented during our brain storming session, and then we exploded out in a couple different directions, and settled on a Tech-Flesh Jungle analogy to represent the internet environment of startup and internet companies in the new net universe – but this one will take some time to digest and to present coherently.

Raw Shoot

Before jumping into the Tech-Flesh concept, we did some basic portraits in my apartment studio. Dania and Greg dropped by one fine Tuesday night, and after a raclette dinner we set about shooting some portraits. Part of the Web Portraits project is to give people who don’t know much about photography and lighting the opportunity to learn. So we started out with Greg shooting after I’d set up the lights. Then I shot sets of Greg and Dania separately and together, getting a nice pool of images for the Amazee Gothic concept.

I wanted some nice, not-dark-and-moody lighting for the two of them. Greg has one of those fabulous near-bald heads that draws up from his body into a sort of classic form which almost demands a gridded softbox. I had one on hand and put an Elinchrom BxRi 250ws into it (a Creative Light 60x90cm gridded softbox). For Dania, and to balance out the sharper light hitting Greg I setup a white Elinchrom beauty dish with a diffusion sock, and inside I added a gold reflector element to give a warmer tone to her. I added some Lastolite Trilite reflectors in front of the two of them and we ready to shoot.

First Cut

I put together a quick first edit of images from the shoot. I had just picked up a flame thrower for a future ProtestLove shoot and it seemed perfect to pair a pregnant Dania with a destruction device I originally saw when the Watchmen promotional posters were released. Basically I was looking for a retro-styled flame thrower like the one the Comedian used to light his cigar, and this one with Dania has the perfect look. The device I found is simplistic and is the perfect size, not too long and not too short. We were sort of thinking of compositing in a bomber in the background dropping a payload of blossoming flowers from the sky. All I need now is to hook the thing up to a propane tank and shoot the flame and do some photoshop magic.

Greg found a pair of those cool 80’s glasses in my apartment I bought on the boardwalk in San Diego, and he wears them extremely well. I shot him with my large Creative Light softbox, and I guess he’s staring into the internet future, and with his smile, sort of reminds me of Max Headroom, I dig this look immensely. In the previous projects, I focused on a grungy look with Mathias, a cleaner look with Lukas, and now with Greg I wanted to do something lighter, so I worked up a composite of Greg with a summer sky shot in Berlin. I wanted something with a lot of light, but to maintain the texture of a painting canvas, some lightflare was added in Photoshop and I sort of want a hint of the awesome flare seen in Star Trek: where J.J Abrams used an anamorphic lens to get wicked flare, you also see this feeling in the Transformers movies, it gives you the sense of sitting in a desert.

A Person Is Not A Subject

When photographers talk about their photographs of people (like portraits), when I read comments on photo forums and on blogs from popular professional photographers it’s popular to use the term subject when referring to the image capture of a person, as in…

“I photographed the subject using a gridded octabox to feather the light off of their nose and give depth to their cheek bones…blah, blah…”

I like to call the humans I photograph people. After writing about subjects and lighting a lot of photographers then say something like, “but you have to make a connection with your subject.” I think that if you treat people like people instead of subjects, then it makes everything easier and natural to start out with. I think of a photo session as just an extended conversation. If you lose the human element in the photograph or image, then you also lose authenticity. And when you lose authenticity you have a picture which is worthless, without emotional impact, and is a waste of time to look. It’s tempting to say subject because it implies that you’re doing something grander than tripping the shutter on a camera during a conversation, but the truth is portrait photography is just about being a human talking to another human. When you get caught up in lights and gear and subjects you might not ever learn that simple fact, and end up treating a person you’re photographing like a science experiment – and I like photography because I’m not in the lab.

Lukas – Movement DJ Portrait

I shot Lukas for the Web Portraits Zurich project some time ago, and I’m finally producing some finished portraits from the shoot. Lukas runs Guzuu and is a fixture in the Swiss web community for his unique visual style. Like many people I meet in the web/startup scene, he’s not just into launching companies, but also has a creative side. In this case, Lukas likes to DJ in Luzern and runs an internet music label (LittleJig.com).

I thought for a long time about how create images of Lukas, I could have just composited in some graffiti and called in a wrap, but then the images would have looked too similar to what I created for Mathias, and my sense for photographic exploration was honed in the academic research world. In Academia the key driver is to do something different, start with what you learned from the work of Bent and Hagood on Active Fiber Composites (AFC) and do something slightly different, evolve the idea a bit. Similarly, I wanted images of Lukas which have more movement and motion elements in them than with Mathias. I wanted to take some elements from my experience dancing in clubs and other DJ images I’ve seen on Flickr, and combine it with the visual style I’ve been developing. This meant light trails, streams of light created from the headlights of moving cars and night scenes of the streets. So when I went to UXCamp Europe 2010 in Berlin, I took some extra days and walked around Berlin, shooting long exposures at Rosenthaler Platz and other locations to generate the necessary texture images for Lukas.

When I’m dancing in a club I like to loose my mind and let my body get connected to the music and the vibrations in my soul. It’s a very personel thing, rather hard to commuincate visually, but I figured I should at least try. A key here was to let the light trails and night scenes move around Lukas, not dominate his image or allow key elements to be lost in the shadows. I’m getting back into painting at the moment, so I had an eye for adding abstract visuals from the night which are probably more like brush strokes than elements from Berlin, but in my head it seems to work.