Cameras

You Are Not The Malcolm X of Cameras (Canon EOS-1D X)

You are not releasing the Malcolm X of cameras or software, so how about not using “X” on every new product: Canon EOS 1D X, OSX, FCPX, etc. I love technology, I like the positive revolutions technology brings to the world, be they social, economic, how we think, how we work, talk, love, and realize our potential as humans. It’s getting common now to use X to denote new releases like cameras and software packages, to make consumers feel like those new iterations on a product are revolutionary in their design and capabilities. The X could mean the 10th edition, taken from ancient Rome, but in general it’s used because it sounds cool – but the person who made X stand for cutting edge revolution was Malcolm.

I first read the Autobiography of Malcolm X while taking a class at Michigan State University, just a short from where Malcolm Little grew up in Michigan. The X represents the idea that Little was the name of the slave master of his father’s family, and that their heritage had been taken from them, hence he took the last name X to represent that loss of identity.

“The Muslim’s ‘X’ symbolized the true African family name that he never could know. For me, my ‘X’ replaced the white slavemaster name of ‘Little’ which some blue-eyed devil named Little had imposed upon my paternal forebears.” ( Malcolm X, Autobiography, Perry, p. 147)

It probably started with OS X, the 10th edition of the Apple operating system. The idea was that Mac OS version 10 was a redesign of the old system, the new being based on Unix and in large way lead to the turn around of Apple, which now dominates many sectors of desktop and mobile computing systems. When Apple released the new version of Final Cut Pro, borrowing heavily from iMovie they called it FCPX. Now Canon is jumping on the X marketing-wagon, naming their new flagship the EOS 1D-X. I foresee a trend here, like using cleaver Latin names on cars. The marketing taps into the power of the word, but does so to sell a product which doesn’t live up to the potential of humanity.

The Canon 1D X isn’t a revolution in video capable DSLRs. It wasn’t oppressed by Kodak-based slave masters or beaten down by Nikon thugs hiding behind white hoods. It’s a tool to shoot still images and videos with. The X is something which screams revolution, but don’t let the marketing guise dilute the true meaning of the letter. It stands for social change, it stands for people standing up and putting their lives on the line to push for a dramatic modification of the social framework of a city or a Nation.

Polaroid Pinhole Camera Recipe

This is a story (or a tutorial) about creating a Polaroid pinhole camera. The initial motivation was to make a pinhole camera for use with a 6 grade class to teach them all about optics, but the camera is also super fun for me. This is my first experiment with a Camera Obscura imaging device, or commonly called: pinhole photography, one of the most accessible high-technologies of this and the last century. It’s a way to create interesting images without an expensive camera, and is an excellent way to demystify photography.

Kids are easy to impress, you give them a smart phone and they’re all like, oohhhhh, awesome, and you can make pictures with these fantastically plastic devices. But with a smart phone you have no understanding at all about what’s going on. Even most folks with a digital SLR probably don’t have a great concept about light capture and the reality that the physics behind your super amazing 24 megapixel Sony A900 can still be boiled down to nothing more than a very advanced light box. That uber-awesome Carl-Zeiss lens is built to high standards, but all it does is focus a little light on a light-sensitive surface – and with a pinhole camera, we don’t even need glass to focus the light.

The Idea

Originally this pinhole idea was for a school project, and I wanted to have something as cheap and easy to build and use as possible. While researching Polaroid pinhole I found a tutorial on Flickr where you put a piece of Polaroid film into the back of an aluminum container to build the camera. This is the cheapest way to do it and works well enough, but you need to change the film in total darkness. You also need a way to press the film correctly to apply the developer to the image, requiring the rollers from an old Polaroid back. Sure, we could do that with a light-tight tent and a rolling pin, but I wanted something more…instant. Also something with fewer things to go wrong to demonstrate the concept to the kids before they built their own. So, I looked at what I had in the house, and I ended up taking apart a Polaroid film back from my Mamiya 645 camera and then taping the aluminum container to it. I painted the inside black with spray paint, and then pressed a pin through the front before taping the film back in place. Hence the name, Polaroid pinhole camera. Now, you can also do things like measuring the pinhole (possible using a projector) and do some calculations to know your exact exposure for your film, but I didn’t feel like doing math and just took the camera out to shoot around Zurich with. More anticipation for the result, less thinking, more fun.

Polaroid Pinhole Recipe

  • Aluminum tin (or box, or whatever)
  • A Polaroid back (any one that accepts film will do)
  • Black paint (choose another color for interesting effects)
  • A pin
  • Polaroid/Fuji Instant film

The aluminum tin or box you buy from a supermarket or find in your house/apartment along with the black paint and the pin. The Polaroid back you can find on eBay (probably the cheapest) or the used departments at places like Keh or Adorama. You can probably also buy an old Polaroid camera and rip it apart for the film back, but that sounds a tad aggressive. Once you have a Polaroid back, you need to remove the front of it. Why? Because these backs are designed to show film areas for 6×4.5 or 6×6 (depends on the back you have), which are smaller than the Polaroid film area, and you want to use the whole piece of film. On my Mamiya Polaroid back I just removed the rubber backing, removed a few screws, and could then pull the face off of the back with out creating any permanent damage. The loading area for the film was perfectly intact, and ready for the pinhole camera body. If you want a wide angle camera, the distance from the film plane to the pinhole should be 2-3 inches, and will correspond to about a 20-35mm lens from a 35mm film camera. If you want more of a telephoto just use a box with a larger distance.

The film isn’t too hard to get, even in Switzerland. You can get Fujifilm or Polaroid. Now, there are two types of instant film from Fuji, one for legacy Polaroid systems, and one for their new Instamatic line. These are not interchangeable, and you want to buy the legacy Polaroid type, otherwise it won’t fit in your Polaroid back. There is also the Impossible Project, a company which makes Polaroid film in various flavors like black and white. The Impossible Project products are direct copies of the now discontinued Polaroid films and will work well with this system. The Fuji however, will be the cheapest and easiest to find, and I would recommend going with the Fuji to start out with to perfect your technique.

What comes next?

I’m having a blast with the Polaroid pinhole, but I see room for biggering. First, I want to start shooting portraits with strobes. It’ll be easy, just take some flashes along, set them up as desired, and trigger them by hand for the shoot. Second, is biggering to a Fuji 4×5 Polaroid back. This is a back for 4×5 large format cameras, and can be found on eBay or in Japan via the Japan Exposures webshop. This will allow me to easily use a larger film size, which can be easily bought in color or black and white from FujiFilm. Excessive? No doubt, but should make for an interesting project.

Analogue to Digital

Once you have your fabulous pinhole images, you might still want to share them with those kids with the smart phones. And on smart phones, you might want to make them look like classic faded Polaroid images, as has become oh, so, so popular with Hipstamatic/instagram mobile apps. I like to scan my image on a flatbed scanner (I have an Epson 4990) and then transfer it to my iPod Touch. From there I run can run the image through Red Giant Plastic Bullet, and then instagram, where I can easily upload to Twitter and Tumblr. For more info, check out article: My Favorite Mobile Photo Apps for iOS Excessive? No doubt, but I don’t like to use just one imaging technology. I mix, I match, and I love the ability to apply the classic Polaroid look to Fuji-instant film on an image captured in a aluminum box and processed on my iOS device. In closing, here are some images showing the disassembled Polaroid back, painted aluminum camera body, assembled camera, and example images.

VG10: Jag35 Field Runner Rig Review

I picked up the Sony NEX-VG10 because it has more of an all-inclusive video camera design than going the DSLR route (Canon 7D, 60D, 550D, etc.). However, as I started using the camera I decided that a shoulder rig would add a lot of functionality to the system to stabilize the camera and to shoot in different situations (and I’ll admit so some gear lust driving my purchase decision). I opted for the Jag35 system because they offer rigs at affordable prices for people in my buying group: folks who are getting into Indy film production but don’t have a huge budget. I decided on the Field Runner because it’s under 300 USD and came with a free handle when I ordered it. I also picked up a tripod baseplate to quickly go from tripod to shoulder mount on shoots.

Shooting with the Field Runner

The Field Runner is fun to shoot with, and that’s an important point. I use the Field Runner with the NEX 18-200mm autofocus lens or something wide like the Sigma 20mm f/1.8 or a Minolta 20mm f/2.8 and stay mobile. Since the NEX is autofocus I don’t yet worry about pulling focus and haven’t added a focus follow to my camera kit just yet. With the 20mm lenses I set the aperture and manual focus as desired. I can then shoot with the rig on my shoulder, or down low from my hip. I’m currently using the Field Runner without any counter weight on the back since the VG10 is pretty light the counter weight isn’t such an issue, but I’ll probably add one in the future to stabilize the system.

On the shoulder the VG10 is very nicely stabilized, and is much better than shooting in the classic Handycam method of just holding the camera in your right hand and putting it up to your face like a tourist or last-rate pornographer. With the Field Runner the VG10 becomes a part of my body. It moves with me, rotates with my torso and feels connected to my center of gravity. In short, it does exactly what I was hoping for when I ordered it. The VG10 now sort of feels naked without the rig. I can imagine shooting without it, but don’t see the point. It’s also nice to cradle the rig in my right arm and hold it to my body, with my left hand on the front handle. I also often shoot from my hip. To do this I make the front handle parallel to the rig and hold that handle with my left hand while holding the raised handle with my right hand and then rest the shoulder pad on my hip and then pan with my body. This is a very secure was to do a low pan when needed and is very comfortable.

Mobility

I like to be mobile as a film maker or photographer (or painter for that matter). I like gear that easily moves me and packs up quickly. I can easily pack up the Field Runner with my VG10 and an assortment of lenses into my Think Tank Airport Acceleration and go without any issues. When on location the Field Runner assembles in a few seconds and I’m ready to shoot. With the optional tripod plate I can mount the rigged camera on my Manfrotto 501HDV fluid head and quickly switch from tripod to hand-held in mere seconds. I just need to swing out the front handles to allow the rig to slide onto the 501 head, but since the handles are locked down with simple twist knobs, this is very easy to do. Then when I go from tripod to shoulder it just takes a second to swing the handle back into position and lock it down and I’m ready to shoot again.

Design Issues

These are a few design issues I’d like to address that may be serious or totally irrelevant to potential buyers. Overall the Jag35 Field Runner is a good value for the money, but there are some areas of the design that need improvement in my opinion. The most serious is related more to the VG10 design than the rig, which is likely irrelevant with any another than the VG10, but needs to be mentioned. The connection of the VG10 tripod plate to the rig is very insecure, this is the heart of the rig system and should be the most well-designed and quality-controlled part. However, this is a design issue with the VG10, and not the Jag35. Now, this is has to have some context. The Field Runner is designed for a DSLR body, and I’m using it with my VG10, which has a long base like most camcorders do, while DSLR bodies are short and wide. For the VG10 you should have a long attachment area like a Manfrotto video plate, which produces a nice secure contact area on the bottom of the camera. This connection system is offered from IndySystem or Cinevate, where you can screw a long Manfrotto plate onto your camera and then just lock that into the baseplate on the rig.

To compare, I also tried the Jag35 camera plate with my Sony A900 just to see how secure it would be with a DSLR body, and it was totally different from the VG10. With a DSLR body the camera sits securely to the Jag35 base plate. With the VG10 it’s ok for basic shooting, but I don’t have faith in the attachment to my camera to forget about it, and is a primary reason I’m looking at adding an IndySystem camera plate to improve my rig setup. I also think the current design would be greatly improved by using a metal knob (similar to those on the rest of the rig) instead of plastic covered screw on the camera plate, as it would be easier to securely tighten the camera plate to the camera tripod socket.

I also found some minor misalignment issues with the connectors which hold the rods together, but this is a smaller issue and doesn’t affect the performance of the system. When the screws are tightened the rig is rigid and secure, and that is the function of the design that matters most. The optional handle could also be improved. The handle needs a lock-off screw to prevent it from rotating. As it is, the off-center handle can easily torque due to the weight of my camera and twist open when held, which is a basic design fix that should be addressed. For this reason, I always need to hold the rig by two hands to prevent unscrewing and rotation. For a rig of this price point and production volume, these design issues are more or less acceptable, and I’m confident they will be ironed out on future rig releases.

Design Update

Jehu Garcia, one of the people behind Jag35 pointed me to an updated design for the camera mounting plate to address the issue of camera-rig connection. There are two key and very welcome design improvements. First, there are a few screws in the base plate which can be screwed to contact with the bottom of the mounted camera. This then counters the tendency of the camera to loosen from the mounting plate. This addresses the torque loading on the rig-camera connection, which can occur when a follow focus is used. It can happen that reaction forces develop at the rig connection point, and these screws help resist those loads by counteracting the torque. From the design, it looks like the new plate will also improve the issue with the VG10 (and the poorly designed Sony tripod mount). The second modification is a nice big aluminum knob. This will make it much easier to tighten the rig to the tripod socket.

Overall I Like It

I’m a mechanical engineer by profession and a scientist by training, so you would expect I’d find and write about any mechanical design issues that I find with the gear I use. However, I can honestly recommend the Jag35 Field Runner, for the price it’s a great rig for new Indyfilm folks and those on a budget. It will be used by weekend warrior film makers and those who don’t mind a few design short-comings. The price difference between the Jag35 offerings and a similar rig from one of the pro-shops like Zacuto or Redrock Micro is nothing short of amazing, and I’m impressed that they have grown so fast and come so far in the short time Jag35 has been selling gear. They’re releasing a motorized follow focus, and they’re even making it wireless. The innovation and price point of their gear is really impressive. At one point I actually was going to start designing my own rig system and get some custom prototypes made, but once I saw what is coming out of Jag35, Habbycam, and IndySystems, I decided the market doesn’t need another rig maker in this category. Of course, the rig system in my head will be designed to be ultra-light using carbon fiber rods with a structural design optimized using Altair Optistruct, so it’s still possible I’ll do something in the future if I’m motivated enough. However, I’m more into spending my time shooting than rig designing.

NEX-VG10 Mamiya 80mm f2.8

One large draw of buying into the Sony NEX system is the ability to adapt many different lenses to the camera bodies. I picked up a VG10 to shoot video, and to use all my medium format, Contax G, and Minolta lenses on a video camera. One of my favorite lenses to shoot with is the Mamiya M645 80mm f/2.8 N, and here are my initial experiences…

Mamiya Background

The 80mm is the standard lens for the Mamiya M645 medium format camera bodies. The Mamiya 645 system has been used extensively by pro shooters for decades, and the equipment was all built to pro standards, making it a quality purchase if found in good condition. The system started out as all manual, but has since evolved into autoexposure, autofocus, and digital with the introduction of the Mamiya 645AF and 645AFD. Since the introduction of the autofocus Mamiya  cameras, the manual focus lenses have lost most of their value to digital shooters, and till recently, really only made sense to use on the older film bodies. However, a few manufacturers make adapters to mount Mamiya and Hasselblad lenses on DSLR bodies. For this reason I picked up a Cirrius adapter on eBay and some cheap used copies of the Mamiya 80mm and 150mm lenses to mount on my Sony A900. However, manual focusing sort of sucks on the A900, in particular if you shoot with old glasses like I do because you spend all your money on camera/video gear, computers, mountaineering trips, and retirement savings. If I had contacts it would be better, but at the moment I can’t accurately manual focus my A900. However, since all NEX cameras have live-view (like the A950 hopefully will have), the system makes an ideal candidate for use with my Hassy and Mamiya lenses.

Mamiya Lenses on the VG10

When used in conjunction with the LA-EA 1 adapter (Sony Alpha to NEX) I’m able to mount the Cirrius Mamiya to Alpha adapter onto my VG10 body, and thereby the Mamiya glass can be adapted to the NEX. The Mamiya lenses are nice candidates for the VG10 because they are compact and have smooth focusing action. When searching out a manual focus lens you want one with a dampened focusing ring. This means the focusing ring moves in a smooth motion, allowing to comfortable attain the correct focus. This is a big selling point of high-end glass like the Zeiss CP.2 compact primes. It should be easy to access the aperture dial as well. The focusing ring on the M645 80mm is prominent and easy to manipulate with the fingers, or for mounting a focus-follow device if desired (haven’t tried this yet on the VG10). The lens has a switch to allow full manual or automatic control modes on an M645 camera. If you put the lens in A-mode the aperture will stay open at f/2.8 no matter what. If you put it in M-mode you can then change the aperture as desired. On the VG10, you have to go into the menu system and turn on the option to allow the camera to shoot without lens attached (this only has to be once). You can now shoot in P or S mode. In P mode the VG10 can adjust ISO (if set to AutoISO) and shutter speed to attain the desired exposure. In S mode you can set the shutter speed and then allow the camera to set the exposure by automatically changing the ISO setting.

80mm Performance

The M645 80mm is a very nice lens, especially for the price you pay on the used market. The colors are great, it’s sharp, has nice bokeh, is compact, is easy to focus, everything you want in a manual focus lens. It could have more aperture stops, but that’s the only fault I see. On the VG10 it acts like a 120mm lens on a 35mm body but it only extends a couple inches from the body, much more compact than mounting my Minolta 85mm f/1.4 beast.

I’ve been shooting video and stills with the 80mm and am very happy with it so far. One video project at the moment is The Formers, a local band from Zurich that I’ve been working with. I took the VG10-80mm combo to their studio to shoot them in rehearsal (video coming soon). This entailed chilling in the room as they played with combined green and orange fluorescent lighting. I was manual focusing on the fly and shooting some stills here and there to sort of give the feeling of the ambiance of the place. I’ve also used the 80mm as a street lens, shooting grafitti, stickers, and flowers on the streets of Darmstadt. The main drawback so far is in the VG10, not the Mamiya.

The main problem with manual focus lenses on the VG10 is focus confirmation. You can focus with the live-view feed off of the LCD screen, but you can’t zoom in like on other cameras to check critical focus before shooting. This makes it difficult to hit the focus point correctly, and really needs to be addressed in a firmware update. Ideally there should be a little area on the LCD which shows a 5-8x zoom of the scene so you can fine-tune your focus. One way to compensate for this is to use your knowledge of hyperfocal distances and shoot at f/5.6 or f/8, and you can then create properly focused images. The Cirrius adapter is also a weak component of the system. The adapter is ok, it mates the Mamiya mount to the Sony Alpha, but there’s some play in the rotation of the lens when mounted, and images are soft when focused to infinity.

Summary

Overall the 80mm Mamiya 645 works very well on the VG10. The adapter from Cirrius isn’t really up to my standards, but it’s the only Mamiya to Alpha adapter I could find. Another option is to buy a Mamiya to Canon/Nikon and then a Canon/Nikon to NEX adapter, but that’s sort of expensive. I’m hoping that Fotodiox will release a Mamiya to NEX adapter in the future, as their Hasselblad to Alpha adapter is awesome and priced at a nice point. Better yet, if Fotodiox releases a tilt-shift Mamiya-NEX adapter I’d be super stoked. I’ve been lusting after a tilt-shift setup from Mirex to use my Mamiya lenses in that fashion, but that’s like almost 400 Euros. The tilt-shift thing would open up some interesting possibilities however, as I could then modify the focal plane as I want in relation to the people or things I’m shooting. Anyways, when you start lusting after more gear you know it’s time to use the stuff you have.

Sony A900 Replacement – A950 Deal Breakers

Rumors are starting to abound of an A900 replacement coming in 2011 (I think) – named the mystic A950 with a new 30 megapixel+ sensor and either a SLT or traditional optical viewfinder design. I heard this from a guy who has a brother who has a friend who works at Sony R&D and he read this rumor on SonyAlphaRumors. Having shot the past year or so with my A900, I have an idea of what the A950 does and doesn’t need. I’ve used the A900 for various needs including weddings, studio portraits, documenting the painting process, grafitti shooting, Bratz dolls, Lego animation, etc. The A900 basically rocks, and only needs a few tweaks to be awesome. What are the deal breakers on the A900 replacement?

Live View

First off, live view is a deal-breaker on the A950. Deal Breaker is a word combination that I hate to write or read (I just felt some bile erupt in my innards at the sound in my head). People throw it around on forums everyday and when you look at the crap these people shoot it’s obvious that they only care about writing useless crap on the internet. But, live view is a deal-breaker on the A900 replacement. Why? Simply because live view dramatically increases the usefulness of a digital still camera.

As a stills device the A900 is awesome, but for shooting macro images or with manual focus lenses, the A900 sucks. Yes, it has a nice large viewfinder (for a DSLR), but the cheaper cameras like the NEX5 and every other DSLR now on the market have this very basic feature of previewing the image before it’s made in real time. Getting accurate focus and framing is just more precise on a large LCD than on a large DSLR focusing screen. It’s also nice for framing an image when you have the camera above your head or down low or at a weird angle. Live view is just a great feature if implemented correctly, and it’s a critical feature to have. Live view means precise macro focusing. It means precise focusing with manual lenses. It means the ability to enable remote camera operation from things like iPads, iPhones and computers (although I think Sony also needs to release a decent SDK for this to happen). Live view helps to frame images when your eye can’t be level with the viewfinder. Live view is needed on the A950 – period.

Take note however, Live View and Intelligent Preview should both be there. Intelligent preview is used to make a temporary image which is displayed on the LCD but not saved to the memory card. I love intelligent preview for quickly checking lighting and histograms in the studio. It’s needed because live view is useless for studio photography when external strobes are used. I use intelligent preview all the time in the studio to quickly preview the scene without taking a full image. And yes, it does make a difference, I don’t want to shoot a full-sized real image and have it saved to my memory card just to visualize lighting and to check the exposure histogram. Intelligent Preview is better for images made using strobes. Live view is needed for everything else.

HD Video

Look, yes, I know and appreciate the difference between stills and video. I bought a VG10 because it’s a proper video camera, not a stills camera that needs to be upgraded to a video device. Video is needed, but not in the same sense as live view, and no, putting the 24p 1080HD video option in an A950 will not kill the new CineAlta F3 or NXCAM cameras. The Canon 5D-II and other popular video DSLRs are being used to make movies because no other device is there to fill that niche, which is why Sony released the CineAlta F3 and the new NEX NXCAM. The F3 is for high-end Indy films and professional digital cinema. The NXCAM model is for Pro video, and there’s the VG10 for consumer video. People are not going to be buying the A950 instead of the new high-end video cameras to shoot movies with. People want to shoot video with video cameras, not giant DSLR rigs that look like baby transformers and have horrible moire performance. That’s why Panasonic is selling the AF100, why RED developed the Scarlet and Epic concepts, and why Sony released the VG10 (and will be releasing the Pro-NEX NXCAM). A video capable A900 would be an awesome compliment the my VG10. Video isn’t a deal-breaker in the A950, but it needs to be there.

Non-Crippled Exposure Mode

The A950 needs the ability to autoexpose in aperture or shutter speed priority modes when manual lenses are attached to the camera. With a manual focus lens you only have the option to shoot in full manual exposure mode with the A900. This sucks and is purely a firmware issue that should’ve been fixed years ago (and could be fixed by a new A900 firmware). I should be able to put a lens on the camera, adjust the aperture on the lens, and have the camera choose the shutter speed and ISO for a correct exposure, just like I can on my NEX-VG10. Without this basic function, your ability to use the camera is limited because you have to adjust the shutter to match the aperture you use. Even my old Minolta 7D chooses the correct shutter speed for an ideal exposure with a manual focus lens attached. It’s a very basic feature and should be a function on any camera body. One reason the NEX line is so popular is that people can use whatever lenses they want on their body (with adapters). This adds to the value of the camera, and it should be the same on the A900 replacement. Focus confirmation on manual focus lenses should also exist. Sure you might need to add an electrical interface to the lens, but this is possible with Canon and Nikon and their built-in rangefinder designs. It just makes the camera better. It’s useful when manual focusing with Sony/Zeiss autofocus lenses and as well old manual focus devices, it’s not a must, but would be awesome.

Optical vs. STL Viewfinder

If the STL viewfinder works as well as an optical one does and improves the user experience, then it should be there. Currently, the A33 and A55 do not do this. With the SLT cameras (and with the NEX-VG10) it’s very difficult to use the cameras in the studio with off-camera flashes. The reason is that the electronic viewfinders try to depict the scene according to the manual exposure the photographer sets on the camera, but this of course doesn’t account for the power output of the flashes that will go off when the shutter button is pushed. The resulting live view image is a black screen when I shoot in my studio with the VG10. This makes framing the shot very difficult and is also a rather huge deal-breaker because it severely limits the use of the camera on shoots. I like having an optical viewfinder because I can easily frame the shot (even if the camera isn’t turned on). What I’m hoping is that Sony will develop a dual-system hybrid view-finder, similar to the Fuji compact camera shown at Photokina 2010. Rumors suggest this will be available on the coming NEX7, and would actually make for a very nice addition to the A950 design.

In Summary

So, basically the A900 replacement needs: Live View, HD video and non-crippled manual exposure mode. If there’s a better viewfinder design than the current one that would be great, but it needs to be better than the A33/A55 design. A rangefinder should also be integrated to help manual focusing, but it’s not a deal-breaker.

A900 Firmware Update

Sony has released a firmware update for the A850/A900 which addresses the exposure issue with manual lenses. The update includes the following:

Faster autofocus, extended the range of exposure value (EV) compensation to increased to ±5EV, exposure bracketing range has been increased to a maximum of 6.0EV (-3EV, 0EV, +3EV). The A900 and A850 firmware updates are available on various Sony support websites, including http://support.sony-europe.com/dime/DSLR/dslr.aspx.

Sony NXCAM: NEX-VG10 Pro Visions

The pro version of the VG10 has been announced and is set for a 2011 release. Sony is taking the large sensor video technology concept of the NEX, and packaging it into a camcorder form with Pro features similar to the new F3. The NXCAM will be the competitor to the Panasonic AF100, and fits in between the VG10 and the F3. I was a little under-whelmed when I read about the F3. Not because it isn’t a significant development, it looks like a kickass camera, but is way outside my price range. There will be multiple frame rate options with the F3, XLR audio inputs, 35 Mb/s 1080p video, and the recording bit rate is much better. With an add-on module you’ll be able to capture 50 Mb/s if needed (and it is needed as per the BBC broadcast standard). However, the F3 is a Pro cinema tool with a PL lens mount and a large price tag. You could shoot it yourself, but is the type of camera that works best with a small crew to handle properly. The NXCAM seems designed for a single user to exploit if needed, and is based on the NEX autofocus lens mount. The NXCAM seems to address the majority of the limitations of the VG10, like the need for multiple frame rates, XLR inputs, etc. This is all nice, but is the NXCAM an alternative to the VG10, an evolution of the design, or just some added features?

NEX Advantage

If Sony were just releasing cameras with fixed lenses or the PL mount, it wouldn’t be so exciting. However, one big advantage of the NEX system is that I can use all my Minolta-Sony lenses as well Mamiya, Hasselblad, etc. The fact that the NEX system can take basically every lens ever made is awesome and a valuable feature for film makers. It’s so awesome that I don’t mind over-looking a lot of the design faults on the VG10 body and camera design. This is also why people shoot with DSLR cameras. They’re not ideal video tools, but the ability to experiment with shallow depth of field and different lenses is just to much fun to ignore. Using the correct adapters you can shoot with Nikon, Canon, Zeiss, Contax, Leica, etc. My personal favorite at the moment is shooting with my Mamiya M645 80mm f/2.8 on the VG10. The manual focus Mamiya lenses are cheap, compact, robust, and have wonderful colors and sharpness. If you only want to shoot in manual focus mode, you have a huge range of lenses to choose from at very attractive prices. I’m adding a Contax G adapter for my awesome Zeiss lenses, and probably one for my Contax C/Y 35mm as well. Where the NEX system has an advantage over DSLRs is in autofocus. The VG10 focuses fast enough that you can shoot with it like a normal consumer handycam, but the large sensor makes even mundane flower video look badass semi-artistic. However, is this needed/wanted in a pro device? Carl-Zeiss has the position that manual focus lenses will always trump autofocus in quality, because you know exactly where your focus point is, and the lens isn’t always trying to find and correct that focus point. On the other hand, the almost-ready-to-be-released RED Epic will allow autofocus with Canon and Nikon lenses (with an add-on module). The idea though, will be to autofocus and shoot, but not to continuously autofocus all the time during shooting like the NEX has.

I’ve been shooting with the VG10 for over a month now, and basically love it. But how will the NXCAM compare to the competition? Unlike the Canon 5D-II, the Pro Sony cameras feature a 2K Super 35mm sized sensor that is designed only for video (as I understand it). The Canon cameras have image sensors designed for stills but also do video as an after-thought. The Sony chip output is supposed to output a 1080-sized image, this means great low light capabilities because the sensor is putting out 1080 video, not down-sampling from a 21 megapixel chip (like the Canon does). This means better control of moire, and a large sensor designed (and optimized) for video. If it’s possible to pull a clean frame from the progressive feed off of the video stream, then it’ll make for nice stills as well – but I think this is where the VG10 has an advantage. One reason I like the VG10 is that it’s a true convergence stills-video hybrid device. I can switch between shooting 1080 HD video and 14 megapixel stills in a fraction of a second. I can also shoot with TTL flash or off-camera strobes. Will I be able to do this with the NXCAM (does Sony think I would want to)? The NXCAM will be a Pro video camera with the NEX mount, but probably won’t be ideal as a stills capture device for someone like myself.

I really love switching between stills and video with the VG10, but maybe that’s only because I’m still so new to video. I like the ability to shoot stills because it means I can setup lights and shoot with my remote radio triggers to create lighting scenarios, which are just not realistic without a lot of extra external LED lighting equipment. I think that the release of these cameras will also push lighting technology advancements. It’s clear that a need exists in the Indy-film economy for lower cost and lower power lighting. When you have a sensor with excellent low-light sensitivity, you don’t need to setup a bunch of tungsten lights or large LED panels. I think that companies like iKan and manufacturers from China will start to fill this growing niche.

NEX Evolution

Now that the NEX line is almost fully defined, this means that new lenses are coming in 2011. At the low photo end you have the NEX3/5, with the NEX7 coming in 2011 (the NEX 3/5 were there to assess market desire). At the video end there’s the VG10 and NXCAM. You can’t release kickass bodies without adding some fast prime lenses and high-quality zooms to go with them. 2011 is the start of the real video cinema year. 2011 is the year that the tools become available to more people to tell interesting stories with moving images. For a range of price points you have access to high-quality video, many lens choices, post-processing workflows, and distribution mediums. Don’t get blind-sided by the technology. It’s all still just a collection of tools to tell interesting stories. The Last Air Bender is a great example of a high-level production with horrible storytelling. A 1080p video feed at 50 Mb/s of a brick wall is just as boring as a 640 VGA phone video clip of the same subject.

Darmstadt Street Stickers VG10

I had a few hours to chill in Darmstadt and took my Sony NEX-VG10 along and shot with the Mamiya M645 80mm f/2.8 lens. This is the fabulous combination of the latest consumer video technology (the VG10) with an old guard lens of the film days (the Mamiya 80mm f/2.8 N). I didn’t find much graffiti in the city but there are a number of stickers and street art. What’s it like shooting manual focus on the VG10 with an old guard manual focus beast? It could be better, but the Mamiya 80mm is a sweet lens, and now my favorite to take along on the streets with the VG10.

Sony CineAlta PMW-F3K Pro Camera Announced

Sony has announced the PMW-F3K and F3L pro level camcorders to the CineAlta line of awesomeness. They feature PL-lens mounts and Super35mm sensor sizes, along with 35 Mbs recording. The camera targets the pro-on-a-budget line of buyers, but is not priced to compete with the Panasonic AF100.  Everyone knew this was coming, as Sony was showing a 35mm full-frame camera at NAB 2010, the only question was when (and for how much).

The F3K offers a nice mix of frame rate features, much like the AF100. It records in 23.98P as a native format, which can be over-cranked to get slow motion effects with fast moving objects. Frame rates are selectable from 1 – 60 fps in 720P and from 1-30 fps in 1080P modes. The wonderful selection of frame rates I wish my VG10 had. Other high points are the recording format, which is in Sony XDCAM, very nice for dropping into a non-linear file editor. There’s also the possiblity of , 10bit 4:2:2 HD-SDI output for hybrid recording possibilities, allowing with content to be recorded the internal memory and on an external device (uncompressed form).

A big question now is, where will a pro model of the NEX-VG10 fall? Phillip Bloom reported on his blog, Tentative pricing from Sony Europe is €20,700 (US$28,850) for F3K (with lenses) or €14,500 (US$20,195) for the F3L (without lenses) model – no where near as cheap as the AF100. Estimated shipping date is January 2011. So not cheap am afraid!

This high price-point places the camera well outside the NEX line. It gives room to offer a NEX Semi-Pro camera at about 3000-6000 USD (which would be in line with the AF100). Of course, the NEX is supposed to be aimed at consumers, not Indy film makers who probably don’t care about auto-focus and adapting Sony Alpha lenses to their video camera, hence the PL lens mount. However, everyone who can create a rumor is suggesting a Pro version of the VG10 will come out in 2011.  I think the desire for such a camera exists. The Canon 5D-II DSLR video craze started things, but Sony is the company heading in the right direction with the NEX camcorder concept. It’s the most versatile design, allowing use of all camera lenses in the form of a camcorder, which also works well as a stills capture device.

Sony NEX-VG10 User Review

Editor’s Note: This is a user review of the Sony NEX-VG10 camcorder. It has been written mainly in a window seat on the TGV express train between Basel and Paris L’est. It is a User Review in the sense that I’m just a guy who likes to use camera and writing technologies as storytelling tools. These are my experiences with the VG10 so far. This user report details why I got the camera, what I use it for, and what I think of it.

Background

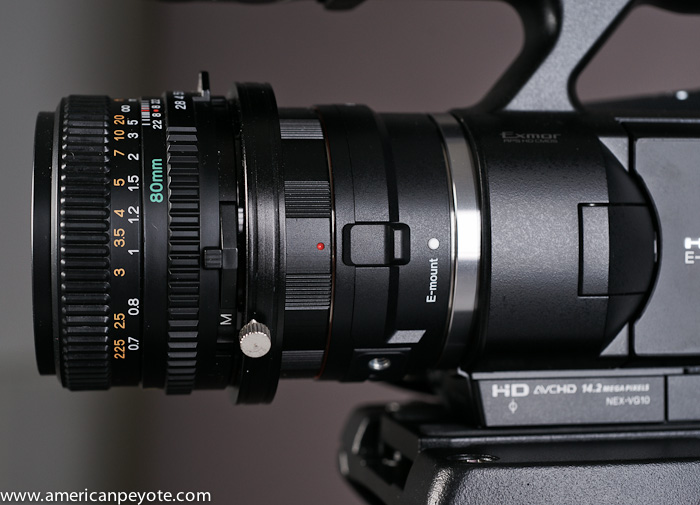
So, of all the video camera options out there, why did I get a VG10 in the first place? Well, I’m basically a stills photographer with movies in my heads, and the time was right for me to start experimenting with video – and the VG10 fit the bill, offering the critical features I was after. I started shooting stills with a Minolta 7, and then moved on to a 7D, eventually to a Sony A900. Presently, I have a nice collection of Sony Alpha-Minolta mount lenses. I love bokeh, and wanted to start taking moving pictures. Those goals would be easiest to attain if I just could shoot video in a similar manner to the way I do photography. The VG10 allows just such a bridge, while integrating quite well with my current photography tools. Using the LA-EA 1 adapter I can shoot video with all of my Minolta lenses with aperture control (but with manual focus) and as well I can use my Sony F58 flash or Elinchrom Skyports for shooting still images with on-board or external flash. A firmware update is coming to also enable autofocusing with Sony SSM/SAM lenses (with the LA-EA 1 adapter). Plus, via third-party adapters I am also able to shoot with nearly every lens I own. This includes my Hasselblad 80mm f/2.8 medium format beast and Contax G glass. Oh, and I’m an admitted Gear Whore, so why wouldn’t I want to buy this cool new toy?

Why Not Just Buy a HDSLR?

I asked myself this a lot. There are many options for video DSLR (HDSLR) cameras or mirrorless designs like the Sony NEX 5 or a Panasonic GH-1 or GH-2 to shoot video with. However, these are all built around the concept of using a photo tool to shoot video. Since I already have an awesome collection of photo tools (Sony A900, Contax G, Fuji GA645, etc.) I figured it was better to do the opposite, and buy a video tool, which can also be used to shoot still images. No other camera I’m aware of at this time includes autofocusing and audio (with a good microphone) recording in one video package. All the current video DSLR or mirrorless options require an external mic for decent audio, and generally extra rigs are required to make them useful for shooting. I’ve played with many of them in the store, and always came away with one main thought, “these would suck to shoot video with.” Afterall, that’s why a whole industry is exploding along side the SLR video revolution, providing things like focus-follow devices, camera cages, external monitors, microphones, shoulder supports, etc. – because the current devices are inadequate for shooting video and recording audio out of the box.

Design Overview

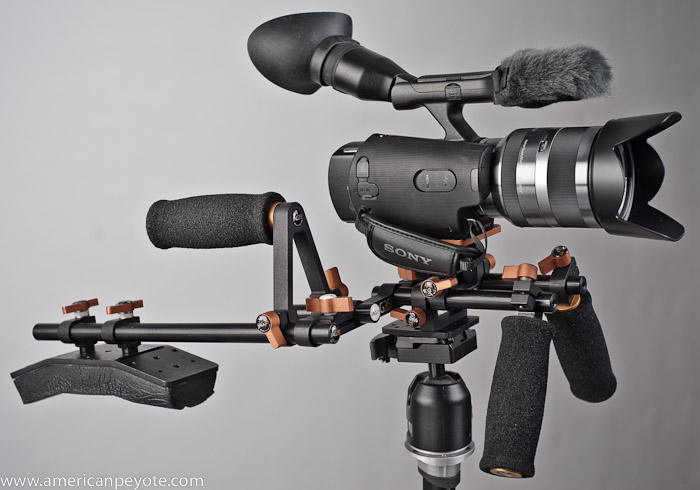
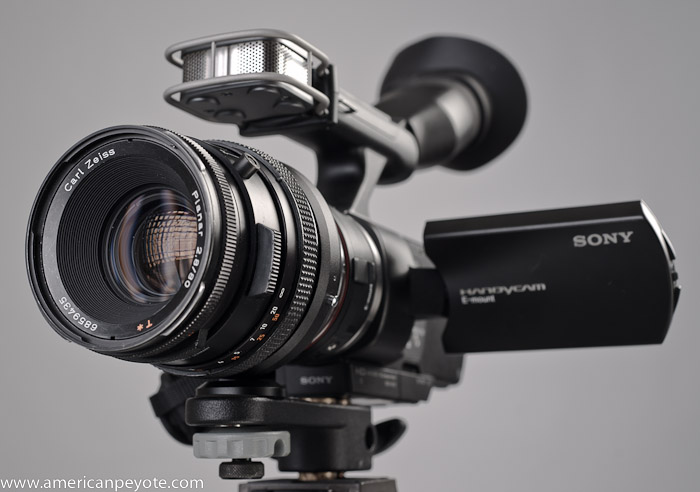
The VG10 is designed as a consumer grade video camera with interchangeable lenses, this makes it totally unique in the world (at the time of publication). It’s designed well, with a nice sort of futuristic body including a handle on top where the microphone is integrated. The handle can be used to hold the camera at waist-level and to pan in different ways. You can do this with a video DSLR as well, you just need to make or buy a cage and handle first. On the left side the viewing screen will flip out and then on the side of body are the various controls. Here you can pick shooting mode, review images, manual exposure settings, etc. You can use the screen or the integrated electronic viewfinder for framing during shooting. This is nice because you can shoot from a number of different positions and comfortably frame the shot. You can buy the camera with the NEX 18-200mm lens, which is optically stabilized. You can also shoot with basically every lens ever made via the appropriate adapter. This makes the camera attractive to owners of any camera system, even Leica users can put their lenses on easily. With its APS sensor, the camera delivers a high quality still or video file. Additionally, due to the sensor size you can have wonderful bokeh (defocused element of the image) in your images or video. The VG10 is often criticized for being rather expensive for what it offers feature wise, but if you price out the body, lens, body design, TTL hotshoe and microphone separately, it offers an acceptable value. What follows are my user views of shooting stills and video with this new funky video-camera.

Shooting Stills

Like I said before, one reason I bought the camera was to be able to shoot with my current lenses. To shoot a still image, you press the still/video toggle button on the back of the camera to access stills mode. Then you press the button on top-rear of the handgrip to shoot an image. All exposure controls are accessed on the control pad behind the video screen. I started by shooting still images to get comfortable with the camera and its user interface and interaction design before getting into video. Since it has a hotshoe, I pulled out my Elinchrom Skyports and started taking images with my external flashes and studio strobes. I had a planned shoot in my studio to produce some send card photos for some models, and I shot with the VG10 along side my A900. The VG10 doesn’t support the RAW file format (but the NEX 3/5 do) but in the studio the exposure is well controlled, and these images would probably not look dramatically different if shot in RAW. Note to Sony: please add RAW file support, it’s easy to do with the firmware update and enough people want it. I like having the RAW option because it allows more freedom in editing. This is one advantage the video DSLR products like the Canon 5D-II have over the VG10, top quality still image quality alongside video capability.

Still Images

Despite the sort of weird feeling of shooting stills with the VG10 (due to its ergonomics as a video device), the file quality is top notch.  Plus, I’m starting to like shooting from the hip or a little low while using the angled viewfinder. I processed the still images from our model session with Adobe Lightroom 3 and Photoshop CS3. The lighting was provided from two Elinchrom BxRi 250ws strobes in softboxes left and right, with fill reflection coming from LastoLite TriLite reflectors setup in front. My Skyport radio trigger slides into the Sony hotshoe via an adapter and I just fire away as normal. The only problem shooting in the studio is that the brightness of the LCD screen is tied to the exposure of the scene, and as such it goes totally black in the studio because the modeling lights on my strobes aren’t providing enough light when I input the manual settings. You get to see the person for a second when you hit the focus and take a picture, but it’s difficult to frame the person correctly. Maybe there’s a way to turn off the LCD exposure matching feature (another firmware fix?), but I haven’t found it yet. This issue is also a problem when using the new electronic viewfinder on the Sony A33/A55 SLT cameras with studio strobes as well. If it’s like that with the coming A77, I won’t be buying one. It really kills the functionality of the camera for off-camera lighting. One thing I would really love is if you could shoot video and then just press the photo button and shoot an image. Then I could just use the modeling light on my studio strobes to light for video and also take a high quality still image when the strobes fire, but this isn’t possible. All in all, the VG10 takes good quality still images. The main limitations are no RAW, no stills while shooting video, and framing difficulty when using manual exposure and off-camera lighting.

Shooting Video

I’m currently using the VG10 for a couple of different video projects. These include, live band footage, Lego stop-motion animation, and screwing around in my apartment.

The VG10 is a Handycam, and as such it is made to shoot video easily and quickly. There’s a large video button on the back of the camera, you press it, and video recording starts. However, it’s only nice when the camera up at shoulder level when your thumb can easily press it. The camera is also designed to be held at waist level and as well by the top handle. So why is there only one big button in the most inconvenient place at the back of the body? And why can’t we use the still photo button to shoot video with? You can force autofocus using the still image button to focus during video recording, but it should allow video start/stopping as well. Even better, there should be a button at the front of the body to allow more natural use. Even better still, I would like some buttons on the handgrip to allow easy manual control of speed and aperture, but that’s probably not happening in a Handycam.

The Formers

My first video experience with the VG10 was at the Formers gig at Zak in Rapperswil-Jona. Zak is a nice small venue, perfect for live music and a little head banging. I shot stills with my A900 and had the VG10 hanging off my shoulder to shoot with as well. The 18-200 isn’t a very fast lens, the maximum aperture is 3.5 at 18mm and the stage lighting alternated between darkness, green smoke, red, etc. It was a good place to see how the camera does in low, unpredictable light. As it is a Handycam, I just pointed and shot, without paying attention to anything like audio levels, exposure, etc. I missed focus a few times because I was accidentally pressing the photo button, which held the focus in the wrong point. If I had just pointed and let the camera do the thinking it would have worked out better.

Adapting Lenses

In my apartment I’ve started playing around with different lenses. One of my favorites is the Sigma 20mm f/1.8 from my film days. It needs to be rechipped and currently the autofocus doesn’t work on any of my digital bodies. However, the main reason to use this lens is at maximum aperture, and that’s what I did while filming my small toy collection. A 20mm lens is a very nice focal length on with the APS-sized sensor of the VG10. It’s moderate wide, and high-point of the Sigma lens is that it has macro-level close-focusing capabilities. You can focus down to a few centimeters with this 20mm lens, very unique in the imaging world. However, filming by hand with such a setup is not easy, and it’s wetting my gear acquisition appetite for a dolly to accurately frame, focus, and have smooth camera movement during the shoot.

I bought a Hasselblad 80mm f/2.8 about a year ago, along with a Fotodiox Hassy-Sony adapter to mount it on my A900. Since I wear glasses and the A900 has no live view, the lens doesn’t work so well with that setup. There’s no split-screen to manual focus with the A900 so when I use and focus in through the viewfinder I always focus in front of whatever I’m shooting. However, using the Fotodiox adapter along with the LA-EA 1 I’m able to put the Hassy glass on the VG10. Now I can focus using liveview for stills or video with the Hassy. This creates a sort of badass combination with very nice bokeh and 1080 video, perfect for video documenatry videography and looking cool. I haven’t used it much, but plan to as soon as the proper project gets started.

Audio Quality

My only other experience with gathering audio is with my Zoom H4. I know what good audio sounds like, just like I know what good wine tastes like, but I’m no expert in the area when it comes to highlighting nuances like the difference between MP3 and uncompressed audio. I just know what sounds and tastes good. The microphone has four omnidirectional elements, which allows the system to filter out unwanted background noise and such. As far as I’m concerned the audio quality rocks. I pointed and shot the Formers, didn’t give a thought to the audio levels and the audio came out sounding awesome. No mess, no fuss, no needing to audio sync the sound and video feeds in post-production (like with a HDSLR), I’m very happy with the audio quality on the VG10.

Video Codec and Frame Rates

As a newby with video production, I am totally new to the video formats, codecs, frame rate issues, and other topics concerning indy film making. The VG10 shoots AVCHD in a 1080 50i/60i wrapper, but the actual frame rate is 25 or 30 fps (depends on where you buy it). Unless someone (maybe someone like me) hacks the firmware (like was done with the GH-1 by someone else), it’s super unlikely Sony will release an updated firmware that allows  variable frame rates. This is due to the design philosophy of the Handycam.

A user should be able to pick up and shoot a Handycam without ever thinking about the details. You can’t even pick an ISO setting for shooting video (but you can when shooting stills). That’s the way consumer Sony video products are, and it will probably stay that way. I would like the ability to change frame rate, but at this point it would just be for experimentation, due to the fact that I’ve read on many internet forums that 24p is what people use to shoot movies because aesthetically it looks better. I’ve also read that AVCHD is a horrible format and it isn’t as good as other options like H.264 or something else. However, since I still don’t really know what I’m doing it doesn’t really matter too much, but eventually I will have a clue, and then I’ll think about going to Panasonic with the GH-2 or AF100 if I really get into video production and Sony isn’t offering what I want (I have no brand loyalty).

So dear Sony, give me variable frame rate and different video codecs or I’ll look to another system or try to hack the firmware (but first I would need to learn how to hack).

In Summary

All in all, I like the VG10. I’m not a technology apologist or a Sony fanboy. I point out when technology sucks and praise the successes I see. I’ve shot stills in the studio and video in a dark venue and the camera performed well. The VG10 fits the bill for what I want right now in my video life. It’s a camera I don’t have to think much with, uses my current lenses, gives me high quality video and audio, and is portable and adaptable for stills as well – and it fun to use. This “bill of features” will change for sure as I learn more about video production and accordingly demand more from my video camera.

Although I bought the VG10 to be an all-in-one device, I’m looking at designing a cage for the VG10 and also adding a focus follow at some point to improve manual focus capabilities. One glaring design flaw is the tripod mount. The mount on the VG10 is one of worst I’ve ever seen – on any camera – ever. It’s basically a small piece of metal, that doesn’t really connect too well to the inner body of the camera. Some people on the Vimeo VG10 group are already talking about modifying the mount to make it usable (yes, it really is horrible). The tripod mount on the LA-EA 1 adapter is much more robust, and I like to use that with tripods. One other design suck is that the tripod mounts on the LA-EA 1 and the VG10 are not level with one another, making it difficult to adapt heavy lenses to the front and improve the rigidity of the system. But it is a consumer body (now I’m starting to apologize).

The VG10 is basically a “feeler” product from Sony, it’s a test to see what consumers want. It’s made for the consumer market, but it’s prosumers who are really going to be using this camera. The future track of the VG10 can be directed along the right path if Sony gets the proper feedback. It’s in their interest to create products people want to buy. After all, Sony changed the NEX 3/5 firmware when consumers became vocal enough and demanded more, so there is hope.

Future Projects

Thanks in part to my  VG10 acquisition, the video bug is really starting to bite. I have ideas on deck for shooting promo videos of my paintings from 1 Day of Art Copenhagen and as well integrating video shootings into the normal portrait shoots I do. This will be sort of an experiment in using viral web movies to connect the intent of the artist with the viewers, and create dynamic as well as static content during shooting sessions. With the paintings, it’s also a way to explain to myself what my subconsious was doing while I was painting. Elevating the Web Portraits Zurich project is also burning in the back of my mind. I’d like to do some short interviews with the next people I shoot for that project to to present more about the person behind the technology. I like it when technology not only inspires me to buy more shit, but also fills my head with bundles of energy to head out and do new projects (or reimagine old ones), and to engage in ideas and storytelling methods I hadn’t considered before and, as a result – make life jus a little bit more interesting.

Ricoh Camera Evolution – GXR System

po1_img3
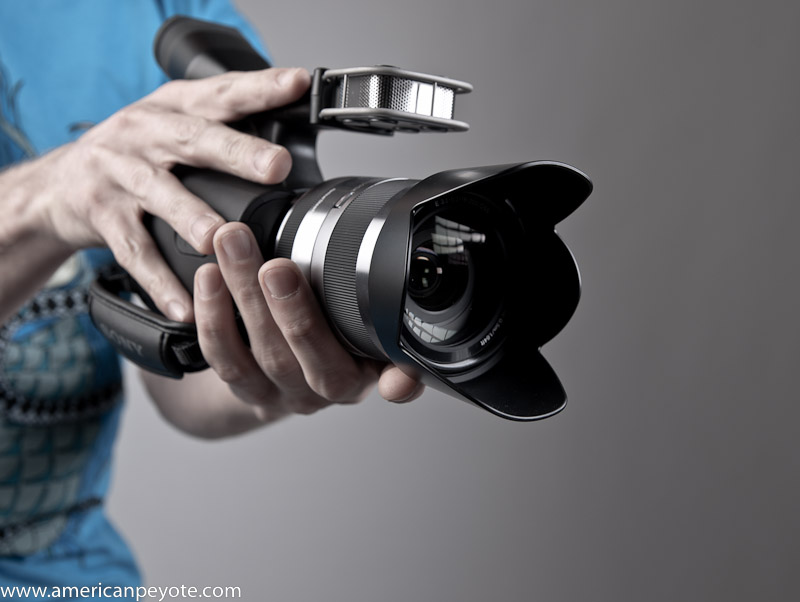
Ricoh has announced the GXR system, essentially it brings to reality a concept some people have talked and dreamed about since the digital imaging revolution began, a system with swappable sensors. Ricoh has taken the concept a bit further and released a system more akin to the not-yet-released Red Scarlet than, say the Lumix GF1. The GXR system includes a camera body with swappable lens-sensor modules. This enables a great deal of flexibility in system design and allows the development and optimization of lenses to sensors. This means you have the GXR body, and just plug in the module for the lens and sensor you want to shoot with. In fact, it’s really the awesome concept I’ve been waiting for in a digital camera, it means I can carry along a point-shoot small sensor module for snap-shots and a large sensor module for high-resolution images. It means I don’t have to carry aound a DSLR and a Ricoh GRD or a Canon G10, I’ll have the portability and high image performance options all in one system. Absolutely awesome!

GXR System Basics

The GXR system is being released with a body and two lens modules including the  A12 50mm F2.5 MACRO and the S10 24-72mm F2.5-4.4 VC.  The 50mm will include an APS sensor while the S10 module appears to have the same type of sensor as the current GX200. Additionally the current accessories include a wide angle and tele-photo adapter, as is currently offered for the GX200, as well as a decent flash and an optional external electronic viewfinder (VF-2). So, currently it looks like a cool slick little camera system, but people like to buy into camera systems, what promise does the GXR system hold for the future?

po3_img7

The control layout and design of the GXR body is very similar to the rest of the GR and GX lines. Meaning it’s more or less the best design being offered in a compact camera with good customization ability and excellent ergonomics. The body is magnesium alloy and the LCD screen is a High-definition 3.0-inch 920,000-dot VGA and a pop-up flash is integrated as well. The actual body is about the same size as the Lumix Micro Four Thirds GF1 from Panasonic, and is a bit larger than the GRD/GX body. So, it has a great size, smaller than a DSLR and is on par with the current camera-to-beat in this class, the GF1 (or the Olympus E-P2). How can the Ricoh GXR system compare the Micro Four Thirds offerings from Panasonic and Olympus?

GXR vs. Micro Four Thirds

po1_img2Two big draws of the GF1 and E-P2 (or E-P1) systems is size and flexibility. Both systems are compact, smaller than a DSLR, but with a reasonably large sensor. They include HD video capability, and via lens adapters they offer the ability to create a tailored system to your individual style of shooting. If you want to use your Leica lenses, there’s an adapter for that. Contax or Nikon? There’s an adapter for those two. With the HD video options these cameras can be compact movie shooting machines in the palm of your hand with great image quality and use of Bokeh due to the large (as compared small sensor cameras) sensor size, nearly on par with offerings from DSLR cameras. Well, if Ricoh has the plan in mind I have in my mind, then the GXR system should be able to equal and actually surpass the capabilities of the Micro Four Thirds and some DSLR systems in a number of ways.

Now, there are some people who’ll jump to the conclusion (withouth really thinking), “But it’s a closed system! With the micro 4/3 system you can use nearly any lens from Leica to Nikon!” And this is just the sort of thinking which makes me think people just want to defend their camera system no matter the facts of reality. The real beauty of the GXR system – the reality, is that a great deal of the image processing, lens motors, focusing, etc. is included in the lens module. So how hard is it going to be for Ricoh to develop a lens module for manual focus lenses like the Leica M, Nikon, Pentax, etc. via one module and an assortment of adapters? Not very hard at all, and if they’re smart (and I know they are) it’s a sure bet that such a module is in the works, and if they’re really smart it’ll be on the market in early 2010. It should even be possible (and no, I don’t think this one will happen) to create a special module for Contax G lenses (but it would be freak’n awesome).

1226635490

GXR – Awesome Customization

The lens module system also means that different modules can be optimized for different file formats. For example, of the first two modules, the S10 24-72mm shoots VGA video while the A12 50mm F2.5 shoots full HD video. You should eventually be able to build the exact system you want, an optimized HD video system for Cine lenses, an action package for sports, a high resolution wide angle system for landscape, a fast aperture system for street shooting, much like the Red Scarlet system (original system image included here), it’s an awesome concept. How about an ultra low-light module? The possibilities are really exciting.

The Ricoh GXR system actually holds the promise of what a lot of people have been asking for, and now they might not fully realize it has arrived. The GXR system is the most modular and flexible ever proposed, and I’m highly anticipating the release. It’ll be the perfect system for different types of shooting and offers the customization that many consumers are interested in. I’m putting off my ambitions to pick up a Lumix GF1 and will look at the GXR system, it simply offers too much promise for customization and system tailoring that I’ve only dreamed would exist, it’s just too much to ignore.

pop_l_front

Digital Holga – Yashica EZ F521 Review

EZF521-03813.jpgYashica released a cool little camera called the EZ F521. It’s been released in Japan and I ordered one from Japan Exposures, this is a review of the camera and additionally of the Digital Holga concept. The Yashica F521 has been labeled the Digital Holga. I think this makes sense on some levels and is preposterous nonsense in other ways. The Holga camera is a simple 120 medium format camera produced in China. You can set the negative size to 6×4.5 or 6×7. The body is plastic as is the lens (the Woca version I use has a glass lens) and comes in variations with or without a flash and now different colors. There’s no way to focus with any precision, the lens has three positions, two apertures, and a fixed shutter speed. Of course you can modify the Holga to do bulb exposure and extra shutter clicks can build up an exposure so you can get cool abstract layers overlaid in one image. Basically the Holga is a cheap and fun way to get into medium format photography. The bodies originally cost about 20 dollars, although since they’ve achieved cult status and been produced in various colors, you might pay between 50-100 USD for a new body (maybe with a flash) which is a lot for some pressed plastic.

The Holga Concept

The Holga concept is to just focus on taking pictures with a cheap camera where you need to focus on the subect, as the performance of the camera sucks. The term Digitla Holga has been thrown around a lot since the rise of digital camera technology, but in my mind the only thing that comes close is sticking a medium format back on a Holga or Woca body. I know you can put a Holga lens on a DSLR, and no, I see no fucking point in putting a 2 cent lens on my Sony A900 body. And no, I don’t want a Lens Baby either. Why? Because the Holga look is a combination of substandard manufacturing and horrible body design coupled with cheap plastic.  It’s insane to put actual time or money into trying to replicate the look in any other way.

EZF521-13170004.jpgThe look of images from the Holga/Woca is characterized as unique, as it comes from light leaks and nearly impossible to determine exposure and focus issues. The image to the left was taken in a coffee shop in Zurich with my Woca. You can see scratch marks from the Woca body and it has a very dark and grungy feel to it. Why try to replicate this look in any other way? Sticking a shitty plastic medium formant lens on your Nikon D3 is not being creative. Additionally, trying to replicate the Holga look in Photoshop using PS actions and filters with programmed algorithms using repeated patterns accomplishes nothing short of making your images look like over processed crap. So in this sense, the Yashica F521 is nothing like a Holga. It doesn’t have light leaks and I think it’s safe to say that pictures from one will look closely like those of another, with little variation from camera to camera. However, the substandard lens and funky exposure properties are retained in the F521 design.

The F521 is too well-built to be a Holga. I’m pretty confident my Holga/Woca would explode if dropped on the ground. Holgas are made from cheap plastic with poor fracture toughness, alowing brittle cracks to propagate easily through the body. The F521 actually has build quality on par with my Ricoh GRD and Canon G10. It’s built like a little tank and sort of resembles a miniature Fuji GA645. The finish on the body looks and feels like anodized aluminum and the faux leather on the grip looks well affixed to the body.

Creative Short-Cut

Anyways, what does it mean to be a Holga? The philosophy behind Holga is that you just shoot, without trying to perfect exposure or focus. Resolution is shit because the lens is crap. The point is just to have fun, and if a cool picture is the results, then sweet. Some will say that these limitations make you more creative, like choosing to use a 50mm instead of a 24-70 zoom. I think this is bullshit, limiting your ability to create an image doesn’t improve creativity, it simply limits your options. Want to be creative? Take up painting and challenge yourself to create something in a completely different way from your normal routine. Photography is the easiest “art form” ever developed, the creative part comes from realizing the non-intuitive attributes of a subject. With a crappy camera like the F521 or Holga you just focus on the subject, not on focus or exposure because you have very little control over either one. So you could say these cameras make you more visually aware, but it’s not a short-cut to overdosing on creative expression.

EZF521-03784-Edit.jpgShooting with the F521

Here are the basic details, the Yashica F521 is light, sized to the palm of your hand, runs on three AAA batteries and takes SD cards. A 1 Gig SD card gives you like 180 images if you use the 12 megapixels interpolated image setting. The normal image size is 5 megapixels. I figure it can’t hurt, so I use the 12 megapixel setting. Look, it’s a toy camera, but the F521 actually has decent control over parameters. You can set the exposure compensation, white balance, image size, there’s macro capability (the lens has two focus positions), on-board flash, and some color modes. The automatic white balance is really horrible, so I set that myself.

My first outing with the F521 was a short trip from Zurich to Basel.  I took the camera along and shot a bunch of abstract motion images in the Zurich and Basel train stations. This is the type of imagery I like producing with this type of camera. I’ve done the same in Tokyo with my Ricoh GRD (GRD Frozen Motion Photography). Basically I walk around shooting while I’m walking and the long shutter speeds due to the low light of the Bahnhof produces the blurred abstract images I see in my head as I’m moving through the night. The F521 scans the sensor from top to bottom (I believe) when taking pictures, so if you’re moving the camera you can get a wavy line patterns due to the sensor scan rate.

Due to it’s small size the F521 is a very non-threatening camera and can be useful for creative street photography. It fits in any bag and the lens has a rubber cap, so it’s very compact to take around and you can throw in a coat pocket without worrying that you might be damaging the front element.

Picture Output

F521_Images-0044.jpgPicture quality is as you would expect from a digital Holga, absolutely horrible, but that’s part of the charm and experience. I mainly use these types of cameras to produce abstract images, more akin to my Artcast paintings than a traditional photo image. You end up with pictures with unpredictable exposure, focus issues, and eventually with non-intuitive results, which is exactly in line with the Holga spirit. Concerning digital workflow, I download the images from the SD card directly into Adobe Lightroom for organizing and processing. The F521 image hold up well to processing, including exposure compensation, shadow adjustments, clarity, etc. Shooting with the F521 is a nice balance to shooting with the A900, and I’m planning to shoot with the 521 and my Elnichrom BxRi lights as soon as I get a photodiode to trigger the Skyports from the on-board flash. Maybe I’ll take off the lens and figure out a way to mount a Mamiya 150 f/3.5 portrait lens to it.

Is It Worth It?

The EZ F521 is cheap and definitely worth a look. It’s available for the international market via Japan Exposures and costs 9,990 Yen (about 100 USD). A few years ago Japan Exposures was selling the Fuji Natura S camera with the fixed 24mm f1.9 lens, I hesitated and then they stopped producing them. It’s my biggest purchasing regret of my camera buying life. So I bought the F521 without really thinking about it and so far I’m loving it. Does it live up to the name Digital Holga? Yes, I’m of the opinion that it totally does.

F521_Images-0032.jpg
F521_Images-0009.jpg
F521_Images-0060.jpg

Sony A900 – First Impressions Sony A900

Ethan_IMy photography-digital-imaging-hobby-obsession has started peaking in the past few months. After putting up some profiles on Model Mayhem and Stylished I started getting requests for Time For CD (TFCD) shoots. So I figured: Hell, why not try out a Sony A900? Why the Sony A900? Well, I have a Minolta 7D, and all my lenses will work with the Sony DSLR line. Plus GraphicArt in Zurich rents the A900 as well as the A700 and all the Zeiss and G lenses. I started out renting the A900 and 24-70mm Zeiss zoom, and since picked up a body, a flash, and a Sigma 70-200 HSM zoom. What follows is a first impressions user review of the Sony A900, used in my apartment studio and around Winterthur and Zurich for location shooting.

Why the Sony A900?

Here’s my DSLR history. I started with a Canon D2000 from eBay, decided I like the DSLR concept, moved on to a Minolta 7D (I own the Minolta 7 film camera) and basically did nothing but shoot with the 7D and expand my lighting kit. Why? Because for basic shooting a 6 megapixel camera is all you need. If you have one then keep shooting with it, only camera freaks feel a constant need to upgrade. I saw little need to buy a new DSLR, in particular I saw no point unless the new camera was significantly better than my current one. I’ve been unimpressed with the results of the Nikon D300 files as compared with those from my 7D, so why consider the A700 (which sports a similar sensor). But after shooting with the Sony A900 for a weekend and seeing how much resolution and shadow texture (dynamic range) I could get with the thing, it was a natural reaction to look at my bank account and pick up a body of my own. So to get it straight, I bought the A900 because I love the colors and shadow detail.

Alexandra_I.jpgThe A900 in the Studio

My first experience with the A900 was shooting Alexandra in my studio. She found me through Model Mayhem and we worked out a few concepts. Here I used the A900, the 24-70mm F/2.8 ZA SSM (SAL2470Z), two Elinchrom BxRi studio strobes as well as a Kacey Beauty Reflector with a Sunpak 383 flash and sometimes the Lastolite Trilite reflector kit. The Zeiss-A900 combination really leaves little to be desired. The resolution and color produced with this combination are simply fantastic, and almost exceeded my expectations (on can never be satisfied with camera gear). One major problem with the Minolta 7D is focusing. I have a number of image with a model against a wall where the camera focused on the wall instead of the model. The resulting image would of course be slightly out of focus. This doesn’t matter much for web stuff, but affects the image quality and provides less image information for post-processing work. Compared to the 7D the Sony A900 has very accurate focusing, in particular when used with a SSM (Sony Super Sonic) lens. The focus point can be controlled using a joystick on the camera, and is very useful when composing. There’s no need to “focus and recompose” as you can just move the focus point where you want. The Sony A900 is the only camera to sport a function called Intelligent Preview. Basically with Intelligent Preview you take a preview image, you can view it on the camera LCD for a few seconds, and make any adjustments necessary. On other cameras you just take an image, so at first I thought “who cares?” The face is, for light checking and shooting with the popular Strobist techniques, Intelligent Preview is a very useful feature. It allows you to fire the strobes and check exposure very quickly without filling up your memory card with test images. And when the full RAW images are 35 Megabytes in size, the Intelligent Preview feature actually saves you a lot of time and storage space.

No camera can produce an image without light. For the lighting, the Elinchrom BxRi flashes were triggered via the Skyport radio system and worked flawlessly. I hooked the Skyport camera trigger up to the A900 using a hotshoe adapter from Gadget Infinity, which enables connection of a standard 1-pin flash to the Sony/Minolta flash mount. The power of the BxRi flashes can then be adjusted directly from the camera. This is ideal when you don’t have an assistant and have a number of lights set up. There’s nothing more annoying than standing around while the photographer fiddles around with lighting equipment.

Alexandra_I-2.jpg

And what is the result? Perfection mon ami, perfection. The tones and colors from the A900 are fantastic. I shot Alexandra in a few different sets against green, red, and grey backgrounds. This included everything from a yellow dress to posing with a Katana and a severed Barbie head necklace. During the pre-shoot brainstorming stage I remember I was thinking something like, “Wouldn’t it be great if she was hunting Barbie dolls in the jungle and then cut off their heads and made a necklace?”

Margarita_I.jpgThe A900 on Location

I was contacted by Margarita via Stylished (she’s also on Model Mayhem). I wanted to do some photography in an urban environment, so we headed to the old industrial area of Winterthur and moved around the old Sulzer industrial-area-turned-hip-living-area. For this shoot I used the Sigma 70-200 HSM and a Sunpak 120J with a Kacey Beauty Reflector. I always use the TR-II battery pack with the 120J, as I can shoot almost all I like without worrying about battery life. I also had a Sunpak 383 with my Orbis ringflash adapter for added fill when needed. Margarita and I did a few different sets in the Sulzer parking garage and then outside. The A900 and Sigma combination was very nice. The Sigma includes an in-body ultra sonic motor, giving fast and accurate focusing. The 120J and Kacey dish is my favorite location lighting kit. Margarita posed against concrete walls, walked around the old industrial space, and contrasted quite well with the steel framework of the place.

Many people say you don’t need the 24 megapixels of the Sony A900, and this is probably true for me as well. However, more important then sensor count is the full-frame 35mm sized sensor. This means you’re able to use the bokeh qualities of your lenses the way they were designed to be used. In the Sulzer garage you have sunlight filtering through the roof and wall windows, I balanced this with my strobe and opened up the aperture of the Sigma lens to get fantastic background blur – an ideal portrait setup. I grabbed the super bokeh frames and then posed Margarita against the steel columns. I placed the Kacey dish just out of the frame to light Margarita’s upper torso and the steel column. Light fall-off from the Kacey dish was as fantastic as ever. Every time I use it I’m happy I bought it.

Margarita_I-2.jpg

The Amazing A900 Files

I’ll be honest, I gag every time someone says something like, “I take real photos, I get it right IN-CAMERA and never use Photoshop.” The images I see in my head can rarely be captured in-camera. Many times they are, but like my paintings, the final image only starts with what I capture in-camera. The ability to manipulate your images in the post-processing stage depends heavily on how much information you’ve captured in-camera. So if you have a 24 megapixel image which isn’t focused properly, the shadows of the image will have poor definition and you’re limited in how well you’ll be able to manipulate those shadows, limiting your vision with Photoshop. The RAW .ARW image from the A900 are beautiful. You can shoot in normal or cRaw, the compressed .ARW format. The uncompressed RAW files are like 35 Mb, and the cRAW are like 24 Mb. Good money says you won’t see much difference between the two formats, and I’m shooting everything in cRAW at the moment. Now, I bought the A900 to get significantly better shadows texture and dynamic range than I was achieving with the 7D. Am I happy? Yes – fuck yes, I am ecstatically over-joyed with the shadow texture and post-processing ability of the A900 RAW files.

But beautiful files eat up a lot of CF card space when you’re like me and only have 1 and 2 gigabyte cards. But given how cheap these things are, I plan to be shooting with 4 or 8 gig cards with the A900. During shooting I copy the A900 files to my HyperDrive Space, then hook that up to my Mac Quicksilver 2002 G4 and copy the files using Adobe Lightroom. Basic adjustments are done in Lightroom, then choice images are exported to Adobe Photoshop to achieve the vision then fine-tuned again in Lightroom before final export to Flickr or for printing. I’ve been told you can just shoot JPEG with the A900, but I can’t figure out why. If you’re shooting JPEG with the A900 you probably don’t need the camera and should sell it to me at a good price so I can have a backup body.

So…

Is the Sony A900 a sweet camera? Yes. Should you buy one? Yes, if you want a fine camera which produces fantastic files, has a speedy focus, handles really well. I kept my Minolta 7D for a long time, and I plan to keep on shooting with it, but I also plan on shooting with the A900. The 24 megapixels are over-kill for many applications, but when you want the fine shadow textures and ability to mainuplate the light of an image, the Sony ARW files are heaven to work with in Photoshop and Lightroom.