Cameras

Canon G10 – Climbing Camera Review

Hand-1.jpgI picked up the Canon G10 for a trip to the States where I would be traveling between San Diego and Los Angeles, including a mountain excursion to San Jacinto, and it seemed like the right time to buy. However, as I live in Switzerland and am sometimes active in the mountains, I’ve started taking the G10 on climbing and mountaineering excursions. This is my functional climbing review of the G10 as a mountaineering camera. A climbing camera needs to be as small and functional as possible. Climbing partners sometimes get pissed if you bring a Fuji GA645 or Sony A900 up north ridges. I’ve reviewed the Ricoh GR Digital (GRD) for climbing in the Swiss Alps, so it seemed like a good idea to do the same with my Canon G10.

Why the Canon G10?

First, from a specs perspective, why the G10? The G10 sports a 28-140mm lens in 35mm format. This gives good coverage for landscape and telephoto for portraits. In addition it shoots RAW and has a 14.7 Megapixel sensor. This is a pretty sweet combination of features, topped off by the fact that the manual control interface is almost as good as the Ricoh cameras (GRD, GRD-II, GX100/200). So far I’ve shot with the G10 in the San Jacinto wilderness in California, on a bike-mountain tour on Glarnish, sport climbing in Ticcino, and up the Braunwald klettersteig in the Swiss Alps. In general, it works very well for climbing. The battery last forever, even when the temperature drops below zero an I’m shooting sunset shots in the snow. It records RAW files instantly, and I barley have to wait before taking another shot. The manual interface is nice, allowing full camera control, exposure compensation, ISO settings, etc with a few movements of my fingers.

Braunwald-1.jpg

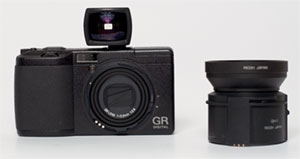
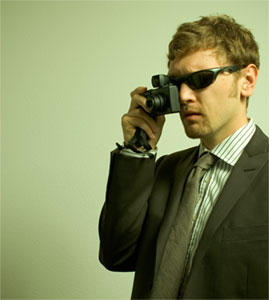
When you’re actually climbing (not setting up shots of other climbers), a camera is really only functional if it can be used with one hand. You occasionally get to use two, but most of the time at least one hand needs to be on the rock or rope belay. This is where the Ricoh still beats the Canon design. The Ricoh GRD can be almost completely controlled with the right hand. Using the custom function button you have full access to file format, exposure compensation, ISO setting, macro focus, flash, metering area, shutter speed, aperture, pretty much everything the camera can do. With the Canon G10, you have the speed wheel, which acts to control shutter or aperture and choose things in menus. Exposure compensation is on a click wheel on the top left of the camera, ISO selection is on a click wheel on right, while flash, macro mode, and menus can be controlled with the right hand using buttons near the speed wheel. From a control layout, the Canon G10 doesn’t measure up to the Ricoh GRD. The Ricoh is king in user interface design.

San_Jacinto-1

G10 vs. GRD

The main problem with the G10 interface is that exposure compensation can’t be controlled with the right hand while holding the camera. Further, ISO is controlled by the click wheel, which isn’t as easy to do as with the Ricoh. This is important for small sensor cameras, because if you over-expose the highlight areas, you easily get a blown out image, instead of a properly exposed one. It’s easy to avoid blown highlights by checking the live histogram and dropping the exposure on the Ricoh. But with the Canon G10 you have click the exposure wheel on the top left of the camera body, something which isn’t easy if you’re left hand is occupied holding your body to a rock face. If you have to pick between bodily injury and exposure compensation, you should choose the former, or get a new digital camera. This limitation can be sidestepped by shooting in aperture or shutter speed mode, but I still find it limiting. If the G10 had the ability to press a button and choose these things like the Ricoh does, it would be a much more functional camera in the mountains – and for implementation that’s nothing more but a firmware addition by the Canon people. Still, I’ve very much enjoyed taking the G10 on mountain trips. It’s reasonably small, the picture quality is excellent, and I wonder why people feel the need to buy a Rebel DSLR when the G10 will probably give all the quality and functionality which most people need in a camera.

Flowers_Bokeh-1.jpg

Macro Goodness

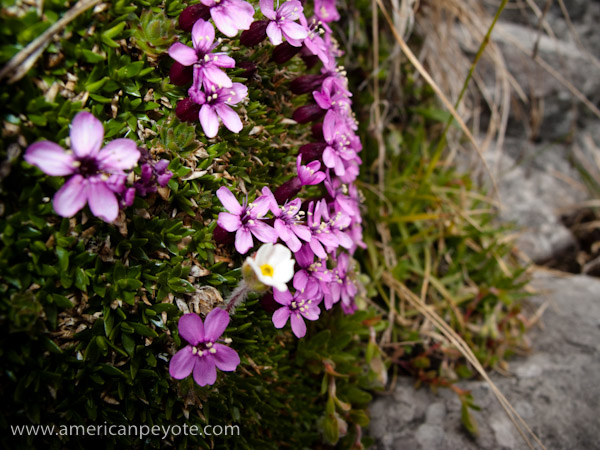
The G10 includes a macro mode, much like every other digicam. In the late spring and early summer the mountain wild flowers take over after the snows melt away, and Braunwald is known as a sort of mountain flower paradise. It’s nearly impossible to walk around the place without killing at least a few violet or yellow beauties with your boots. Naturally I had to stop and take a few generic flower photos. As I had packed light on this trip, I didn’t use any strobes, and instead used the on-board flash for a bit of fill. To take this flower photos I dialed in a an exposure compensation of about minus 1/2 or minus 1 and focused on the middle of the flower patch.  The bokeh from the G10 is actually fairly nice. For these close-up macro type images the blurred background doesn’t distract from the sharp part of the image. The on-board flash does a good job of adding just enough light and not overpowering the exposure, of course, it’s best to control this using the exposure dial. When you have two hands free to operate the camera it’s very easy the intuitive to dial in manual camera settings and fine-tune the exposure, I just wish it was a tad easier to do with just one hand.

Beyond Snap Shots

The mountains beg for landscapes, I sometimes shoot with a GigaPan, but it’s far too bulky and heavy for most of my mountain trips. I sometimes shoot with a tripod and pan, other times I just rotate the camera and guess that I’m keeping the nodal point reasonably centered. I process my panoramas in PTGui Pro, which works equally well stitching two or two hundred images together.

Pano_800px.jpg
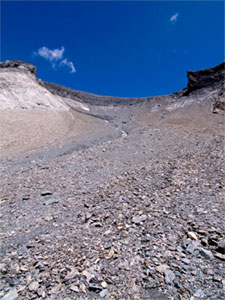
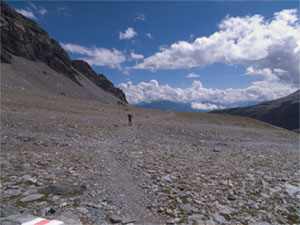
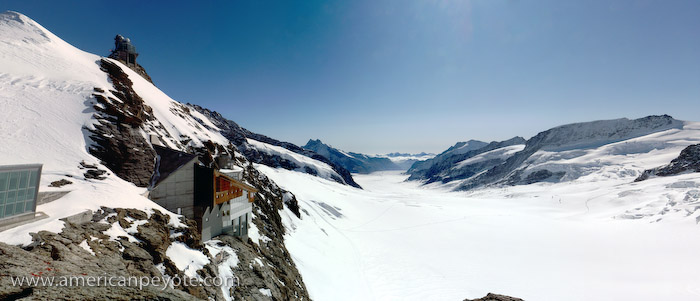
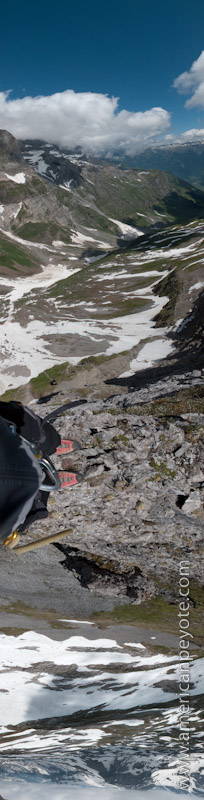
I took the G10 on my climb up the Eggstock in Braunwald. This is a klettersteig climb, you don’t have to worry about having a climbing partner and can cruise up the mountain with ease. I used the G10 to shoot perspective images, document the climb, and take a few landscapes. Generally I had the G10 slung in front of my, and shot with one hand while holding on to the rock with my left. After climbing up the Eggstock klettersteig I continued along the blue alpine route, which follows the ridge of the mountain, eventually leading up to Bos Fulen. If you follow this ridge it eventually becomes as wide as a pair of La Sportiva Trango S mountaineering boots. I took this time, standing on the edge between a moderately dangerous tumble on my right, and a suicide-sure-to-be-dead fall on my left to shoot a quick panorama. Yes I was wearing a harness, no it wasn’t connected to anything which would have saved me (sorry mom). Yes the rock in this area is a tad sketchy, and I soon decided to climb down rather than to continue and risk the rock collapsing under me, hoping I would fall to my right rather than the 600m drop-off to my left. You don’t want to be fiddling with camera settings when you’re trying to take a panorama like this. If you get distracted and forget to balance it’s rather easy to kill yourself, so I was happy that I was able to easily meter the scene using the live histogram, lock exposure with manual settings, and take a succession of shots for the final panorama before coming to my senses and descending.

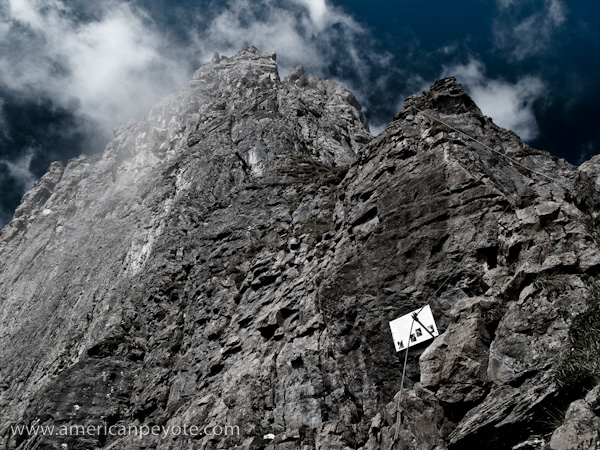
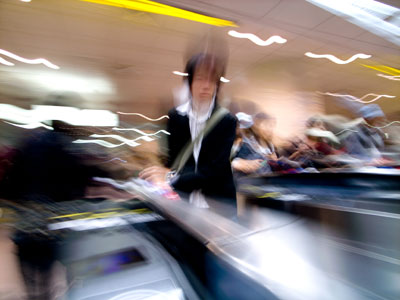
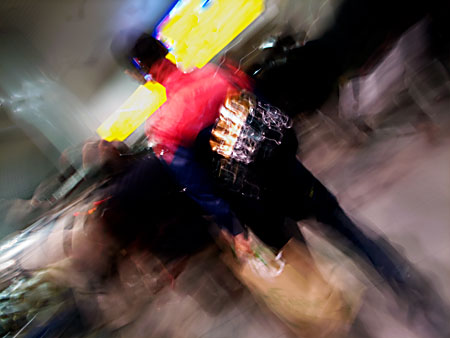
Aside from the handling and image making capabilities, the G10 produces decent files for post-processing.  The resolution of the G10 matches and exceeds that of many DSLRs, but it’s the ability to manipulate shadows and the textures of life which fascinates me. The post-processing capability of images is where small sensor cameras deviate from DSLRs.  With better rendering of shadows and capturing the dynamic range of a scene.  This is where a camera like the Minolta 7D excels compared with, say the Canon G7. In the first two images featured here, I processed the images in Adobe Lightroom and Photoshop CS3. Generally if you post-process small-sensor images, you can manipulate the shadows a bit, but pushing the exposure too much in Photoshop will blow everything out and you end up with a mess. With the G10 images, I can add a black+white conversion layer to bring out the shadows and the desaturate a bit and kick up the exposure a bit to bring out the clouds.

Happy?

So, is the Canon G10 a sweet mountaineering/climbing camera? Yes, I would say that it is. The combination of functionality and image quality is really fantastic. In the Alps it’s easy to have fantastic weather, and the G10 takes beautiful images when the light is right and you don’t have a huge span from light to dark in your image. The flash works well to balance the exposure when you have a foreground subject in the shade and the background is bright and beautiful. I hardly ever use the viewfinder, and enjoy composing with the LCD, getting the exposure right with the histogram and then snapping a photo. The battery life is excellent, and I have not experienced any battery drain issues associated with cold temperatures, something which is a huge short-coming of my Ricoh GRD. With the Ricoh I have to keep the battery warm in my jacket before shooting, and with the G10 I can just shoot away.

I’m eager to see what comes from the niew micro 4/3 sensor cameras. The new Olympus E-P1 digital Pen camera will no doubt be a serious contender for my next mountaineering camera, likely with better dynamic range than the G10. But don’t count out Ricoh. Word on the digital street is that Ricoh is entering the micro 4/3’s arena with a small DSLR type camera, which will for sure be a sweet climibing camera, especially if they’re excellent user interface deisgn is retained.

GigaPan Panorama Camera Review

GigaPan-2.jpgThe GigaPan is one of those, I have to have it gadgets that any no-life photographer salivates after. The concept is simple and perfect, turn a pocket camera into a Gigapixel producing machine. It was developed at Carnegie Mellon University with support by GoogleCMU and the NASA/Ames Intelligent Robotics Group. The term Gigapixel became popular a few years ago in Geek photo circles when people started stitching multiple images together to create extremely high resolution images. This allows the creation of images which could provide for the archiving and exploration of our world in a way never before possible. The super-high resolution image can be zoomed in on, and minute details of the world explored. This is all great, but when I finally received my GigaPan from the Beta program, I sort of lost interest in creating gigapixel images. What was probably one of the first GigaPans in Switzerland sat on my desk for a week, and in the interest of actually using it for something I loaned it out to a photographer who had time to play with it. Then I got inspired again and took it back. The point of the GigaPan is to take a large number (like 50, 100, 200 exposures) of images with the camera set on it’s maximum focal length (and therefore it’s highest resolution for a given scene). These are then stitched together, creating images in the 50 Megapixel (at the low end) to the multi gigapixel range. This is great, and I’m sure many photographers are using the GigaPan for it’s intended purpose, so the scientific researcher in me decided to go rogue and mount a wide angle Ricoh GR Digital instead of a normal point-and-shoot digital like a GX200 or Canon G9/G10.

My desire is to eventually use the GigaPan to create automated panoramic images for 360 degree visual environments as one would find at VRMag. As I don’t know how to make these interactive environments just yet, I started by taking more traditional mountain landscape panoramas. There’s an advantage to using a wide angle camera with the GigaPan. If you use a camera with a long focal length (100-200mm) which is continually zoomed to it’s maximum focal length, then it will be difficult to take descent images with foreground objects, since these will most likely be out of focus with respect to the background. With a wide angle lens and small aperture however, it is much easier to get both the foreground and background sharp in focus. Thereby you can create panoramas that better represent the local environment around the GigaPan, instead of just capturing a far-off scene.  For this intended application, the Ricoh GR Digital with it’s fixed 28mm, and add-on 21mm and 40mm lens options seemed like the perfect camera to use with the GigaPan.

My first outing with the GigaPan was to the Jungfraujoch, “the Top of Europe.” My parents were in town and I took them up to the Jungfraujoch, a train stop and observation station at something like 3454m in the Swiss Alps. It’s a “must stop” on numerous Swiss tours and is a fantastic money-maker for the region. Actually, I think the entire tourist economy of the Swiss Alps is tied to the Jungfrau Bahn, and without the train the country would fall into a crippling recession (yes, I exaggerate). Since the GigaPan is realistically too large, bulky, and heavy to take on a climbing trip, the Jungfraujoch provided a painless way to test the GigaPan in the mountains. The weather was as perfect as I have ever seen in the Alps.  I shot with the Ricoh  GRD and the 40mm GT-1 add-on lens.  This allowed me to test how well the GigaPan and panoramic software would work with a moderately wide angle lens, and provide a good technical basis for later projects, which will utilize the 21mm lens.

Jungfraujoch_Gigapan_I.jpg

Setup

Ricoh GR Digital
Ricoh GT-1 40mm lens
Manfrotto 055PROXB
Manfrotto 486RC2 Ballhead
GigaPan Robotic Head

Ease of Use

The GigaPan is easy…I mean, jaw-dropping-drunk-dialing easy to use. There’s some video tutorials on YouTube, but I was able to figure it out before the first video was halfway finished. There’s only a few buttons to push, and all you do is set the top left and bottom right hand corner of your panorama and push the start button. The field of view of your camera can be calibrated, so you can use wide angle or long focal length lens without any fuss. The battery life of the GigaPan is supposed to be an issue, but it outlasts the batteries of my Rioch, so I’d say I haven’t found the battery life to be an issue. I used basic rechargeable AA’s, I imagine battery life would become an issue at low temperatures.

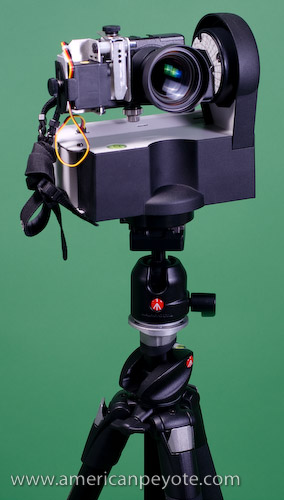
A key to creating good stitched panoramas is accurately centering the camera on your panoramic mount and figuring out things like the nodal point of the lens and other important details I don’t care about. I deal with technical details in my research work, I avoid them with my photography. In this respect the GigaPan rocks, because it has a marker for exactly where the lens should be in relation to the camera mount, so all you have to do is attach your camera with a screw and center it on the mount. I’m under the impression that given the small physical size of a compact camera lens, the exact location of the nodal point of the lens in relation to the rotating base isn’t as critical as with a DSLR. There’s a bubble level on the GigaPan which makes leveling the camera quick and painless, which is also important for creating images which are aligned well and makes the stitching process easier. My Ricoh GRD with the GT-1 40mm lens just barely fits on the GigaPan, but this is because the 40mm add-on lens is wider and physically larger than the GigaPan was designed for. For the automation process, a robotic arm depresses the shutter release on the camera to take a picture, and then moves to a new position and takes another image, and so on till the pano is finished. The camera has to be pre-focused (generally focused to infinity) and the exposure needs to be locked so the images can be accurately stitched together without exposure mismatches between images. In this regard the Ricoh GRD, GX100 and GX200 cameras are perfect, because all those operations are extremely easy to do on those camera models.
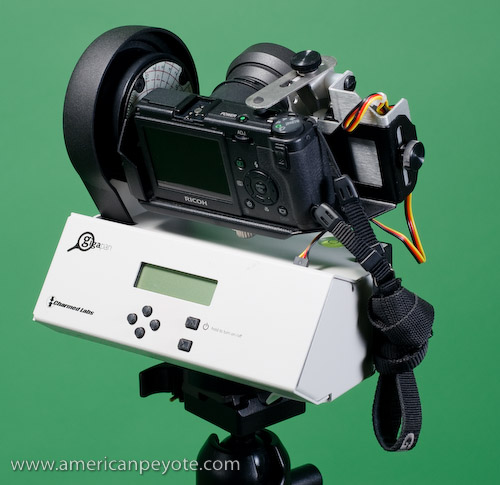
GigaPan-6.jpgDesign

This is element which stands out in my mind. The GigaPan looks like it was designed in a lab because it looks like a piece of boring lab equipment. I say this from the viewpoint of an academic researcher who has spent various nights in front of boring box-like designed lab equipment pieces, and who is now dreaming up designs for his own furniture. I mean, seriously, it’s beige, it’s made of bent metal, and the body is as angular and unsexy as possible. In the future, I highly recommend that the GigaPan design be outsourced to the CMU School of Design as a student project. I had high hopes of being able to take the GigaPan on climbing trips, but my climbing partner nearly flogged me to death with a quickdraw when he saw that I had taken my Fuji GA645w, Rioch GRD, and a small Velbon Sherpa tripod on our last Alpine attempt up the North ridge of the Weissmies. So, tossing the GigaPan and full tripod in my climbing pack is sort of out of the question. As I’ve left the academic research world and become a full-time simulation/optimization engineer, I know for certain that the GigaPan could be redesigned to be lighter and more functional. Future versions are said to include plans for a DSLR GigaPan, and I can’t imagine how large and heavy such a design would be if the current GigaPan were simply scaled up.

Panorama Processing

As part of the GigaPan program, free stitching software is available from the GigaPan website. This is great, except that I use a dual 1 GHz G4 PowerMac and the software only runs on Intel macs. This was fine though, because I purchased PTGui Pro, which is one of the best panoramic stitching programs on the market. I chose PTGui because Hugin, the free Canon stitcher, and Photoshop CS3 all proved inadequate for the job of stitching 20-200 images together. Plus, as I’m using a wide angle lens for my panos, I figured it was better to use software optimized for different panoramic stitching techniques, where I can choose and optimize my control points, image distortion, and exposure of the images. I’m pretty sure that the GigaPan stitcher software was programed with the idea of people shooting with their cameras zoomed in to the maximum focal length, on the order of 100-200mm, which is exactly what I’m not doing. PTGui Pro is as painless to use as the GigaPan, and makes quick work of any number of images which require stitching. It just takes a while to stitch 200 images because my computer is slow by today’s standards.

GigaPan-4.jpgBrass-Tacs

The GigaPan is a fantastic piece of equipment for the lazy panoramic photographer, or those who actually want to make Gigapixel images for research and exploration of our world, or photo geeks in general. It’s painless to use, portable for many applications, and is pretty hard to screw up due to its simple design. I didn’t find battery life to be an issue and it’s pretty cool to shoot with. Everyone stops by to check out what you’re doing when you shoot with a GigaPan. Kids will be amazed that you’re shooting with a camera that looks like a mini anti-aircraft weapons system, their Dads will ask you questions, and in general women will probably be turned off by the fact that you have the least sexy panoramic camera mount a person can buy. But I digress, good design is the combination of form as well as function, and what the GigaPan lacks in style it makes up for in terms of function. In some ways shooting with the GigaPan is like wearing a colorful pair of Onitsuka Tigers on a fine Autumn afternoon. You get noticed wearing Tigers and it’s the same with the GigaPan. Now, Imagine if the GigaPan were designed with a body style other than “as-unsexy-as-possible” and a color other than beige? Imagine the possibilities when I could wear my Onitsuka Tigers and shoot GigaPan Berlin city panoramas in style with an air of well-designed confidence.

Essential Links

GigaPan.org
Global Connection Project
GigaPan Video Tutorials

Panasonic LX3 and Elinchrom Coffee Madness

For the first two years of it’s genre, the Ricoh GRD, GX100, and Canon G7 were the top compact cameras in the marketplace. This has changed as camera companies have realized that yes, photographers do want high quality image making ability in the palms of their hands. Currently, the high quality compact camera field includes the Ricoh GX200, Ricoh GRD (II), the Canon G10, the Nikon P6000, and the Panasonic LX3 (we’ll ignore the Leica clone model). Ah, and the Sigma DP1. Many reviews are out on these tools, but I have a will to be weird, so when Matt emails me and says we should test out his new LX3 in my new home studio, I says “Hell Yes” in my heads.

Matt picked up the Panasonic LX3 for an upcoming bike tour in Asia, I just got a studio background system, Matt has a set of Elinchrom Ranger Rx flashes, and I have a new coffee pot and set of vintage coffee cups. The keen reader might be able to guess what’s coming next, but I’m about to tell you so it’s irrelevant. There’s a shot I’ve been replaying in my head for a while, a person trying to sip a bit of coffee as it flies through the air, just out of reach of their lips. This is easy to imagine, but slightly more complicated to realize. You need good lighting, a fast shutter speed to capture the coffee in the air (with tack sharpness) and you need a place to do it. With Matt’s email, I knew all the elements were now in place.

Now, we had other tools to do this shot, I have a Minolta 7D, Matt shoots his professional jobs with a Nikon D300, and we both have access to excellent rental shops in Zurich, where you can get whatever you need from Canon to Mamiya, from Leaf to Phase One. But we wanted to explore the LX3 and see how it works in the studio. Does it make sense to use a $2000 lighting kit with a pocket camera? Hell Yes I says in my heads.

Technical Details

The Elinchrom Ranger system was fired using the Skyport radio trigger system, as the LX3 has a hot shoe, this worked flawlessly. The Ranger RX system has a flash duration around 1/2250 sec. depending on the power setting (according to the Elinchrom specs). This is one reason to use a top-of-the-line lighting kit like the Ranger system over my Strobist-inspired Contax and Metz flashes for capturing coffee in the air. With such a short flash duration, you can freeze moving liquids with super precision. Additionally, we used Matt’s Elinchrom Octa box, which provided beautiful wrap-around lighting – and makes my small Alzo softboxes look like, well, small, inadequate light modifiers (for this application).

The full setup included an Apple Green background, and me kneeling on the floor with a few towels laid down to protect the paper from the incoming coffee splatter (only partially effective). We had a system, Matt counted one….two….three, and at each number I moved….left…..right…..left, and at the same time propelled the coffee cup in the air and tried to catch the flying liquid with my lips. Then I would wipe up all the coffee splatter that missed the towels and had landed instead on my new wood floor. This took a few shots to get the timing down, but after a few tries and two beers we were getting acceptable results. One main difference between DSLRs and compacts is shutter lag and focusing time. To get around these limitations Matt pre-focused and locked the focus on his LX3. This essentially eliminated the shutter lag problem. He shot with a shutter speed of 1/1000 and an f-stop of f/8. There were no problems syncing the flashes at this speed, the Skyport system worked much better than my Chinese radio triggers in this regard (high speed syncing). This of course highlights one reason to use the LX3 instead of a DSLR or a digital back system, theoretical high-speed syncing on the order of 1/2000. Chase Jarvis did something similar in his Kung Fu water droplet tutorial. But you really don’t need a $40,000 camera system to capture liquid in the air. In fact, you’re a tad limited if you do pick the Hasselblad because if you use a $40,000 Hassy system you’re limited by the sync speed of the camera. To work around the shutter sync limitation one would generally decrease the ambient lighting in the studio, open up the shutter of the camera, and then fire the strobes separately to capture the action, and close the shutter. The exposure is then determined by the flash exposure and aperture setting of the lens. This technique requires a bit of preparation for each shot. With the LX3 and it’s high-speed sync abilities combined with short duration Elinchrom strobes, you just point and shoot, which is the whole point in using a point-and-shoot camera. ?You’ll need to fiddle a bit with the strobe power setting and aperture setting on the camera, but it only takes a few seconds. ?In this setting the shutter speed was around 1/600, but a lower speed could have been used as well, the exposure of the scene being dominated by the strobes.

The Results

The combination of studio lighting and the LX3 really surpassed what I was expecting. The light quality produced with the Octabox combined with the short flash duration of the Rangers made it possible to freeze the flying coffee with a texture and definition I was not expecting. When combined with the resolution of the LX3, and it’s superb Leica lens, you get a tack-sharp image with excellent color and dimension. The combination of a small sensor camera with a small aperture also meant sharpness across the image. As the LX3 RAW format is not widely supported, Matt shot in JPEG, which was fine for this application. We’re not planning on blowing these images up to large sizes and the exposure was perfect, so the difference between a RAW and JPEG image in this shoot was fairly minimal.

There’s one thing I’ve learned since I started shooting with a Ricoh GRD a year ago, and is reinforced here: pocket cameras, like all tools have limitations, but when the right light is used, the resulting images can be as jaw dropping as those taken with DSLRs. Lighting and composition are generally more important than megapixels, and it’s one reason why I’ve added more flashes and modifiers to my toolbox instead of a new DSLR (but the Sony A900 is oh, so, so tempting). Still, if you’re getting a pocket camera, it’s good to know it can be used in a variety of situations. Like the Ricoh GRD, the Panasonic LX3 works great in the studio environment. When Matt emailed me about shooting with the LX3 in the studio I was afraid I would be motivated to pick up an LX3, but the experience was worse, because now my eyes are set on the new BXri 250/500 Elinchrom flashes announced at Photokina.

About the photographers:

Matthew Anderson recently moved to Switzerland and is currently engaged in the art of producing beautiful wedding photography and the precision of imagery for commercial clients.

I technically didn’t do much photography here, and was more of an art director, have little of a life and fill the void with photo gear.

Ricoh GR Digital – Climbing Review

Fuji GA645wi Ricoh GR DigitalOne reason I bought the Ricoh GR Digital (GRD) was to use as a climbing and mountaineering camera. What follows is a user review and my impressions of the GRD in the mountain environment.

I live in Switzerland and mountain trips are frequently on my schedule. A basic day trip involves an elevation gain (and equally large loss) of 800-1200 meters, and involves hiking, rock scrambling or sections of actual climbing. This means that any weight savings makes a difference in terms of how fast and how far I can go on any given trip. It also means that if I want to use a camera, I don’t always have the benefit of using two hands when taking a picture. Sometimes trips just need to be documented, a shot for the blog, or just to record the day. Other times I go with the intention of bringing back some good-looking, printable photos. My current list of cameras includes: Contax G1 (28,45,90mm lenses), Fuji GA645, GA645wi, Minolta 7D.

In general, none of these cameras have been ideal in the mountains, although the Fuji GA cameras come pretty close to being perfect for landscapes. The Contax G1/G2 is a good choice, but if I’m just documenting a trip, then I don’t need or want to go through the costs of processing 35mm film, and then taking the time to scan the images. Plus, while 35mm film can produce some very nice detail and colors, it leaves me wanting more for landscapes. The Fuji GA645 and GA645wi are my favorite film cameras for mountaineering, but (aside from the developing costs) they don’t have a close focusing distance, which only makes them good for landscape shots, and is not ideal for focusing on close objects. The Minolta 7D is great, but generally needs to be accessed from my backpack and can’t be comfortably held with one hand for shooting purposes. Plus, a 7D with lenses is not a light kit to carry into the hills.

Climbing Ricoh GR Digital GRDFrom a certain perspective, the Ricoh GRD was seemingly made for mountaineers. The fixed 28mm and 21mm add-on lenses are ideal for landscapes and the camera is incredibly compact. In fact, it’s not a stretch to call the Ricoh GRD (and GRD-II) as well as the GX100/GX200 some of the most compact wide-angle cameras on the market. In addition, the GRD is incredibly light. The Contax G1/G2 is also a compact camera, but it isn’t really light from a pack-weight point of view.

My first mountain trip with the Ricoh GRD was up Mt. Fuji in Japan, where I also took my Fuji GA645wi. The Ricoh performed wonderfully, but since Mt. Fuji can’t really be considered more than a hike, it wasn’t until I got back to mountaineering in Switzerland that I could get a feeling for how the GRD performs in a mountain touring environment, which is the focus of this article.

To date, I’ve taken my GRD ice climbing, mountain touring in Graubünden, hiking up Säntis in the Alpstein, and climbing on a klettersteig in Braunwald. I plan on ascending some higher peaks and undertaking some longer tours soon and think the GRD will be up to snuff. There are a few main criteria I’ll be focusing on including how well the GRD can be operated while climbing, it’s attributes such as the LCD screen, and creating good exposures in the mountains.

Braunwald Klettersteig Ricoh GRDOperation – One of the GRD’s strengths has always been customization and user control. I can hold the camera up to a scene, automatically see if the histogram looks good, and if not, two small clicks on the exposure compensation button and I know I can take a picture without blowing away the highlights. Similarly, the ISO, focusing mode, file type/size, shutter speed, and aperture can all be changed within a few seconds using one-handed operation. I can’t do that with any other camera I own without the risk of dropping the camera. While seemingly unimportant or at best a convenience for city use, when one hand is holding onto the mountainside, one-handed operation really does make the difference between possibly falling or getting the shot I want. With the GRD I can easily have my left hand secured on a handhold while operating the camera with my right hand.

Image Quality – As a small sensor camera, the Ricoh GR Digital obviously can’t compare with DSLRs or medium format film cameras for image quality. However, you don’t always need a perfect landscape image worthy of pixel-peeping. For trip documenting and small prints, the Ricoh GRD does pretty good. When the images are exposed correctly the contain a great deal of detail and you won’t have a problem creating large prints. Small sensor camera image quality degrades as ISO increases, however, in the mountain environment you generally have more than enough natural sunlight to create exposures with shutter speeds above 1/200 using ISO 64 (the base ISO of the GRD). Since these landscapes will nearly always be with a low ISO, noise won’t be much of an issue. I love the colors I get from GRD files and so long as the images aren’t over-exposed you’ll be pleased with the results.

Braunwald Towards OrtstockRAW Write Time – This is by far the greatest drawback of the original GRD. When deciding to buy the GRD, one of the biggest draws was its ability to write RAW files at a time when pretty much every other pocket camera would only do jpeg. Depending on SD card type, the time to write a RAW file is about 9-12 seconds using the original GR Digital. Many users have produced reports detailing which cards write faster, but generally the difference is only a few seconds at best, and the three cards I have all write at different speeds. Depending on your shooting style, for landscape use the RAW write time is sort of irrelevant. With the exception of creating multiple images for stitched panoramas, I haven’t found the long write time to be a significant problem for landscape images. On the other hand, when you’re moving fast over a mountain landscape and trying to document the climb, I would no doubt love the improved RAW write time of the GX100/GX200 and GRD-II, which from what I read are on the order of 4-5 seconds.

Battery Life – At least with the GRD (not considering the GRD-II as I haven’t used one) the battery life and performance could be better. I find that I’m always getting low by the end of a climb, and although I always carry a second battery, this is one area that I would like to see improvement in. For multi-day trips nothing sucks more than running out of juice, which is one reason I still love my Fuji GA and other film cameras, as I’ve never had a similar battery problem. Cold also seems to be an issue, and hampered by ability to use the GRD while ice climbing during December.

LCD Screen – The LCD screen on the GRD leaves much to be desired in the mountain environment. It just sucks in bright sunlight, and is only good for framing the subject. I do have the external viewfinder, and I’m glad I bought it, but don’t use it very much in the mountains. Since the live histogram is available (and easy to see in sunlight), I’m of the opinion that having a perfect image on the LCD screen isn’t really a big deal. More exact framing can be accomplished with the aid of the external viewfinder. Here’s the thing, If you can monitor the histogram, you know if the highlights will be blown and can adjust the exposure as you like. It doesn’t really matter if you have a bright, perfectly defined image when framing a shot. Often times upon review, the images on the GRD LCD screen look extremely dark in bright sun, but when reviewed later indoors, the images are perfect. As long as you base your exposure on the live histogram, the quality of the image on the LCD is somewhat unimportant. The lack of a live histogram display is one big reason I’ve decided not to buy the Sigma DP-1. The live histogram is invaluable in producing well-exposed images the first time, and eliminates the need to reshoot a scene. It’s one of the things I love about digital cameras to start with, and the primary reason I want live-view in the next DSLR I buy (probably the Sony A900). As the DP-1 lacks this seemingly basic function, I’d rather take a Fuji GA rangefinder on a climb.

Edelweiss in Braunwald Ricoh GRDMacro Focusing – This is where the GRD really beats all my other cameras and is one big reason why I love climbing with it. You can get as close as 1cm from your subject to create sharp macro images of anything on a tour whenever you feel inspired. You might just think this is great for flower shots – and it is, but what I love is creating wide-angle macro shots during climbing for point-of-view (POV) images. I love getting the Ricoh close to my equipment or looking out over rock edges and creating unique shots that I haven’t seen before. The only way to get similar images with my current equipment is using my Minolta 7 film camera with the Sigma 20mm lens (very close focusing ability), which also is rather large, heavy, and also produces images with just a bit more distortion than I would like. Plus, with the Sigma 20mm you have a much shallower depth of field and a lot of Bokeh (diffused image areas), which isn’t a bad thing, but at the moment for climbing, I like close-up images with a good deal of sharpness across the image. With the small sensor of the GRD, you get really deep depth of field, and combined with the 28mm lens and one-handed operation, this means the ability to take crisp images that are more or less unobtainable with other camera systems.

Compact Size – This is one of the main requirements for a mountaineering camera, it needs as small and light as possible. The GRD is great because I can put it in a case and clip it to the chest strap on my backpack. This keeps it away from my carabiners or quick-draws, and is accessible whenever I want to shoot. It also means it won’t interfere with my climbing movements.

Wide Angle Lens – The lens on the GR Digital is very good, as has been reported elsewhere. I have the 21mm add-on lens, which supplements the fixed 28mm lens. The wide angle still sets the Ricoh apart from other compact cameras. Even the top of the line Canon G9 only has about a 37mm (in 35mm terms) lens, which is not ideal for landscapes. Distortion is very low and the lens will render a sharp image across its entire frame. For mountain landscapes, and in particular for climbing, the wide angle lenses on the GRD are unique and much more useful than those of competing cameras. Using the wide lens of the GRD I’ve been able to obtain shots in the mountains that would not have been possible otherwise.

Braunwald Klettersteig Bridge

So, Why Do I Take My Ricoh GRD Mountaineering?

Great image quality
Unique macro image ability
Low weight
One-hand operation
Live histogram display

What Needs Improvement?

Battery life
RAW write time
LCD screen performance
Image stabilization would be nice

The strengths far outweigh the drawbacks of the GRD. It remains a high quality, extremely packable digital camera. If you’re in the market for a climbing and mountaineering camera, I highly recommend one of the Ricoh designs, including the GR Digital, GRD2, GX100, and GX200. In addition to using the GRD as a traditional landscape and portrait tool, it also works well for off-camera lighting, and I plan to do more trips packing the GR Digital with a small strobe flash and radio triggers.

Further Reading:

Ricoh GRD Articles

Hiking Mt. Fuji with the GRD

Fuji GA Camera Articles

Ricoh GR Digital Mountianeering

Big Three Camera Blood Bath

Rejoice all the digital junkies of the world, for the Gods have again bestowed upon mortals trinkets and tools to again usher in a new era of digital photographic expression.

These quick and dim-witted camera update articles are some of the more difficult and revolting for photography fanatics to write. But THEY’RE NECESSARY. If I don’t post a fast word-for-word copy of the Nikon D700 press release, I’ll loose all credibility as a respectable hack internet camera writer. It’s the tools you see, not the photography technique which makes great images, and if I don’t tell people to go out and buy a D700, the quality of images world-wide will plummet like a man with wax wings flying towards the sun.

New from Ricoh, the GX200 was announced as a logical update to the fantastic GX100, one of the best compact digital cameras available. The GX200 sports a 12 megapixel sensor, and keeps the fantastic 24-72 mm zoom lens and electronic viewfinder – still in a class all it’s own without any competitors. the RAW write time will be a little bit better and the engineer-Gods at Ricoh promise an improvement in the signal-to-noise ratio. As a good priest to the Gods I can tell, nay, interpret this for you mortals…

The GX200 is better than the GX100, but basically the update is needed for Ricoh to remain competitive in a field of cameras where after 1 year on the shelf nearly every camera becomes obsolete as compared with the competition.

Ahhhh, and Nikon has finally done what Canon did two years ago with the 5D, and with the release of the D700 Nikon now offers a camera with a full 35 mm sized sensor and a price mark of $3000. In addition there’s an updated SB-900, with more power and added benefits for the Nikon flash fetishist (reference strobist).

Photo by Nikon

But what comes next? Gods have the power to bestow life as well as death…what happens when the Digital Gods become angry? No chance, digital junkies across the world are waiting for the fire storm of camera goodness sure to come at Photokina 2008, when Sony will for sure be unveiling and launching the A900 flagship camera, full-framed 35mm and 24 megapixels, the A900 will be competing against the Nikon D700 and Canon 5D-II (or whatever they call it) for market share in the bloodiest digital camera free-for-all since Canon battled Nikon in the pro-journalist and sport-shooter markets in the 1980’s and 90’s.

The end is near, make sure you buy the best glass and camera to capture it…

Sony flagship from PMA2008

Ricoh GT-1 40mm – The Sad Clown Portraits

The Ricoh 40mm is one of those fantastic photo accessories which is amazing under certain conditions, and fouls the mind when used in sub-prime environments. The Ricoh GR digital is one of the best digital cameras around, and possibly has the most legacy support of any digital camera I’ve come across. I use an original GR Digital, and bought the 40mm lens for it, what follows is my review of it’s capabilities in a controlled light (studio) environment.

The original GRD (28mm lens) was released as a stand alone small sensor camera, and additionally with a 21mm lens in a creative set. Basically, the GR Digital is the most portable and useable wide angle point and shoot digital every created, which means it’s also the most portable and usable wide able camera ever created. There were limitations of course, one being that the 28mm and 21mm focal lengths are great for city and landscape work, but more difficult to use for portraits. So it was intensely cool when Ricoh released the GR Digital II, an updated version of the GRD, as well as a new 40mm add-on accessory lens. The new 40mm lens is compatible with the “old” Ricoh GR Digital camera. A weak dollar and rampant vacation through Detroit made purchasing the 40mm add-on a no brainer for me.

My main desire in buying the 40mm was to extend the portrait capability of my GRD, by using a more patriot-oriented focal length (40mm). I use my Ricoh for controlled light (studio) portraits, often employing a “strobist” inspired lighting philosophy. One advantage of using the GRD for controlled light portraits, is that it’s so small it can be used in many situations where a DSLR is too bulky to use, like in confined-space conditions.

Wait…why use a point-and-shoot camera when you have a full DSLR setup?

There are many benefits to using a small sensor camera with studio lighting for portraits. In general, one key element of portraiture is ensuring that the eyes remain in Focus. You can have all the diffused areas you want around the subject, blur out the mouth, whatever, but if the eyes aren’t in focus, you don’t get that feeling of being pulled into the image and conversing with the soul of that face staring back at you. This is where small sensor cameras are awesome compared with DSLRs, because with the Ricoh GRD and 40mm lens, the very large depth of field means that the eyes will pretty much always be razor sharp, and you can add all the blur and diffusion you want later in Photoshop.

When you start getting into a serious camera and photography knowledge collection one thing is clear, there’s no end to it. Once you understand cameras you move on to lighting, and once you know how to light for portraits and mood, you generally get into fashion and design, and once you get past basic fashion down, the most logical step is getting into make-up. This is confusing territory for guys who aren’t into drag, so I went to the Source to get a crash-course schooling in eyeliner and foundation.

The makeup was sort of a freak accident you see. I was strolling through the Somerset Collection, an upscale shopping experience a-la-mall in the suburbs of Detroit, and after checking out the Levi’s store I wandered into Sephora. Previously unknown to me, it’s one of the prime makeup stores in the States. I walked in with a vague idea about asking for eyeliner, and a minute later found myself sitting in a chair with a makeup artist named Susan applying foundation to my nose and facial structure. 10 minutes later I was being told by everyone in the store that I looked fresh from a rock stage. I ended up dropping $100 on eyeliner and makeup. With my new look intact I headed to suitable location to make some magic.

Cramped Basement

The perfect cramped studio location presented itself in the form of my parent’s basement in the Detroit suburbs. The place is still cluttered with things like my old G.I. Joe and Star Wars toys. I found a section of wall to work with and setup my lights: one Contax TLA280 and a Sunpak 383, both placed in Alzo digital softboxes. After a wardrobe change plus a few lighting adjustments I had a set of images called:

The Sad Clown

Every photo needs a back-story:

The Sad Clown has little ambition or direction in life, schooled on the streets and usually found sleeping in the gutters of Paris, he sports a stripped sweater, yellow button-down shirt by Ben Sherman, and occasionally a sport coat by “WE” and a tie by the same label.

The Sad Clown smokes 15 year old cigarettes and laments on the laughs he cannot produce due to this wasted life on the stage.

The Sad Clown I

From a tech standpoint, the 40mm Ricoh is a sharp and rather bad-ass piece of glass. The detail from well-exposed portraits is really excellent. However, the lens is also big, and pretty much kills the convert, concealable factor, for which the GRD is known for. The 40mm also flares like a Phoenix farting in your face whenever a light source is pointed even remotely towards the front element. This shouldn’t be a surprise, the main element is massive, and sets the perfect stage for ungodly internal reflections. I had to be sure my softboxes were not directed at the camera, otherwise big red blotches would show up in the images.

The Sad Clown II

You can see in this view that the eyes couldn’t be sharper. This is one reason to use a Ricoh Digital over a massive DSLR with an 85mm f/1.4 lens, the quality of small sensor Ricoh GR portraits include very sharply defined lines – and when properly exposed, excellent subject-background separation. I don’t think it would really even be feasible to produce an image like this using my Minolta 7D, or any other DSLR, unless using a very long lens to compress the image and increase the depth of field by using a very small aperture. With the Ricoh GR and Alzo Digital Softboxes, it took 5 minutes to setup and execute this portrait in a very confined and cluttered space.

Every piece of equipment has it’s limitations, and in total the 40mm is an excellent lens, extending the usability of the GR digital system considerably. With the 21mm and 40mm lenses, you have an excellent small sensor camera system, suitable for travel, landscapes, city, portrait, and the production of unique images with studio lighting techniques. Well, actually, you can use it for whatever your heart desires – go out and make the Sad Clown smile again.

The Sad Clown on Flickr

Sigma DP1 – Revelations from the Camera Shrine

When an 800 pound Gorilla walks into a room, everyone notices.? When a world class lens company releases a new camera, few will barely have the inclination to even suggest turning their eyes to acknowledge noticing. ?Sony owned the PMA 2008 news like no other, and the other companies seemed to know it.? That’s what it means to be an 800 pound Gorilla, your competitors have to sit back and watch the beast do what it wants because there’s no way to realistically deny your presence. ?Aside from the Sony DSLR releases there was one lone camera release by Sigma, the lens company which also makes a DSLR which has one of the smallest user bases of any current camera maker.? It could probably be argued that the Sigma DSLR user bases is actually smaller than those of some defunct camera lines like Contax. ?Sigma produces lenses for nearly every camera type, from Canon to Pentax, and even for their own DSLR camera, the SD14 – a camera which has been discounted as much as any camera in history, except for those which were officially discontinued – because despite their best intentions to market a “competitor” few take Sigma seriously when it comes to making digitally enhanced light-tight boxes.? At least, until their development of a pocket camera with a large APS-sized imaging sensor.

At Photokina 2006 Sigma announced they were developing a camera from heavens, and showed a prototype at PMA 2007 of the small and powerful DP1 – which was enough to create a butterfly marketing breeze strong enough to light up every photo website on the net and generate universal interest from nearly every user group, from Canon to Minolta.

Then came the delays and speculation.? The DP1 didn’t materialize at PMA 2007 and the word “Vaporware” started to spread.? There are many examples of awesome camera products like the Pentax Medium Format Digital, which had nice mock-ups at the PMA and Photokina shows but never materialized in the marketplace.? So it was with great mega-pixel glee that camera geeks across the globe read the news of the DP1 launch at PMA 2008.

Like every camera maker, Sigma has a user base of die-hards committed to loving their products till life slips from their fingers – no matter the actual performance and usability of the camera system. ?However, Sigma is a little different than Canikon, because although their core user base will jump on any product they produce (like the SD14), it doesn’t mean that their customer base will grow by any measurable amount. ?Enter: The Sigma DP1, a camera that a lot of photographers would be willing to drop dollars on if it would only be released – and according to Amazon.com, the DP1 will be available on March 25, 2008 with a price tag of $799.

The Sigma DP1 with 14 megapixel FOVEON X3 is set to go on sale in late March.? It will have a fixed f/4 16.6mm (28mm equiv.) lens, with manual focusing capabilities, a hot shoe, optional external viewfinder, and 2.5″ LCD screen.? This means a compact camera with a high resolution sensor and a pixel size of 7.8 microns – promising to render smooth images with dynamic range beyond that of every other hand sized camera on the market today.

Now the digital camera market has come of age with a compact point-and-shoot camera with a APS-sized sensor, all the image quality capabilities of a DSLR in the palm of your hand.? In short, the God-send camera users have been calling for.? It is true deliverance from the camera Gods, a high resolution, high quality compact camera with an affordable price, something not seen since the film days when a compact Contax G1/G2 could match the image quality of any top-shelf SLR.

Of course, many people have already counted the DP1 as being a flop.? The rationale being that with a 28mm equivalent lens and a “slow” aperture of only f/4, and a maximum ISO of only 800, a number of folks don’t even want to consider it as a digital imaging tool.? Which is sort of the reception the Ricoh GRD first received, but it since risen to become a cult camera favorite.

And I would discount the DP1 too if I listened to the gadget-junky-fools on the net.? The thing is, I like to “use” the cameras that I buy, and getting down to Brass Tacs, my Fuji GA645 and GA645w film cameras (both with a slow f/4 lens) produce incredibly sharp, amazing results in a relatively small package.? The Fuji auto-focus 6×4.5 rangefinders did well in their day, but with the advent of digital the cameras didn’t make the impact they deserved and are now only found on the used market.

But the Sigma DP1 is different, it will find a profitable niche, because once people start using it, they’ll no doubt find that having a high performance tool in the palm of your hand is much better than a $2,000 DSLR-lens combo which sits around on your desk half the time because it isn’t convenient to take everywhere. ?I know for a fact deep down in my heart that at the very least the DP1 will be a killer landscape tool for the mountaineers and travelers of the world, and if a wide angle and telephoto converter were offered, (as are available for the Ricoh GRD line) it would be the perfect travel package to tool around the globe with.

Essential Links:

Sigma DP1
Sample Pics on Dpreview
Press Release on Dpreview

Ricoh GRD – Frozen Motion Street Photography

Street photography gets debated a lot in online photo forum elitist groups.  Favorite arguments will revolve around "What is Street Photography" and unknown photographers lavishing praise on figures like Cartier-Bresson – who in certain circles enjoys more mindless devotion than the Gods.

I like the idea of photography being a documentary tool, but documentary according to what?  We all perceive ideas and images in various ways, so it’s pretty hard to set down a specific definition of Street Photography.  Tokyo is probably one of the best places in the World to make street images.  The number and styles of people spread throughout the city is endless and sets an excellent stage for your humble photographer narrator.

My day to day routine in Tokyo involves taking the train from Komaba and changing in Shibuya, one of the busiest stations in Tokyo.  This affords daily opportunities to exercise one of my favorite photography styles – capturing Frozen Motion of folks heading hither and thither.

Cameras are by default used to capture static moments in time.  This often entails sharp, defined images where you can clearly see what the photographer saw.  Or was it only what was recorded by the machine?  My mind doesn’t always percieve street photography as a static scene.  I want to see the unseen image, the one I didn’t know was there – the Motion.  I want to take an image with my camera to see what it will look like.  Capturing motion is pretty easy, you just reduce the shutter speed such that the resulting images capture enough definition so everything isn’t a total blur.

The Ricoh GRD is pretty much the perfect camera for street shooting, save for the long RAW write time – in which case the Ricoh GX100 or the new Ricoh GRD2 is probably the best camera available for these types of boredom deflecting activities.  With the wide angle 21 mm lens attachment you can pull in a very wide scene, with colors and motion from everywhere in front of the lens.

Motion capture can be very cool, but it’s also very easy to make mediocre images this way.  To my eye, if there’s just enough blur to make the image appear unfocused, but not enough for any colors to mix with one another, it’s just a waste of memory card space.

Many Japanese wear conservative suits to the offices, and when mixed together this renders a sea of grey.  The element I look for is something with a bright color, a hand bag, a light colored box, something that will stand out in the sea.

The second element I hunt for is mixed motion.  If you just stand there and shoot, all the motion is in one direction, one or two of these shots are cool if you’ve never used this technique before – but gets old crazy fast.  I like capturing motion from different directions.

In Shibuya, I usually head up the stairs and position myself on the edge of the up and down directions, then I can focus on someone with a non-standard element (color, geometry) and pan on them while I’m walking past.  This means that the image is a combination of them getting closer to me while my camera is rotating, if I’m lucky I can catch one element of their person in reasonable focus – like a hand or bag.  If executed with exacting imprecision this results in an element popping out from the chaos.

The Frozen Motion technique works for me because it’s the scene which I want to capture for Street Photography.  The important element isn’t capturing and documenting the scene exactly as it occurred, I want to paint with the motion, get the random colors mixing – chaos going and freeze it in-camera.

You can try stretching the image and using motion blur filters in Photoshop, but for my taste it’s like using a Lens Baby instead of a Holga, there’s no randomness to the image – it’s all been over-engineered, and hence – boring to my eyes.

Rioch GRD II – Deliverence from the Gods

In our digital age the Gods are real and our prayers answered with ever increasing frequency.  Two years ago the Japanese God Ricoh Ltd. gave to this Earth the digital incarnation of his most special creation – the Ricoh GRD, a digital version of the fabled razor sharp Ricoh GR and GR21.  Now the prayers of GR pilgrims has again been answered, in the form of an updated GRD-II.

The Ricoh GRD-II was announced this November and is due out in stores just before December.  The GRD2 looks pretty much exactly like the GRD and sports every new feature a GR fanatic could want.  The Raw write time has been reduced to a few seconds, higher ISO images will sport less noise and a 40 mm add-on lens will be available as well as a new smaller external viewfinder. 

The coolest thing about the GRD2 is that most of this new technology will be available to and compatible with the existing GRD model.  The 21 mm lens from the GRD works on  the GRD2, and the new 40 mm lens works with the GRD.  Ricoh isn’t just releasing a marketing hyped camera to replace your year old-one like most camera makers generally do.  Once again Ricoh is actually adding value to an existing product through a new firmware upgrade and accessories.  This pretty much cements my economic commitment to Ricoh for compact cameras, with the new 40 mm lens there’s far less reason to look at a Canon G9 for a compact portrait camera.

The only missing feature in the GRD2 is shake reduction.  An anti-shake function is built into the Ricoh GX100 and R-Series cameras, so many were GR disciples were expecting it to be in the GRD2 as well.  To be honest this isn’t a huge thing for me.  I shoot with a Minolta 7D, the first anti-shake DSLR, but with my GRD I often shoot at low speeds approaching 1/10 of a second with minimal blur.  The fact is that with a short focal length lens, anti-shake isn’t such a big deal.  Does it help?  Yes, but so does a camera strap wrapped around your shoulder, and that doesn’t increase manufacturing costs of the final product.

I see the minor upgrades of the GRD2 as an affirmation of Ricoh’s place as one of the best digital camera makers.  Aside from more resolution, anti-shake, better raw write time, and a mild-telephoto lens, there was nothing to improve upon with the GRD2.  Much like the Canon G9 is pretty much the same as the G7, but with the Raw format and a better LCD screen.

Yes dear digital imaging children it’s true, in certain circles the digital camera technology revolution is starting to plateau, technology is maturing, and one doesn’t have to worry about their camera being obsolete in a year.

Ricoh GRD Review
Tokyo Strobist Ricoh GRD
Ricoh GRD on Mt. Fuji

More info at:

Ricoh GRD II Page
GRD Blog

Ricoh GRD – Tokyo Strobist and Shoestring Lighting

There are many thing to do in Tokyo, but on a Monday night after riding the metro one needs to relax. One of my favorite relaxing activities is the impromptu self-portrait session with a digital camera. This session focused on using off-camera flash with the Ricoh GRD. But here’s the problem, while checking in for my flight to Tokyo I was made aware of the fact that I was 15 kilos over weight, I’d either have to dump half my baggage or pay great fool-damned weight penalty.?While tossing things out of my luggage at Zurich I tried to cut it down to the essentials. The crampons and ice axe had to go, but perhaps a bit more regretful was leaving behind my light stand. Yes, I’ve made a habit of taking various cameras and at least one flash everywhere I fly to. As a compromise I kept the umbrella and flash bracket, thinking I’d find a solution in Tokyo.

Shooting in a cramped dorm room in Tokyo can be a bit limiting. With a desk, bed, and bookshelf there’s pretty much no room to do anything. I wanted a clear background and that meant setting up in the hallway. The cramped hallway presented an interesting shooting situation.? At only four feet wide, there was really no room for a normal camera to focus and capture the subject (me). Ah, but I had in my possession the fabled and non-standard wide angle Ricoh GRD digital camera. I setup a tripod and decided to go with the GRD and the 21mm add-on lens. This gave me a wide angle setup perfect for the cramped hallway.

For the lighting, I had a set of Gadget Infinity radio triggers to trip my old Contax TLA280 flash. The Contax flash was fired on manual mode into a 40 inch umbrella, in the narrow hallway this provided a rather large body of light, perfect for the random portrait session. However, without a stand, it’s pretty hard to set up an umbrella anywhere. To solve this problem I borrowed from my climbing mind and decided the best course of action would be to suspend the umbrella and flash (with bracket) using two shoelaces from my running shoes.

In my experience, the Ricoh GRD has been awesome for mountaineering and city shooting, but I’d never used it with off-camera strobes before. One difficulty with self-portraits is triggering the camera. The GRD has a nice interval timer, I set it for a 5 second delay and started shooting after a few test shots to get a nice exposure setting. Doing off-camera flash with the GRD was totally painless. Using the interval setting the GRD refocuses for each shot and will keep shooting till the battery runs out or the SD card is full. Five seconds is perfect for changing poses and waiting for the camera to focus.

Compact digital cameras are generally ignored with it comes to flash work, and usually have horrible small flashes that create unnaturally ugly images. The Gadget Infinity radio trigger is very small, and fits extremely well on the GRD hotshoe. It means you have the freedom to take a small flash wherever you’re going and bounce it or diffuse it for awesome lighting on the fly and create excellent flash photos, even with a point and shoot digital like the GRD, Canon G9, or any digital with a hotshoe.

The extreme wide angle of the GRD was very cool to work with. The GRD has an awesome lens, and worked extremely well in the tight confines of mine small dorm room. I took to shooting myself in various combinations of the clothes I brought to Tokyo. It’s not rocket science, the images aren’t fantastic art or crazy creative, but I like them and plan to expand on the wide angle portrait technique.

Traditional portrait guidelines call for a camera with a focal length around 85mm (in 35mm format). Wide angle lenses are generally not used since distortions in the face can be considered unflattering. I found the 21mm GRD lens just awesome for portraits. The advantage is, with a few movements forward or backward and left or right, you can control which parts of your body are slightly distorted, made larger or small due to the distortions inherent in the lens. This means you can easily modify the subject of your portraits by making parts of the body larger or smaller, distorted or normal. Positioning various parts of your subject in the distorted range of the lens can dramatically increase how the subject is communicated to the viewer of the images.

I had an awesome time shooting with the Ricoh GRD and off-camera flash for the exposure. The wide angle 21mm lens gives the brave photographer a number of creative opportunities to portray your subject in ways not possible with traditional mid-telephoto lenses. The compact size of the GRD means you can set up anywhere, and break the myth that flash and small compact cameras doesn’t work.

If you found this information helpful and would like to experiment for yourself, check out Strobist for lighting info with off-camera flashes.

Gadget Freak – Pimp Your Digital Camera

As a gadget freak, cameras are just cool to hold and use.? However, some days you get the feeling that the camera shouldn’t just be a tool to record events, but also an integral part of your look.? The classic photographer response is something like:“The photographer is an observer, and as such should be on the side-lines, recording events and being unobtrusive.”

The thing is, I’ve developed a communication style care of Hunter S. Thompson literature, and sometimes the line between participant and observer should be blurred.? That’s why the writer should be part of the novel, and the photographer part of the picture.?Choosing a camera for the night can be as hard as picking the right sunglasses.? A full DSLR might look good slung over your shoulder when wearing a Lowe Alpine jacket, but a Canon 1D type camera might be too much when sporting a pinstripe suit.? Camera pimping allows one to add or remove accessories as desired.

Pimping a camera out is pretty easy in the world of internet auctions and mail order.? The integration of cheap manufacturing and eBay means you can get whatever you want in the way of camera accessories.? That wouldn’t have been possible even two years ago.

One of the most functional and cosmetic extension for a DSLR is the vertical grip.? Most cameras are landscape oriented, so the photo frame or sensor is wider than it is tall.? But for portraits it’s often nice to make the picture taller than it is wide.? The easiest way to do this tilt the camera 90 degrees.? But then your hand is crooked, and in a non-optimal shooting configuration.? Most prosumer cameras have the option of a vertical grip, it screws into the camera base and generally includes more batteries so you can shoot longer.? The VC-7 for my Minolta 7D is kick-ass but cheap manufacturing technologies from China and commerce via eBay means you can get one for pretty much any DSLR.

The term “Photography” refers light painting, so controlling the light is essential to making images.? Light painting is easiest to do via a camera flash placed away from the subject.? Flashes are plentiful and easy to get off the used market.? Any flash that is big, offers manual control, and can swivel will add instant “cool” to any camera.? Things like flash cards add a professional look as well as providing even flash coverage, and really will improve the look of your photos.

The flash bracket is a timeless camera pimp-out.? Cheap ones can be found for any camera type, even point-and-shoots.? By moving the flash away from the lens you reduce red-eye in photos produced by on-camera flash bouncing off the retinas of your subject.? It also adds bulk and a “professional” look, and those people who don’t know that equipment alone doesn’t equate to quality photos might be impressed.? In addition, it makes the camera easier to hold and adds bulk if you need to use it as a blunt instrument to make a quick escape or are attacked in a dark alley.? A number of expensive and cheap brackets are on the market.? Some of nicer mid-priced but very cool and functional brackets are made by ALZO Digital.

What’s cooler than wireless?? It’s in computers and phones – video flies through the air like ghosts of the 4th dimension.? And now you can cheaply get it for your flash as well.? One goes on the camera via flash-shoe or PC socket, the receiver goes on the flash.? This means you can do crazy lighting on the fly.? You can hold the flash above your head, put it on a stand to add awesome pop to your images.? The added gadget and wires pimps out the camera look, and thanks to Chinese manufacturing and eBay they’re a breeze to buy.? Check out Gadget Infinity.? To learn about using an off-camera flash with radio remotes, check out Strobist.

??

So the next time you’re heading out and want to pimp your camera to fit your look, be expressive, take a fashion risk, add the flash or accessories you need to complete your aura.

Ricoh GRD Awesome Digital Camera Experience

As a prelude to a forth coming stay in Japan and the desire to lower my mountain pack weight, I picked up a Ricoh GRD digital camera creative set with the 21 mm add-on lens.

Rioch GRD

The Ricoh GRD is a point-and-shoot 8 Mega-pixel digital camera with a fixed 28 mm and 21 mm add-on lens (from a 35 mm camera focal length prespective).  I’d been salivating after the GRD since it was released two years ago.  Like every digital camera, it’s value has dropped after being around so long, and with the release of the Ricoh GX100 and forth coming Ricoh GRD2, the price of the GRD Creative set has become very attractive here in Switzerland.

My motivations for getting the GRD were image quality, size/weight and wide angle lens capability.  After years of hauling various cameras through Europe and around the mountains of Bolivia, Colordao, New Mexico, and Switzerland I’ve come to asess the usability of a camera in relation to how much volume it takes up and how much it weighs as compared with the quality of the resulting photos.  The trade-off between performance and weight or volume is critical for travel and mountaineering.  I bought the Ricoh GRD because it offers high image quality with a wide angle lens in a light weight design.

I also bought the GRD because with its macro capabilities, it opens up more options to explore.  Therefore, the Ricoh GRD was pretty much a no-brainer for me.  Wide angle lenses are generally harder to design and implement in any camera platform.  That’s why most digital cameras have focal lengths from about 35 mm onwards.  This posses a problem for a traveler/mountaineer, since the subjects, mountains and buildings are often times too close to be captured effectively using the 35 mm focal length.  When balanced on a razor rock edge, there’s no possiblity of taking a few steps back to get more of that mountain in the picture frame.  Hence, a wide angle lens is essential for my travels.

People tend to get lost in the Mega-pixel debate.  A consumer is liable to check out the price of a Canon Rebel or Nikon D40 and not give a thought to the lenses that would really excel with those bodies.  An 8 Mega-pixel point-and-shoot with a sub-par lens might be on par with a 2 Mega-pixel DSLR (like the Canon D2000) simply because of the lense quality difference between the two cameras.

So it really makes sense to design a camera and lens together, which is basically what one has with the Ricoh GRD.  The lens is tack sharp as can be, and the image quality with the 28 mm or 21 mm lenses is just outstanding.  But no lens-sensor combination is worth anything without kick-ass user control.  The Ricoh GRD and GX100 are the only point-and-shoots with full manual control.  Yes there’s the Fujis and Leicas/Panasonics which claim full manual, but they don’t have adjustment wheels, you have to do it via menus.  The Canon G7 and G9 come close, but you only have one control wheel.  Plus, and this is huge, the Ricoh GRD has the Raw image format.

Now, it does suck that the time required to write a Raw file on the GRD is a tad long, on the order of 10-15 seconds.  Amateur camera critics and professional equipment complainers throughout the internet have decreed the long Raw write time as a "deal breaker" meaning that they’ll feel entitled to not buy the camera and then waste a great deal of their day complaining about the GRD instead of taking photos in the real world.  The Raw write time is an issue, but it hasn’t been an obstacle for me.

The GRD has no built-in viewfinder.  But an external high-quality finder fits into the hotshoe.  I love this combination because it allows me to get the exposure right by monitoring the historgram on the LCD screen and then composing using the viewfinder for excellent framing and stabilization.  The viewfinder is bright and works great with eyeglasses, sunglasses, or no glasses.  In a sense, the GRD actually exceeds the capabilities of my DSLRs because I get exposure information in realtime (via the live historgram) and only need to take one image.  With a DSLR I have to take an image and then review the historgram (chimp the image), then retake the shot if the exposure was off.  It doesn’t matter if your DSLR can take multiple Raw images per second if the exposure isn’t correct.  So, for a landscape shot, I actually waste more time getting the exposure right with a DSLR than with the 10-15 seconds Raw writing time with the GRD.  Hence, the long Raw write time is a non-issue with me.  Now, it’s true that the new crop of DSLRs have live-view, so one can get the exposure right the first time, but it will be a while before I pick one up.

So far the Ricoh GRD has been along on trips through Zurich, the Alps, and now Tokyo.  I love the GRD, I love the image quality, I love the manual control, and I love how easy it is to use.  When you buy a Ricoh, you’re also supporting the camera design efforts of a company which actually listens to it’s users.  Ricoh cameras like the GRD and GX100 will include a number of firmware updates.  Some will say this is proof that the camera was released too soon, and should have gone through more testing before release.  I see it as Ricoh listening to their customers and providing support to improve the funtionality of their product after the sale.  Ricoh is one of the most foreward looking and innovative camera makers today, and I like the idea of supporting them.  If you’re looking for a take everywhere high-quality camera with wide angle lens, manual control, and Raw image capabilities, the GRD might be for you.  The GRD is stealthy and robust.  It can go dressed up in the city or rugged into the mountains and continually retain its cool factor.