 The GigaPan is one of those, I have to have it gadgets that any no-life photographer salivates after. The concept is simple and perfect, turn a pocket camera into a Gigapixel producing machine. It was developed at Carnegie Mellon University with support by Google, CMU and the NASA/Ames Intelligent Robotics Group. The term Gigapixel became popular a few years ago in Geek photo circles when people started stitching multiple images together to create extremely high resolution images. This allows the creation of images which could provide for the archiving and exploration of our world in a way never before possible. The super-high resolution image can be zoomed in on, and minute details of the world explored. This is all great, but when I finally received my GigaPan from the Beta program, I sort of lost interest in creating gigapixel images. What was probably one of the first GigaPans in Switzerland sat on my desk for a week, and in the interest of actually using it for something I loaned it out to a photographer who had time to play with it. Then I got inspired again and took it back. The point of the GigaPan is to take a large number (like 50, 100, 200 exposures) of images with the camera set on it’s maximum focal length (and therefore it’s highest resolution for a given scene). These are then stitched together, creating images in the 50 Megapixel (at the low end) to the multi gigapixel range. This is great, and I’m sure many photographers are using the GigaPan for it’s intended purpose, so the scientific researcher in me decided to go rogue and mount a wide angle Ricoh GR Digital instead of a normal point-and-shoot digital like a GX200 or Canon G9/G10.
 My desire is to eventually use the GigaPan to create automated panoramic images for 360 degree visual environments as one would find at VRMag. As I don’t know how to make these interactive environments just yet, I started by taking more traditional mountain landscape panoramas. There’s an advantage to using a wide angle camera with the GigaPan. If you use a camera with a long focal length (100-200mm) which is continually zoomed to it’s maximum focal length, then it will be difficult to take descent images with foreground objects, since these will most likely be out of focus with respect to the background. With a wide angle lens and small aperture however, it is much easier to get both the foreground and background sharp in focus. Thereby you can create panoramas that better represent the local environment around the GigaPan, instead of just capturing a far-off scene. For this intended application, the Ricoh GR Digital with it’s fixed 28mm, and add-on 21mm and 40mm lens options seemed like the perfect camera to use with the GigaPan.
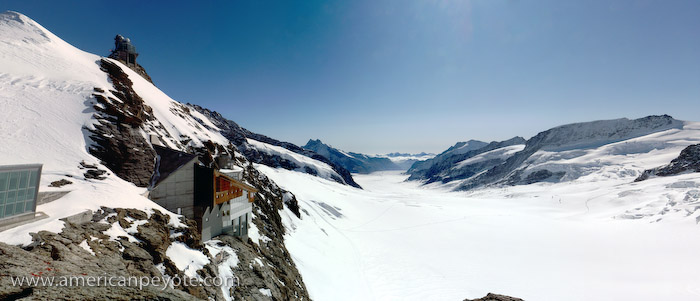
My first outing with the GigaPan was to the Jungfraujoch, “the Top of Europe.” My parents were in town and I took them up to the Jungfraujoch, a train stop and observation station at something like 3454m in the Swiss Alps. It’s a “must stop” on numerous Swiss tours and is a fantastic money-maker for the region. Actually, I think the entire tourist economy of the Swiss Alps is tied to the Jungfrau Bahn, and without the train the country would fall into a crippling recession (yes, I exaggerate). Since the GigaPan is realistically too large, bulky, and heavy to take on a climbing trip, the Jungfraujoch provided a painless way to test the GigaPan in the mountains. The weather was as perfect as I have ever seen in the Alps. I shot with the Ricoh GRD and the 40mm GT-1 add-on lens. This allowed me to test how well the GigaPan and panoramic software would work with a moderately wide angle lens, and provide a good technical basis for later projects, which will utilize the 21mm lens.
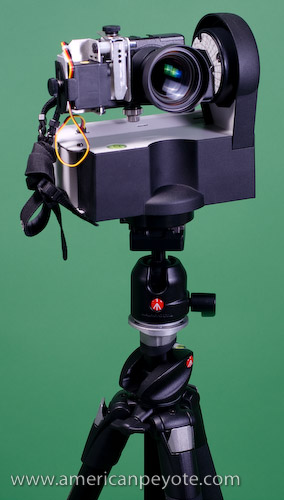
Setup
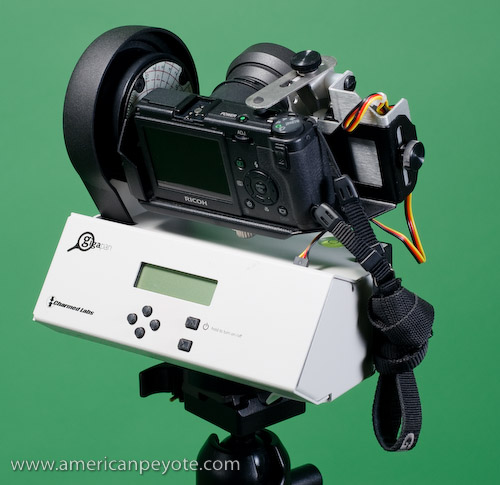
Ricoh GR Digital
Ricoh GT-1 40mm lens
Manfrotto 055PROXB
Manfrotto 486RC2 Ballhead
GigaPan Robotic Head
 Ease of Use
The GigaPan is easy…I mean, jaw-dropping-drunk-dialing easy to use. There’s some video tutorials on YouTube, but I was able to figure it out before the first video was halfway finished. There’s only a few buttons to push, and all you do is set the top left and bottom right hand corner of your panorama and push the start button. The field of view of your camera can be calibrated, so you can use wide angle or long focal length lens without any fuss. The battery life of the GigaPan is supposed to be an issue, but it outlasts the batteries of my Rioch, so I’d say I haven’t found the battery life to be an issue. I used basic rechargeable AA’s, I imagine battery life would become an issue at low temperatures.
 A key to creating good stitched panoramas is accurately centering the camera on your panoramic mount and figuring out things like the nodal point of the lens and other important details I don’t care about. I deal with technical details in my research work, I avoid them with my photography. In this respect the GigaPan rocks, because it has a marker for exactly where the lens should be in relation to the camera mount, so all you have to do is attach your camera with a screw and center it on the mount. I’m under the impression that given the small physical size of a compact camera lens, the exact location of the nodal point of the lens in relation to the rotating base isn’t as critical as with a DSLR. There’s a bubble level on the GigaPan which makes leveling the camera quick and painless, which is also important for creating images which are aligned well and makes the stitching process easier. My Ricoh GRD with the GT-1 40mm lens just barely fits on the GigaPan, but this is because the 40mm add-on lens is wider and physically larger than the GigaPan was designed for. For the automation process, a robotic arm depresses the shutter release on the camera to take a picture, and then moves to a new position and takes another image, and so on till the pano is finished. The camera has to be pre-focused (generally focused to infinity) and the exposure needs to be locked so the images can be accurately stitched together without exposure mismatches between images. In this regard the Ricoh GRD, GX100 and GX200 cameras are perfect, because all those operations are extremely easy to do on those camera models.
 Design
This is element which stands out in my mind. The GigaPan looks like it was designed in a lab because it looks like a piece of boring lab equipment. I say this from the viewpoint of an academic researcher who has spent various nights in front of boring box-like designed lab equipment pieces, and who is now dreaming up designs for his own furniture. I mean, seriously, it’s beige, it’s made of bent metal, and the body is as angular and unsexy as possible. In the future, I highly recommend that the GigaPan design be outsourced to the CMU School of Design as a student project. I had high hopes of being able to take the GigaPan on climbing trips, but my climbing partner nearly flogged me to death with a quickdraw when he saw that I had taken my Fuji GA645w, Rioch GRD, and a small Velbon Sherpa tripod on our last Alpine attempt up the North ridge of the Weissmies. So, tossing the GigaPan and full tripod in my climbing pack is sort of out of the question. As I’ve left the academic research world and become a full-time simulation/optimization engineer, I know for certain that the GigaPan could be redesigned to be lighter and more functional. Future versions are said to include plans for a DSLR GigaPan, and I can’t imagine how large and heavy such a design would be if the current GigaPan were simply scaled up.

Panorama Processing
As part of the GigaPan program, free stitching software is available from the GigaPan website. This is great, except that I use a dual 1 GHz G4 PowerMac and the software only runs on Intel macs. This was fine though, because I purchased PTGui Pro, which is one of the best panoramic stitching programs on the market. I chose PTGui because Hugin, the free Canon stitcher, and Photoshop CS3 all proved inadequate for the job of stitching 20-200 images together. Plus, as I’m using a wide angle lens for my panos, I figured it was better to use software optimized for different panoramic stitching techniques, where I can choose and optimize my control points, image distortion, and exposure of the images. I’m pretty sure that the GigaPan stitcher software was programed with the idea of people shooting with their cameras zoomed in to the maximum focal length, on the order of 100-200mm, which is exactly what I’m not doing. PTGui Pro is as painless to use as the GigaPan, and makes quick work of any number of images which require stitching. It just takes a while to stitch 200 images because my computer is slow by today’s standards.
 Brass-Tacs
The GigaPan is a fantastic piece of equipment for the lazy panoramic photographer, or those who actually want to make Gigapixel images for research and exploration of our world, or photo geeks in general. It’s painless to use, portable for many applications, and is pretty hard to screw up due to its simple design. I didn’t find battery life to be an issue and it’s pretty cool to shoot with. Everyone stops by to check out what you’re doing when you shoot with a GigaPan. Kids will be amazed that you’re shooting with a camera that looks like a mini anti-aircraft weapons system, their Dads will ask you questions, and in general women will probably be turned off by the fact that you have the least sexy panoramic camera mount a person can buy. But I digress, good design is the combination of form as well as function, and what the GigaPan lacks in style it makes up for in terms of function. In some ways shooting with the GigaPan is like wearing a colorful pair of Onitsuka Tigers on a fine Autumn afternoon. You get noticed wearing Tigers and it’s the same with the GigaPan. Now, Imagine if the GigaPan were designed with a body style other than “as-unsexy-as-possible” and a color other than beige? Imagine the possibilities when I could wear my Onitsuka Tigers and shoot GigaPan Berlin city panoramas in style with an air of well-designed confidence.
Essential Links
GigaPan.org
Global Connection Project
GigaPan Video Tutorials