digital

Ricoh GT-1 40mm – The Sad Clown Portraits

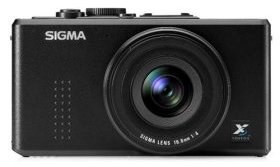
The Ricoh 40mm is one of those fantastic photo accessories which is amazing under certain conditions, and fouls the mind when used in sub-prime environments. The Ricoh GR digital is one of the best digital cameras around, and possibly has the most legacy support of any digital camera I’ve come across. I use an original GR Digital, and bought the 40mm lens for it, what follows is my review of it’s capabilities in a controlled light (studio) environment.

The original GRD (28mm lens) was released as a stand alone small sensor camera, and additionally with a 21mm lens in a creative set. Basically, the GR Digital is the most portable and useable wide angle point and shoot digital every created, which means it’s also the most portable and usable wide able camera ever created. There were limitations of course, one being that the 28mm and 21mm focal lengths are great for city and landscape work, but more difficult to use for portraits. So it was intensely cool when Ricoh released the GR Digital II, an updated version of the GRD, as well as a new 40mm add-on accessory lens. The new 40mm lens is compatible with the “old” Ricoh GR Digital camera. A weak dollar and rampant vacation through Detroit made purchasing the 40mm add-on a no brainer for me.

My main desire in buying the 40mm was to extend the portrait capability of my GRD, by using a more patriot-oriented focal length (40mm). I use my Ricoh for controlled light (studio) portraits, often employing a “strobist” inspired lighting philosophy. One advantage of using the GRD for controlled light portraits, is that it’s so small it can be used in many situations where a DSLR is too bulky to use, like in confined-space conditions.

Wait…why use a point-and-shoot camera when you have a full DSLR setup?

There are many benefits to using a small sensor camera with studio lighting for portraits. In general, one key element of portraiture is ensuring that the eyes remain in Focus. You can have all the diffused areas you want around the subject, blur out the mouth, whatever, but if the eyes aren’t in focus, you don’t get that feeling of being pulled into the image and conversing with the soul of that face staring back at you. This is where small sensor cameras are awesome compared with DSLRs, because with the Ricoh GRD and 40mm lens, the very large depth of field means that the eyes will pretty much always be razor sharp, and you can add all the blur and diffusion you want later in Photoshop.

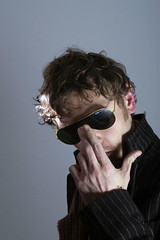
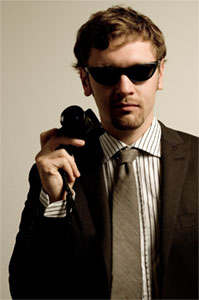
When you start getting into a serious camera and photography knowledge collection one thing is clear, there’s no end to it. Once you understand cameras you move on to lighting, and once you know how to light for portraits and mood, you generally get into fashion and design, and once you get past basic fashion down, the most logical step is getting into make-up. This is confusing territory for guys who aren’t into drag, so I went to the Source to get a crash-course schooling in eyeliner and foundation.

The makeup was sort of a freak accident you see. I was strolling through the Somerset Collection, an upscale shopping experience a-la-mall in the suburbs of Detroit, and after checking out the Levi’s store I wandered into Sephora. Previously unknown to me, it’s one of the prime makeup stores in the States. I walked in with a vague idea about asking for eyeliner, and a minute later found myself sitting in a chair with a makeup artist named Susan applying foundation to my nose and facial structure. 10 minutes later I was being told by everyone in the store that I looked fresh from a rock stage. I ended up dropping $100 on eyeliner and makeup. With my new look intact I headed to suitable location to make some magic.

Cramped Basement

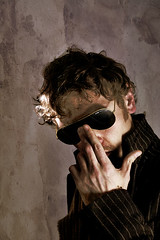
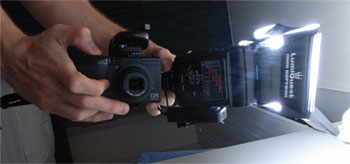
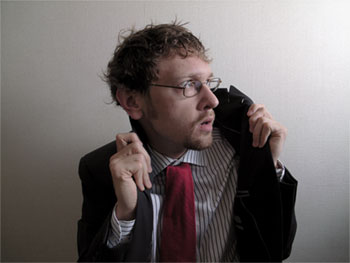
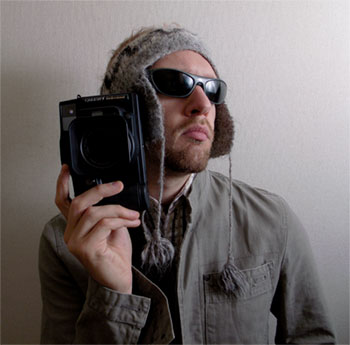
The perfect cramped studio location presented itself in the form of my parent’s basement in the Detroit suburbs. The place is still cluttered with things like my old G.I. Joe and Star Wars toys. I found a section of wall to work with and setup my lights: one Contax TLA280 and a Sunpak 383, both placed in Alzo digital softboxes. After a wardrobe change plus a few lighting adjustments I had a set of images called:

The Sad Clown

Every photo needs a back-story:

The Sad Clown has little ambition or direction in life, schooled on the streets and usually found sleeping in the gutters of Paris, he sports a stripped sweater, yellow button-down shirt by Ben Sherman, and occasionally a sport coat by “WE” and a tie by the same label.

The Sad Clown smokes 15 year old cigarettes and laments on the laughs he cannot produce due to this wasted life on the stage.

The Sad Clown I

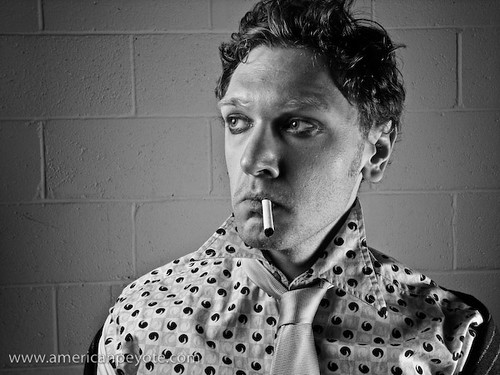
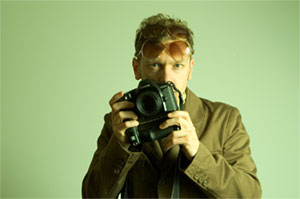
From a tech standpoint, the 40mm Ricoh is a sharp and rather bad-ass piece of glass. The detail from well-exposed portraits is really excellent. However, the lens is also big, and pretty much kills the convert, concealable factor, for which the GRD is known for. The 40mm also flares like a Phoenix farting in your face whenever a light source is pointed even remotely towards the front element. This shouldn’t be a surprise, the main element is massive, and sets the perfect stage for ungodly internal reflections. I had to be sure my softboxes were not directed at the camera, otherwise big red blotches would show up in the images.

The Sad Clown II

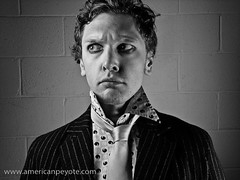
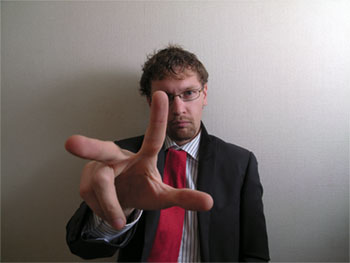
You can see in this view that the eyes couldn’t be sharper. This is one reason to use a Ricoh Digital over a massive DSLR with an 85mm f/1.4 lens, the quality of small sensor Ricoh GR portraits include very sharply defined lines – and when properly exposed, excellent subject-background separation. I don’t think it would really even be feasible to produce an image like this using my Minolta 7D, or any other DSLR, unless using a very long lens to compress the image and increase the depth of field by using a very small aperture. With the Ricoh GR and Alzo Digital Softboxes, it took 5 minutes to setup and execute this portrait in a very confined and cluttered space.

Every piece of equipment has it’s limitations, and in total the 40mm is an excellent lens, extending the usability of the GR digital system considerably. With the 21mm and 40mm lenses, you have an excellent small sensor camera system, suitable for travel, landscapes, city, portrait, and the production of unique images with studio lighting techniques. Well, actually, you can use it for whatever your heart desires – go out and make the Sad Clown smile again.

The Sad Clown on Flickr

Sigma DP1 – Revelations from the Camera Shrine

When an 800 pound Gorilla walks into a room, everyone notices.? When a world class lens company releases a new camera, few will barely have the inclination to even suggest turning their eyes to acknowledge noticing. ?Sony owned the PMA 2008 news like no other, and the other companies seemed to know it.? That’s what it means to be an 800 pound Gorilla, your competitors have to sit back and watch the beast do what it wants because there’s no way to realistically deny your presence. ?Aside from the Sony DSLR releases there was one lone camera release by Sigma, the lens company which also makes a DSLR which has one of the smallest user bases of any current camera maker.? It could probably be argued that the Sigma DSLR user bases is actually smaller than those of some defunct camera lines like Contax. ?Sigma produces lenses for nearly every camera type, from Canon to Pentax, and even for their own DSLR camera, the SD14 – a camera which has been discounted as much as any camera in history, except for those which were officially discontinued – because despite their best intentions to market a “competitor” few take Sigma seriously when it comes to making digitally enhanced light-tight boxes.? At least, until their development of a pocket camera with a large APS-sized imaging sensor.

At Photokina 2006 Sigma announced they were developing a camera from heavens, and showed a prototype at PMA 2007 of the small and powerful DP1 – which was enough to create a butterfly marketing breeze strong enough to light up every photo website on the net and generate universal interest from nearly every user group, from Canon to Minolta.

Then came the delays and speculation.? The DP1 didn’t materialize at PMA 2007 and the word “Vaporware” started to spread.? There are many examples of awesome camera products like the Pentax Medium Format Digital, which had nice mock-ups at the PMA and Photokina shows but never materialized in the marketplace.? So it was with great mega-pixel glee that camera geeks across the globe read the news of the DP1 launch at PMA 2008.

Like every camera maker, Sigma has a user base of die-hards committed to loving their products till life slips from their fingers – no matter the actual performance and usability of the camera system. ?However, Sigma is a little different than Canikon, because although their core user base will jump on any product they produce (like the SD14), it doesn’t mean that their customer base will grow by any measurable amount. ?Enter: The Sigma DP1, a camera that a lot of photographers would be willing to drop dollars on if it would only be released – and according to Amazon.com, the DP1 will be available on March 25, 2008 with a price tag of $799.

The Sigma DP1 with 14 megapixel FOVEON X3 is set to go on sale in late March.? It will have a fixed f/4 16.6mm (28mm equiv.) lens, with manual focusing capabilities, a hot shoe, optional external viewfinder, and 2.5″ LCD screen.? This means a compact camera with a high resolution sensor and a pixel size of 7.8 microns – promising to render smooth images with dynamic range beyond that of every other hand sized camera on the market today.

Now the digital camera market has come of age with a compact point-and-shoot camera with a APS-sized sensor, all the image quality capabilities of a DSLR in the palm of your hand.? In short, the God-send camera users have been calling for.? It is true deliverance from the camera Gods, a high resolution, high quality compact camera with an affordable price, something not seen since the film days when a compact Contax G1/G2 could match the image quality of any top-shelf SLR.

Of course, many people have already counted the DP1 as being a flop.? The rationale being that with a 28mm equivalent lens and a “slow” aperture of only f/4, and a maximum ISO of only 800, a number of folks don’t even want to consider it as a digital imaging tool.? Which is sort of the reception the Ricoh GRD first received, but it since risen to become a cult camera favorite.

And I would discount the DP1 too if I listened to the gadget-junky-fools on the net.? The thing is, I like to “use” the cameras that I buy, and getting down to Brass Tacs, my Fuji GA645 and GA645w film cameras (both with a slow f/4 lens) produce incredibly sharp, amazing results in a relatively small package.? The Fuji auto-focus 6×4.5 rangefinders did well in their day, but with the advent of digital the cameras didn’t make the impact they deserved and are now only found on the used market.

But the Sigma DP1 is different, it will find a profitable niche, because once people start using it, they’ll no doubt find that having a high performance tool in the palm of your hand is much better than a $2,000 DSLR-lens combo which sits around on your desk half the time because it isn’t convenient to take everywhere. ?I know for a fact deep down in my heart that at the very least the DP1 will be a killer landscape tool for the mountaineers and travelers of the world, and if a wide angle and telephoto converter were offered, (as are available for the Ricoh GRD line) it would be the perfect travel package to tool around the globe with.

Essential Links:

Sigma DP1
Sample Pics on Dpreview
Press Release on Dpreview

JoeyL Tutorial Review – Behind the Scenes

Editor’s Note:
What follows is a Review of JoeyL Behind the Scenes: The Complete Tutorial.  This is an impression of the DVD tutorial provided by the reviewer and nothing else.  There are no financial ties between this review and the photographer Joey Lawrence.

JoeyL: Behind the Scenes Review

I’ve been shooting various cameras and engaged in various amounts of Photoshop for five or six years now.  I think of cameras and computers and hammers in the same way – tools with which to do something, nothing more or less.  In the past year I’ve expanded from mountaineering and landscape and travel photography to using studio lighting techniques, mainly gleamed from www.Strobist.com, where I read an interview by David Hobby with Joey Lawrence and learned about his new DVD tutorial.  He seems to have a cool style and creative philosophy, so I bought his tutorial for $249 (promotion till Oct. 21st, – $299 thereafter).

This is the first Photoshop tutorial I’ve ever bought, and it was purchased for the following reason:  I’ve become comfortable with the basics of Photoshop, using the clone tool for basic corrections, levels and saturation control for various tonal adjustments.  Basically using those tools to enhance the feeling I wanted to communicate with the images taken using my cameras.  I’ve been looking for a learning package to help me take things to the next level and to expand beyond the basics of enhancing an image and start using Photoshop as a tool to create a specific visual impact with my digital images – beyond what can be accomplished with cameras and basic lighting.

Did the JoeyL DVD contribute in the aim of fulfilling my creative desires?  Who is the DVD for?  Will you, as a reader benefit from buying your own copy?  Hopefully you’ll find some answers here.

DVD Contents

The JoeyL DVD is broken up into two sections: Lessons and Videos, a preview is available on the tutorial website.

The Lessons section includes videos showing Joey editing digital images in Photoshop, explaining along the way how and why specific adjustments are made to enhance the photo and his vision for the final image.  The specific lessons are:

Specialized RAW Conversion Techniques (manual HDR)
Levels and Curves
Multiply techniques (“Joey L signature look”)
Dodge/Burn
Soft Light Techniques
Grunge (apply textures, scratches to images)
Rescue (rescue a ‘bad take’ photo)
Tilt/Shift (simulate lens blur effect)
Quick Masks (influence light/dark values)
Cooking Your Own Textures (texture production)

The Videos section includes four production videos, which show Joey working with different bands and models.  The creative process is explained including some lighting diagrams to illustrate how lighting was setup for the shoots.

A set up Photoshop actions and high resolution textures are also included on the DVD.  A set of actions like these would probably set you back a certain amount of money if bought separately.  If you add up the projected cost of the 10 actions and 51 custom textures (by my hand counting), the total price of the DVD becomes more digestible.

So, after going through the DVD various times and working with the techniques and evaluating what I’ve learning and what it means for my future image making process, here are my impressions:

The Impressions

During the lessons Mr. Lawrence talks through his thinking process in adding various layers and how to do different adjustments.  Adding layers and blending and the use of manipulating shadows and adding light to images is well explained.  This is exactly what I was looking for, since it shows you how to enhance lighting effects in Photoshop which were absent or difficult to produce in reality.  A problem though is that the Photoshop techniques are presented as separate from the production process.

Some videos are included which document different shoots and the photos of which are used in the lessons.  This is pretty cool, since you can see how the images were created and then you can go through the editing process in Photoshop to see the evolution of concept to digital final.  However, a link between lighting for the sets and how that lighting was used in the editing process isn’t really presented.  Of course, a specific link may exist, but adding the connection would greatly enhance the learning experience.

There are five videos in the Video section, but really only two videos on the DVD include lighting diagrams and a talk-through about the production process.  I was hoping for a broader amount of material here, including a workflow starting out with planning for the shot, figuring out what lights would be needed and more interaction about what was working and why.  The lighting of course, is key here, many of the Photoshop editing techniques work because the lighting produced the right shadow which would later be enhanced in Photoshop.  Without more background on the lighting, it just feels like something is missing.

I like that videos are included that show the production shoots.  The images from those shoots are later used to illustrate the editing techniques.  So you get a feeling for how one goes from doing the photography to producing the final image.  However, in this sense I feel like the material doesn’t flow as well as it could.  The editing and production videos are separate, and must be viewed separately.  I think it would have been beneficial to integrate the two together.  Of course, this would make it more difficult to organize the lessons in an easily accessible format.  Still, it would be cool it the Photoshop editing could have been added to the production footage to better illustrate the path from initial idea – image capture – digital editing ending with the final image.  Of course, this is my bias and reflects how I would have liked it to have been setup.  It wouldn’t be too hard to import the movie files into Final Cut or iMovie and re-edit the JoeyL Tutorial to a form which better fits with my leaning preferences.

Is It Worth the Price?

The creative process was a main draw when I finally sent my credit card info for the DVD, knowing full well that $249 was just dropped electronically.  In my opinion a description of the creative process is probably the weak point of the tutorials.  The Photoshop techniques are very clearly explained and you can start doing cool things to your own images in the time it takes to open your file in Photoshop.  Now, a critic will say that it’s easy to find all the info one wants on Photoshop on the web – hence, why buy the tutorial?

Numerous web tutorials and people like Russell Brown show you how to do many things in Photoshop.  Of course, this information is generally spread out everywhere across the web, and all without the benefit of a professional photographer explaining their creative process.  Time is valuable, and time wasted scouring the web for into on Photoshop and then taking the time to figure out what enhances what is time not used shooting photos or climbing mountains.

My reason for buying the JoeyL DVD was to see how Photoshop can be used to create an image as a part of the creative production process and to enhance my own creativity.  In this capacity I’m very happy with my decision to drop $249 on the JoeyL DVD tutorial and would do so again.

Beyond Photoshop

Learning about the creative process isn’t just important for photography and Photoshop.  I look at the purchase of the JoeyL DVD as enhancing other areas of my life, both the artistic and in the scientific research realm.  To a certain extent, I expect to see a benefit from using the JoeyL tutorial in my research career.  This could be in any area from designing actuator systems for smart material applications to a new scaffold strategy for bone regeneration implants.

“What!!!  Did he just use his job as a scientist to justify a $249 Photoshop tutorial purchase???”

You’re damn right I did.  When you get to a certain level in engineering you see that the line between art and science is pretty much just a myth perpetrated by those who like categorizing things.

My knowledge of Photoshop and photo printers and the creative process from an artistic viewpoint has only enhanced by ability as a research scientist.  When you engage in a free-creative pastime like photography and enhance your image making abilities with Photoshop you’re training your mind to be more open and flexible than is generally taught in engineering, chemistry and science classes.

In both art and science you characterize the world around you using various tools to translate your vision into something which can be communicated to other people.  The tools can be cameras, physics, Photoshop, ANSYS, mathematical equations, wide angle lenses, whatever tools you need to tell the story you’re interested in.  The story could be the emotions evoked by a portrait or the aerodynamics of a rocket.  Exploring the creative process of other scientists or artists can only enhance you’re own.

Should You Buy It?

Now, that I’ve explained what I liked and what I felt could be improved in the JoeyL DVD – the question then becomes if you, the potential customer should drop the change to buy your own copy.  Here’s what I think…

  • If you’re a Photoshop whiz and already do your own lighting, know what you want to create, have a handle on your creative process and so fourth, you might not find a lot of value in this tutorial.
  • If you have no idea about Photoshop and want to create cool images with a nice gritty Grunge feel to them (the JoeyL look).  Yes, you will get a ton out of this DVD and it could act as a great starting point for jump starting your own vision.  Even if you’re starting from a very low Photoshop level, it wouldn’t be too hard to get to the point where you’ll understand and be able to exploit the techniques in this tutorial.
  • If you’re like me, someone who understands lighting at the mid-intermediate level, knows Photoshop but isn’t a Pro and is interested in the creative process and not just editing details, yes, you’ll probably enjoy the tutorial and find a lot of value in it.
  • If you’re a scientist and wish to enhance your creativity in the technical research world, I would recommend the tutorial only after reading Sparks of Genius.
  • If you’re more interested in camera specs than pictures and enjoy debating the finer points of copying the Dave Hill look than finding your own style and feel a deep resentment towards the fact that a 17 year old guy from Canada is an established photographer while you’re spending your time pouring over photo forums and tutorial reviews…well, I recommend you find a new outlet in your life.


Brass-Tacks

Reviews like this shouldn’t just be about feelings and impressions but also a prelude to action.  I worked with a self-portrait which I like and tried out some of the techniques from the JoeyL DVD and played with the JoeyL Photoshop action.  This entailed the addition of various overlays and a cool texture to give the image a nice gritty feel.  I’ve never used these techniques before and I love the result that 10 minutes of my day coupled with knowledge from the tutorial was able to produce.

JoeyL Tutorial Before JoeyL Tutorial After
If you’d like another opinion check out the Review on Strobist.com
There’s also a discussion at the Flickr Strobist Forum

Infinite Memory Card – Hyperdrive Space Review

In the age of digital cameras, new gimmicks and trinkets are released every week.  Mega-autofocus-crazy-byte products from Canon, Nikon, Sony, Ricoh, Olympus, Leica, Panasocnic, and a multitude in between like Fuji give one the option of any camera one’s heart desires.  Memory card capacities double every couple years or so and the cost of storage is insanely cheap compared to just a few years back.  Still…the management and backup of memory cards is generally a problem, especially when traveling.  You can’t see which pictures are on which card, and backing up to a laptop means physically sitting down, having a computer with you, and the time to download your images.  There are portable hard drives and image viewers like those from Canon, Jobo, etc., but many times these are a tad more expensive and more flash than utilitarian.  Many times the ideal design solution is one thought up on the outside of the large corporations.  In the case of infinite storage, the Hyperdrive line of memory card backup devices really excels at doing what it was designed for. 

Problems arise when traveling and shooting digitally, especially with with multiple cameras.  Adding a laptop to your travel accessories just to backup images is a big waste of space and weight.  Memory cards can fill up incredibly fast, and nothing sucks more than not having free space to get that cool shot that’s happening right this second.  Backup in the field is a primary concern of any digital image maker.  One of the really useful digital gadgets that one can use to store images from SD, MMC, Compact Flash, and pretty much any digital card you can imagine is the Hyperdrive Space – not to be confused with the mythical hyperdrive engine which allows space travel at speeds greater than light.  The Hyperdrive is a bare-bones storage device for backing up images from memory cards.  The Hyperdrive is basically a notebook hard-drive enclosure with a battery, card slots, and LCD screen.

I bought my Hyperdrive just a week before flying to Tokyo for three months.  The Hyperdrive with a 120 GB drive was the perfect solution for backing up images from my Ricoh GRD while traveling.  I have a laptop and am continually trying to free up harddrive space.  With the Hyperdrive I can backup 1 Gigabyte memory cards in a minute or so and not have the added worry of taking my laptop everywhere.  When I need images, they’re right there on the Hyperdrive.

The LCD screen displays basic information.  It allows access to which folders are on the drive, you can assign the name of new folders, check how much harddrive space is available.  So, no, you can’t view stored images on the Hyperdrive Space.  The Space is specifically for backing up images, not viewing them.  I download everything from the card to the Hyperdrive, choosing an appropriate file name for the folder, which helps with Digital Asset Management (DAM).  I now have a portable catalogue of all my images.  Assessing the images is awesome and easy.  For posting to my blog or other things, I just hook up the Hyperdrive to my laptop, open up Photoshop, and work on the photos I want to use.  I save a copy to my laptop and post to the web.  This allows me to back everything up on the drive, copy any originals that I need, and not fill up my laptop harddrive.  When I get back to Zurich I’ll do a full backup on a normal drive, but for travel the Hyperdrive is a super efficient bare-none one of the best accessories for digital photography I have.

The Hyperdrive Space is powered by an internal user-replaceable Lithium Ion battery.  For normal use, if you charge it once and then leave it hooked up to your computer for a while here and there, you won’t have to worry about the batter running out.  A full charge is supposed to last for 100 Gb of data transfer and can be recharged via a normal outlet or by plugging the USB into a computer.

The only thing I would modify in the Hyperdrive design is the addition of doors to the card slots, which are open to the external environment.  For normal day to day things this isn’t an issue.  You get a nice neoprene cover with the Hyperdrive, which protects it during normal travel.  Still, it would be cool to have doors to protect the card slots, or even better, the option of an external armor, like the kind available for iPods.

The Hyperdrive line has been extended since the first models and now includes the Hyperdrive ColorSpace, which was just released.  The Hyperdrive Color sports a high resolution color screen with full playback of stored images.  You can view histogram and exif info on the screen and even access RAW format images from various DSLRs.  Exactly which DSLRs I’m not sure of, the info isn’t specifically posted on the Hyperdrive website.  Since the firmware of the Hyperdrive is updatable, presumably the most popular RAW formats will be supported initially, and new camera models would be supported with new firmware updates.

Even if all my cameras aren’t supported, the addition of a color screen makes the Hyperdrive Colorspace pretty much the perfect backup device for digital photographers.  The Colorspace version without a harddrive is about $200, if I have spare funds later I might pick this up, but really, but I have enough gadgets at the moment.

So, to sum it all up – a review of my impressions: The Hyperdrives are small, download photos really fast, read any memory card and the harddrive is easily replaced.  You get the most value for your money of any of the other portable image drives out there.  The Hyperdrive is an awesome example of the benefits of the digital age for the entrepreneur.  Someone sees a need in the market and has the ability to fill that void at a cost less than the major companies like Canon or Epson or Jobo, who all have their own back up devices which are flashy and expensive.

I’ll use the Hyperdrive when I’m back in Zurich for backing up pictures and not worrying about knowing which photos are on which harddrive.  I’m looking at picking up the Colorspace version, but it’s not an absolute necessity for me at this time.  Now, if the color version had been out three months ago, I probably would have bought it.

Ricoh GRD – Tokyo Strobist and Shoestring Lighting

There are many thing to do in Tokyo, but on a Monday night after riding the metro one needs to relax. One of my favorite relaxing activities is the impromptu self-portrait session with a digital camera. This session focused on using off-camera flash with the Ricoh GRD. But here’s the problem, while checking in for my flight to Tokyo I was made aware of the fact that I was 15 kilos over weight, I’d either have to dump half my baggage or pay great fool-damned weight penalty.?While tossing things out of my luggage at Zurich I tried to cut it down to the essentials. The crampons and ice axe had to go, but perhaps a bit more regretful was leaving behind my light stand. Yes, I’ve made a habit of taking various cameras and at least one flash everywhere I fly to. As a compromise I kept the umbrella and flash bracket, thinking I’d find a solution in Tokyo.

Shooting in a cramped dorm room in Tokyo can be a bit limiting. With a desk, bed, and bookshelf there’s pretty much no room to do anything. I wanted a clear background and that meant setting up in the hallway. The cramped hallway presented an interesting shooting situation.? At only four feet wide, there was really no room for a normal camera to focus and capture the subject (me). Ah, but I had in my possession the fabled and non-standard wide angle Ricoh GRD digital camera. I setup a tripod and decided to go with the GRD and the 21mm add-on lens. This gave me a wide angle setup perfect for the cramped hallway.

For the lighting, I had a set of Gadget Infinity radio triggers to trip my old Contax TLA280 flash. The Contax flash was fired on manual mode into a 40 inch umbrella, in the narrow hallway this provided a rather large body of light, perfect for the random portrait session. However, without a stand, it’s pretty hard to set up an umbrella anywhere. To solve this problem I borrowed from my climbing mind and decided the best course of action would be to suspend the umbrella and flash (with bracket) using two shoelaces from my running shoes.

In my experience, the Ricoh GRD has been awesome for mountaineering and city shooting, but I’d never used it with off-camera strobes before. One difficulty with self-portraits is triggering the camera. The GRD has a nice interval timer, I set it for a 5 second delay and started shooting after a few test shots to get a nice exposure setting. Doing off-camera flash with the GRD was totally painless. Using the interval setting the GRD refocuses for each shot and will keep shooting till the battery runs out or the SD card is full. Five seconds is perfect for changing poses and waiting for the camera to focus.

Compact digital cameras are generally ignored with it comes to flash work, and usually have horrible small flashes that create unnaturally ugly images. The Gadget Infinity radio trigger is very small, and fits extremely well on the GRD hotshoe. It means you have the freedom to take a small flash wherever you’re going and bounce it or diffuse it for awesome lighting on the fly and create excellent flash photos, even with a point and shoot digital like the GRD, Canon G9, or any digital with a hotshoe.

The extreme wide angle of the GRD was very cool to work with. The GRD has an awesome lens, and worked extremely well in the tight confines of mine small dorm room. I took to shooting myself in various combinations of the clothes I brought to Tokyo. It’s not rocket science, the images aren’t fantastic art or crazy creative, but I like them and plan to expand on the wide angle portrait technique.

Traditional portrait guidelines call for a camera with a focal length around 85mm (in 35mm format). Wide angle lenses are generally not used since distortions in the face can be considered unflattering. I found the 21mm GRD lens just awesome for portraits. The advantage is, with a few movements forward or backward and left or right, you can control which parts of your body are slightly distorted, made larger or small due to the distortions inherent in the lens. This means you can easily modify the subject of your portraits by making parts of the body larger or smaller, distorted or normal. Positioning various parts of your subject in the distorted range of the lens can dramatically increase how the subject is communicated to the viewer of the images.

I had an awesome time shooting with the Ricoh GRD and off-camera flash for the exposure. The wide angle 21mm lens gives the brave photographer a number of creative opportunities to portray your subject in ways not possible with traditional mid-telephoto lenses. The compact size of the GRD means you can set up anywhere, and break the myth that flash and small compact cameras doesn’t work.

If you found this information helpful and would like to experiment for yourself, check out Strobist for lighting info with off-camera flashes.

Gadget Freak – Pimp Your Digital Camera

As a gadget freak, cameras are just cool to hold and use.? However, some days you get the feeling that the camera shouldn’t just be a tool to record events, but also an integral part of your look.? The classic photographer response is something like:“The photographer is an observer, and as such should be on the side-lines, recording events and being unobtrusive.”

The thing is, I’ve developed a communication style care of Hunter S. Thompson literature, and sometimes the line between participant and observer should be blurred.? That’s why the writer should be part of the novel, and the photographer part of the picture.?Choosing a camera for the night can be as hard as picking the right sunglasses.? A full DSLR might look good slung over your shoulder when wearing a Lowe Alpine jacket, but a Canon 1D type camera might be too much when sporting a pinstripe suit.? Camera pimping allows one to add or remove accessories as desired.

Pimping a camera out is pretty easy in the world of internet auctions and mail order.? The integration of cheap manufacturing and eBay means you can get whatever you want in the way of camera accessories.? That wouldn’t have been possible even two years ago.

One of the most functional and cosmetic extension for a DSLR is the vertical grip.? Most cameras are landscape oriented, so the photo frame or sensor is wider than it is tall.? But for portraits it’s often nice to make the picture taller than it is wide.? The easiest way to do this tilt the camera 90 degrees.? But then your hand is crooked, and in a non-optimal shooting configuration.? Most prosumer cameras have the option of a vertical grip, it screws into the camera base and generally includes more batteries so you can shoot longer.? The VC-7 for my Minolta 7D is kick-ass but cheap manufacturing technologies from China and commerce via eBay means you can get one for pretty much any DSLR.

The term “Photography” refers light painting, so controlling the light is essential to making images.? Light painting is easiest to do via a camera flash placed away from the subject.? Flashes are plentiful and easy to get off the used market.? Any flash that is big, offers manual control, and can swivel will add instant “cool” to any camera.? Things like flash cards add a professional look as well as providing even flash coverage, and really will improve the look of your photos.

The flash bracket is a timeless camera pimp-out.? Cheap ones can be found for any camera type, even point-and-shoots.? By moving the flash away from the lens you reduce red-eye in photos produced by on-camera flash bouncing off the retinas of your subject.? It also adds bulk and a “professional” look, and those people who don’t know that equipment alone doesn’t equate to quality photos might be impressed.? In addition, it makes the camera easier to hold and adds bulk if you need to use it as a blunt instrument to make a quick escape or are attacked in a dark alley.? A number of expensive and cheap brackets are on the market.? Some of nicer mid-priced but very cool and functional brackets are made by ALZO Digital.

What’s cooler than wireless?? It’s in computers and phones – video flies through the air like ghosts of the 4th dimension.? And now you can cheaply get it for your flash as well.? One goes on the camera via flash-shoe or PC socket, the receiver goes on the flash.? This means you can do crazy lighting on the fly.? You can hold the flash above your head, put it on a stand to add awesome pop to your images.? The added gadget and wires pimps out the camera look, and thanks to Chinese manufacturing and eBay they’re a breeze to buy.? Check out Gadget Infinity.? To learn about using an off-camera flash with radio remotes, check out Strobist.

??

So the next time you’re heading out and want to pimp your camera to fit your look, be expressive, take a fashion risk, add the flash or accessories you need to complete your aura.

Sketching – Awesome Not Digital Photography

I’ve been fascinated by photography for sometime.  In particular I like trying to capture moments of movement and darkness that cameras and eyes usually never get.

But sometimes you get bored, don’t want to drag along a camera and look for another way to express some creativity.  Most of my progress reports at Detroit Country Day School focused on similar theme,

"Mark is a hard worker, blah, blah, but needs to focus more on his studies and less on drawing during class…blah, blah, blah."

So lately I’ve been getting back to my roots.  Those long tentacles that have been developing in school since I could pick up a pencil.  Drawing, the first artistic love of my life.

I used to draw in every class from History to Math, even Graduate level Colloid Science.  For some reason the professor didn’t appreciate this very much.  When I asked him what I could do to improve my understanding of colloids he cited my sleeping in class and attention to sketches as evidence that I was a poor student.  Of course, he was oblivious to the fact that the woman sitting behind me drew more often and far more elaborately during his PowerPoint lectures than I ever did.

In reality I draw in class to keep the visual centers of my mind occupied, and to balance the resources needed to retain information in the long-term memory banks.  As the keen reader might imagine, my teachers have never really understood or cared about this technique.

Back to the recent past, I took in two concerts recently: Kosheen and Juliette Lewis.  My cameras stayed at home while I sketched the events as they occurred – true Gonzo Sketching Journalism.

Kosheen is an electronic-themed singer from the UK.  The music is something like relaxed Jazz feeling a-la techno music experience.  Her show on Wed. April 18th was in the Zurich Volkshaus venue.  It’s close to Helvetia Platz, just a stones throw from Xenix and only a few blocks from the strip joints on Langstrasse, the Red Light District of Zurich.

Volkshaus has a nice theater-like setup.  The lobby entrance includes bouncers and a bar.  Walk through the doors and you’re on the main floor with the stage at the end of the room.  Sometimes you want to dance in-front of the stage, sometimes you just want to relax and enjoy the experience.  We went upstairs to the balcony section where we had free roam of unreserved wood seating.  Hanging from the ceiling was grand chandelier-type lighting.

I like having choices in life, Volkshaus is a cool venue because you can be part of the show on the floor or just chill by the roof rafters.  The balcony also gave a nice vantage point for sketching.  On the floor the action would have been moving too fast to draw anything, but in the thin air I could sit back and let the scene materialize on the paper.

It felt good getting back to my drawing roots.  Unless you’re taking a high-quality camera to the show, your photos will most likely turning out looking black with some detail of the people on-stage.  By sketching the scene you can make things as clear or obscure as you like, add whatever elements are needed and leave out the distracting ones.  Plus, it makes you look at photo subjects in a different way, combining this slow exposure technique with your photographic vision helps develop an eye for the interesting elements of a scene which your pocket digital camera would have probably glossed over.