review

Sony A900 – First Impressions Sony A900

Ethan_IMy photography-digital-imaging-hobby-obsession has started peaking in the past few months. After putting up some profiles on Model Mayhem and Stylished I started getting requests for Time For CD (TFCD) shoots. So I figured: Hell, why not try out a Sony A900? Why the Sony A900? Well, I have a Minolta 7D, and all my lenses will work with the Sony DSLR line. Plus GraphicArt in Zurich rents the A900 as well as the A700 and all the Zeiss and G lenses. I started out renting the A900 and 24-70mm Zeiss zoom, and since picked up a body, a flash, and a Sigma 70-200 HSM zoom. What follows is a first impressions user review of the Sony A900, used in my apartment studio and around Winterthur and Zurich for location shooting.

Why the Sony A900?

Here’s my DSLR history. I started with a Canon D2000 from eBay, decided I like the DSLR concept, moved on to a Minolta 7D (I own the Minolta 7 film camera) and basically did nothing but shoot with the 7D and expand my lighting kit. Why? Because for basic shooting a 6 megapixel camera is all you need. If you have one then keep shooting with it, only camera freaks feel a constant need to upgrade. I saw little need to buy a new DSLR, in particular I saw no point unless the new camera was significantly better than my current one. I’ve been unimpressed with the results of the Nikon D300 files as compared with those from my 7D, so why consider the A700 (which sports a similar sensor). But after shooting with the Sony A900 for a weekend and seeing how much resolution and shadow texture (dynamic range) I could get with the thing, it was a natural reaction to look at my bank account and pick up a body of my own. So to get it straight, I bought the A900 because I love the colors and shadow detail.

Alexandra_I.jpgThe A900 in the Studio

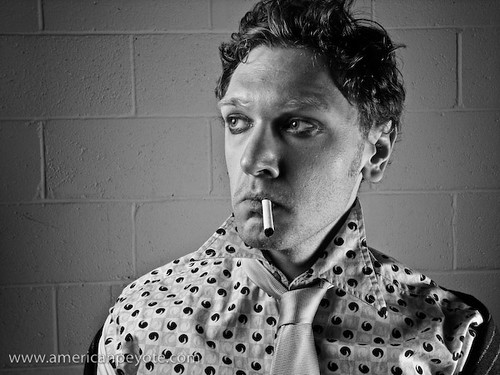
My first experience with the A900 was shooting Alexandra in my studio. She found me through Model Mayhem and we worked out a few concepts. Here I used the A900, the 24-70mm F/2.8 ZA SSM (SAL2470Z), two Elinchrom BxRi studio strobes as well as a Kacey Beauty Reflector with a Sunpak 383 flash and sometimes the Lastolite Trilite reflector kit. The Zeiss-A900 combination really leaves little to be desired. The resolution and color produced with this combination are simply fantastic, and almost exceeded my expectations (on can never be satisfied with camera gear). One major problem with the Minolta 7D is focusing. I have a number of image with a model against a wall where the camera focused on the wall instead of the model. The resulting image would of course be slightly out of focus. This doesn’t matter much for web stuff, but affects the image quality and provides less image information for post-processing work. Compared to the 7D the Sony A900 has very accurate focusing, in particular when used with a SSM (Sony Super Sonic) lens. The focus point can be controlled using a joystick on the camera, and is very useful when composing. There’s no need to “focus and recompose” as you can just move the focus point where you want. The Sony A900 is the only camera to sport a function called Intelligent Preview. Basically with Intelligent Preview you take a preview image, you can view it on the camera LCD for a few seconds, and make any adjustments necessary. On other cameras you just take an image, so at first I thought “who cares?” The face is, for light checking and shooting with the popular Strobist techniques, Intelligent Preview is a very useful feature. It allows you to fire the strobes and check exposure very quickly without filling up your memory card with test images. And when the full RAW images are 35 Megabytes in size, the Intelligent Preview feature actually saves you a lot of time and storage space.

No camera can produce an image without light. For the lighting, the Elinchrom BxRi flashes were triggered via the Skyport radio system and worked flawlessly. I hooked the Skyport camera trigger up to the A900 using a hotshoe adapter from Gadget Infinity, which enables connection of a standard 1-pin flash to the Sony/Minolta flash mount. The power of the BxRi flashes can then be adjusted directly from the camera. This is ideal when you don’t have an assistant and have a number of lights set up. There’s nothing more annoying than standing around while the photographer fiddles around with lighting equipment.

Alexandra_I-2.jpg

And what is the result? Perfection mon ami, perfection. The tones and colors from the A900 are fantastic. I shot Alexandra in a few different sets against green, red, and grey backgrounds. This included everything from a yellow dress to posing with a Katana and a severed Barbie head necklace. During the pre-shoot brainstorming stage I remember I was thinking something like, “Wouldn’t it be great if she was hunting Barbie dolls in the jungle and then cut off their heads and made a necklace?”

Margarita_I.jpgThe A900 on Location

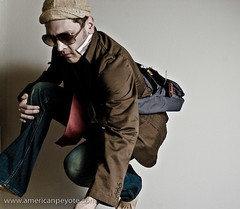
I was contacted by Margarita via Stylished (she’s also on Model Mayhem). I wanted to do some photography in an urban environment, so we headed to the old industrial area of Winterthur and moved around the old Sulzer industrial-area-turned-hip-living-area. For this shoot I used the Sigma 70-200 HSM and a Sunpak 120J with a Kacey Beauty Reflector. I always use the TR-II battery pack with the 120J, as I can shoot almost all I like without worrying about battery life. I also had a Sunpak 383 with my Orbis ringflash adapter for added fill when needed. Margarita and I did a few different sets in the Sulzer parking garage and then outside. The A900 and Sigma combination was very nice. The Sigma includes an in-body ultra sonic motor, giving fast and accurate focusing. The 120J and Kacey dish is my favorite location lighting kit. Margarita posed against concrete walls, walked around the old industrial space, and contrasted quite well with the steel framework of the place.

Many people say you don’t need the 24 megapixels of the Sony A900, and this is probably true for me as well. However, more important then sensor count is the full-frame 35mm sized sensor. This means you’re able to use the bokeh qualities of your lenses the way they were designed to be used. In the Sulzer garage you have sunlight filtering through the roof and wall windows, I balanced this with my strobe and opened up the aperture of the Sigma lens to get fantastic background blur – an ideal portrait setup. I grabbed the super bokeh frames and then posed Margarita against the steel columns. I placed the Kacey dish just out of the frame to light Margarita’s upper torso and the steel column. Light fall-off from the Kacey dish was as fantastic as ever. Every time I use it I’m happy I bought it.

Margarita_I-2.jpg

The Amazing A900 Files

I’ll be honest, I gag every time someone says something like, “I take real photos, I get it right IN-CAMERA and never use Photoshop.” The images I see in my head can rarely be captured in-camera. Many times they are, but like my paintings, the final image only starts with what I capture in-camera. The ability to manipulate your images in the post-processing stage depends heavily on how much information you’ve captured in-camera. So if you have a 24 megapixel image which isn’t focused properly, the shadows of the image will have poor definition and you’re limited in how well you’ll be able to manipulate those shadows, limiting your vision with Photoshop. The RAW .ARW image from the A900 are beautiful. You can shoot in normal or cRaw, the compressed .ARW format. The uncompressed RAW files are like 35 Mb, and the cRAW are like 24 Mb. Good money says you won’t see much difference between the two formats, and I’m shooting everything in cRAW at the moment. Now, I bought the A900 to get significantly better shadows texture and dynamic range than I was achieving with the 7D. Am I happy? Yes – fuck yes, I am ecstatically over-joyed with the shadow texture and post-processing ability of the A900 RAW files.

But beautiful files eat up a lot of CF card space when you’re like me and only have 1 and 2 gigabyte cards. But given how cheap these things are, I plan to be shooting with 4 or 8 gig cards with the A900. During shooting I copy the A900 files to my HyperDrive Space, then hook that up to my Mac Quicksilver 2002 G4 and copy the files using Adobe Lightroom. Basic adjustments are done in Lightroom, then choice images are exported to Adobe Photoshop to achieve the vision then fine-tuned again in Lightroom before final export to Flickr or for printing. I’ve been told you can just shoot JPEG with the A900, but I can’t figure out why. If you’re shooting JPEG with the A900 you probably don’t need the camera and should sell it to me at a good price so I can have a backup body.

So…

Is the Sony A900 a sweet camera? Yes. Should you buy one? Yes, if you want a fine camera which produces fantastic files, has a speedy focus, handles really well. I kept my Minolta 7D for a long time, and I plan to keep on shooting with it, but I also plan on shooting with the A900. The 24 megapixels are over-kill for many applications, but when you want the fine shadow textures and ability to mainuplate the light of an image, the Sony ARW files are heaven to work with in Photoshop and Lightroom.

Canon G10 – Climbing Camera Review

Hand-1.jpgI picked up the Canon G10 for a trip to the States where I would be traveling between San Diego and Los Angeles, including a mountain excursion to San Jacinto, and it seemed like the right time to buy. However, as I live in Switzerland and am sometimes active in the mountains, I’ve started taking the G10 on climbing and mountaineering excursions. This is my functional climbing review of the G10 as a mountaineering camera. A climbing camera needs to be as small and functional as possible. Climbing partners sometimes get pissed if you bring a Fuji GA645 or Sony A900 up north ridges. I’ve reviewed the Ricoh GR Digital (GRD) for climbing in the Swiss Alps, so it seemed like a good idea to do the same with my Canon G10.

Why the Canon G10?

First, from a specs perspective, why the G10? The G10 sports a 28-140mm lens in 35mm format. This gives good coverage for landscape and telephoto for portraits. In addition it shoots RAW and has a 14.7 Megapixel sensor. This is a pretty sweet combination of features, topped off by the fact that the manual control interface is almost as good as the Ricoh cameras (GRD, GRD-II, GX100/200). So far I’ve shot with the G10 in the San Jacinto wilderness in California, on a bike-mountain tour on Glarnish, sport climbing in Ticcino, and up the Braunwald klettersteig in the Swiss Alps. In general, it works very well for climbing. The battery last forever, even when the temperature drops below zero an I’m shooting sunset shots in the snow. It records RAW files instantly, and I barley have to wait before taking another shot. The manual interface is nice, allowing full camera control, exposure compensation, ISO settings, etc with a few movements of my fingers.

Braunwald-1.jpg

When you’re actually climbing (not setting up shots of other climbers), a camera is really only functional if it can be used with one hand. You occasionally get to use two, but most of the time at least one hand needs to be on the rock or rope belay. This is where the Ricoh still beats the Canon design. The Ricoh GRD can be almost completely controlled with the right hand. Using the custom function button you have full access to file format, exposure compensation, ISO setting, macro focus, flash, metering area, shutter speed, aperture, pretty much everything the camera can do. With the Canon G10, you have the speed wheel, which acts to control shutter or aperture and choose things in menus. Exposure compensation is on a click wheel on the top left of the camera, ISO selection is on a click wheel on right, while flash, macro mode, and menus can be controlled with the right hand using buttons near the speed wheel. From a control layout, the Canon G10 doesn’t measure up to the Ricoh GRD. The Ricoh is king in user interface design.

San_Jacinto-1

G10 vs. GRD

The main problem with the G10 interface is that exposure compensation can’t be controlled with the right hand while holding the camera. Further, ISO is controlled by the click wheel, which isn’t as easy to do as with the Ricoh. This is important for small sensor cameras, because if you over-expose the highlight areas, you easily get a blown out image, instead of a properly exposed one. It’s easy to avoid blown highlights by checking the live histogram and dropping the exposure on the Ricoh. But with the Canon G10 you have click the exposure wheel on the top left of the camera body, something which isn’t easy if you’re left hand is occupied holding your body to a rock face. If you have to pick between bodily injury and exposure compensation, you should choose the former, or get a new digital camera. This limitation can be sidestepped by shooting in aperture or shutter speed mode, but I still find it limiting. If the G10 had the ability to press a button and choose these things like the Ricoh does, it would be a much more functional camera in the mountains – and for implementation that’s nothing more but a firmware addition by the Canon people. Still, I’ve very much enjoyed taking the G10 on mountain trips. It’s reasonably small, the picture quality is excellent, and I wonder why people feel the need to buy a Rebel DSLR when the G10 will probably give all the quality and functionality which most people need in a camera.

Flowers_Bokeh-1.jpg

Macro Goodness

The G10 includes a macro mode, much like every other digicam. In the late spring and early summer the mountain wild flowers take over after the snows melt away, and Braunwald is known as a sort of mountain flower paradise. It’s nearly impossible to walk around the place without killing at least a few violet or yellow beauties with your boots. Naturally I had to stop and take a few generic flower photos. As I had packed light on this trip, I didn’t use any strobes, and instead used the on-board flash for a bit of fill. To take this flower photos I dialed in a an exposure compensation of about minus 1/2 or minus 1 and focused on the middle of the flower patch.  The bokeh from the G10 is actually fairly nice. For these close-up macro type images the blurred background doesn’t distract from the sharp part of the image. The on-board flash does a good job of adding just enough light and not overpowering the exposure, of course, it’s best to control this using the exposure dial. When you have two hands free to operate the camera it’s very easy the intuitive to dial in manual camera settings and fine-tune the exposure, I just wish it was a tad easier to do with just one hand.

Beyond Snap Shots

The mountains beg for landscapes, I sometimes shoot with a GigaPan, but it’s far too bulky and heavy for most of my mountain trips. I sometimes shoot with a tripod and pan, other times I just rotate the camera and guess that I’m keeping the nodal point reasonably centered. I process my panoramas in PTGui Pro, which works equally well stitching two or two hundred images together.

Pano_800px.jpg
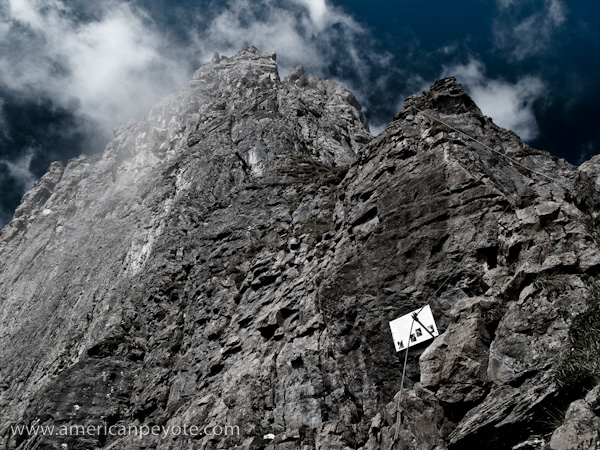
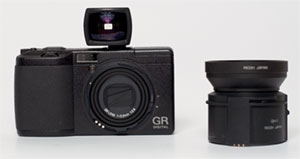
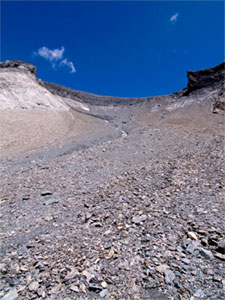
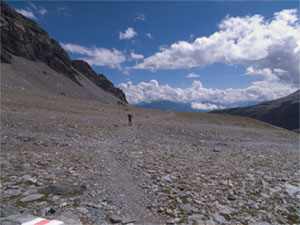
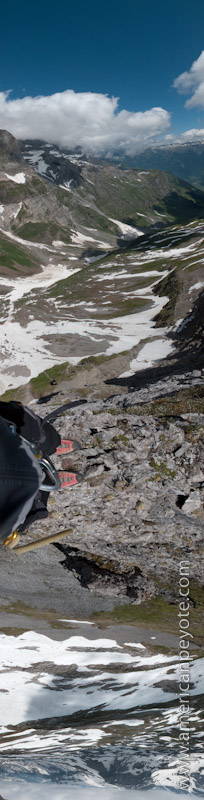
I took the G10 on my climb up the Eggstock in Braunwald. This is a klettersteig climb, you don’t have to worry about having a climbing partner and can cruise up the mountain with ease. I used the G10 to shoot perspective images, document the climb, and take a few landscapes. Generally I had the G10 slung in front of my, and shot with one hand while holding on to the rock with my left. After climbing up the Eggstock klettersteig I continued along the blue alpine route, which follows the ridge of the mountain, eventually leading up to Bos Fulen. If you follow this ridge it eventually becomes as wide as a pair of La Sportiva Trango S mountaineering boots. I took this time, standing on the edge between a moderately dangerous tumble on my right, and a suicide-sure-to-be-dead fall on my left to shoot a quick panorama. Yes I was wearing a harness, no it wasn’t connected to anything which would have saved me (sorry mom). Yes the rock in this area is a tad sketchy, and I soon decided to climb down rather than to continue and risk the rock collapsing under me, hoping I would fall to my right rather than the 600m drop-off to my left. You don’t want to be fiddling with camera settings when you’re trying to take a panorama like this. If you get distracted and forget to balance it’s rather easy to kill yourself, so I was happy that I was able to easily meter the scene using the live histogram, lock exposure with manual settings, and take a succession of shots for the final panorama before coming to my senses and descending.

Aside from the handling and image making capabilities, the G10 produces decent files for post-processing.  The resolution of the G10 matches and exceeds that of many DSLRs, but it’s the ability to manipulate shadows and the textures of life which fascinates me. The post-processing capability of images is where small sensor cameras deviate from DSLRs.  With better rendering of shadows and capturing the dynamic range of a scene.  This is where a camera like the Minolta 7D excels compared with, say the Canon G7. In the first two images featured here, I processed the images in Adobe Lightroom and Photoshop CS3. Generally if you post-process small-sensor images, you can manipulate the shadows a bit, but pushing the exposure too much in Photoshop will blow everything out and you end up with a mess. With the G10 images, I can add a black+white conversion layer to bring out the shadows and the desaturate a bit and kick up the exposure a bit to bring out the clouds.

Happy?

So, is the Canon G10 a sweet mountaineering/climbing camera? Yes, I would say that it is. The combination of functionality and image quality is really fantastic. In the Alps it’s easy to have fantastic weather, and the G10 takes beautiful images when the light is right and you don’t have a huge span from light to dark in your image. The flash works well to balance the exposure when you have a foreground subject in the shade and the background is bright and beautiful. I hardly ever use the viewfinder, and enjoy composing with the LCD, getting the exposure right with the histogram and then snapping a photo. The battery life is excellent, and I have not experienced any battery drain issues associated with cold temperatures, something which is a huge short-coming of my Ricoh GRD. With the Ricoh I have to keep the battery warm in my jacket before shooting, and with the G10 I can just shoot away.

I’m eager to see what comes from the niew micro 4/3 sensor cameras. The new Olympus E-P1 digital Pen camera will no doubt be a serious contender for my next mountaineering camera, likely with better dynamic range than the G10. But don’t count out Ricoh. Word on the digital street is that Ricoh is entering the micro 4/3’s arena with a small DSLR type camera, which will for sure be a sweet climibing camera, especially if they’re excellent user interface deisgn is retained.

Pelican 1510 Photo Gear Case

Pelican 1510 Lighting GodWhen one gets deep into photography the inevitable question becomes, what can I store my gear in to keep it organized, accessible, mobile, bombproof and cool when jet-setting across the globe? The default answer is a Pelican case. Although now a cliche – Pelican cases are still the gold standard in photo gear protection. I bought a Pelican 1510 for various reasons, but the primary being that I needed a mobile case to house my gear for locations and for taking whatever wherever I desire without worrying about stuff breaking in-transit. I’ve used my 1510 for over half a year now, on planes, in my apartment, anywhere I decided I needed it to be (mostly my apartment).

I buy my gear used and don’t upgrade my DSLR every two years. I just haven’t seen the logic in stopping my acquisition of camera gear, and once you have a fine collection of cameras and lenses, the natural desire is to push it as far as possible on a given budget, and what better way to do that than buying a nice case to keep and transport everything in?

Additionally, I was tired of looking around for ways to pack gear, put some stuff here and other stuff there, and wanted to consolidate everything in one reliable, robust, portable container. The Pelican 1510 is perfect in this respect for a small production photographer (or random Flickr poster). It’s uber portable and aside from being checked by security nearly every time I go through an airport, it’s been a joy to use on the airlines. So far it’s been between Zurich, Boston, Detroit, and Zurich. In nearly each place I get checked at the security line. It must have something to do with the case, because on previous trips with more or less the same gear distributed in my carry-on luggage I was never pulled aside. Of course, it makes a bit of sense, with three or four flashes all lined up side by side, the case does no doubt look like some sort of munitions case on the X-ray machine.

Then come the inevitable question, “are you a photographer?” Ahhh, no dude, I just carry a box full of cameras and flashes because it makes me feel cool (ok, this “is” close to the truth). In Boston the TSA guy asked where I was going and recommended the lobsters in Baltimore…or maybe the chowder, I can’t remember. He also mentioned something about this looking like a lot of equipment for a hobby. My natural response to him was, of course, “well, you gotta have a hobby.”

pelican_1510-2My hobby sometimes includes hanging off of parking garage supports or skipping around abandoned factories in my Doc Martens, and photographing the concept images using off-camera small strobe techniques. This was the main reason I got the 1510, to roll around as needed in any given urban location. At any given time my Pelican 1510 contains 4-5 flashes with Gadget Infinity radio triggers, a DSLR (Minolta 7D), 2 lenses (20mm and 50mm), my Hyperdrive, maybe a Zoom H4 cable release, extra AA batteries, memory cards, plus a vertical grip, and Ricoh GR Digital or Fuji GA645w. In general, almost all of the above fits nicely in the 1510. I can grab what I need and shoot instead of worrying about gear organization. I just choose the light modifiers and stands I want to use and I’m off. Now I never need to look aimlessly around wondering where I put that extra hotshoe adapter or if I have some extra AA batteries somewhere. It’s all there when I need it and I can take wherever I want to go. The stock 1510 comes with pluck foam, but I opted for a version from B&H which came with dividers, and I added the optional photography organizer for the lid. This was an extra $40 or so, but I highly recommend it if you plan on using the 1510 as a traveling toolkit. It’s worth the extra few bucks without a second thought.

The 1510 with its rolling wheels is also handy around the house. People living in an apartment which doesn’t have a dedicated studio room often need to setup their studio and break it down before their husband/wife/boyfriend/girlfriend starts complaining about having the living room back, and it’s a breeze to roll the Pelican from one room to the next. This has changed somewhat since I moved into a big place with space for a small studio, but it’s nice to know the functionality is there.

There are cheaper options of course. You could, for example just get a clear plastic case and drop your assorted flashes and gear in there. It would cost less and still be nearly as functional. However, I like gear that can be abused if needed. Plus, you can stand on it in a lighting storm to insulate your body from extreme electro-shock therapy of Mother Nature during thunderstorms.

pelican_1510-3I like the security of Pelican cases and knowing that I never have to worry about the stuff I put inside them. The only time I ever opened a Pelican case to find the contents broken was when the TSA decided they needed to break open every fucking chocolate Easter bunny which I had packed in my 1450 (as checked luggage) as a present for my niece and nephew. Because, obviously if I wanted to smuggle drugs into the country I would do it in chocolate Easter bunnies which were still in the sealed packaging they came in from the store I bought them at in Switzerland. Which brings up another point, the 1450 is the perfect travel companion to the 1510. I can use my 1510 primarily for my lighting kit and then pack my Minolta 7D and assorted prime and zoom lenses into the 1450 (which is paired with a Pelican camera bag). The 1510 counts as the normal carry-on bag, the 1450 can counted as a camera bag. Since the 1510 is bomb-proof, it’s not light, and some people could run into the problem that it’s too heavy to take in the cabin. However, for myself it hasn’t been a problem.

So, if you’re in the market for a mid-sized bomb-proof rolling case for your photo-related mayhem consider a Pelican 1510 ?- I highly recommend it. If you’re weight consious I’d look to a rolling Kata bag or a backpack.

GigaPan Panorama Camera Review

GigaPan-2.jpgThe GigaPan is one of those, I have to have it gadgets that any no-life photographer salivates after. The concept is simple and perfect, turn a pocket camera into a Gigapixel producing machine. It was developed at Carnegie Mellon University with support by GoogleCMU and the NASA/Ames Intelligent Robotics Group. The term Gigapixel became popular a few years ago in Geek photo circles when people started stitching multiple images together to create extremely high resolution images. This allows the creation of images which could provide for the archiving and exploration of our world in a way never before possible. The super-high resolution image can be zoomed in on, and minute details of the world explored. This is all great, but when I finally received my GigaPan from the Beta program, I sort of lost interest in creating gigapixel images. What was probably one of the first GigaPans in Switzerland sat on my desk for a week, and in the interest of actually using it for something I loaned it out to a photographer who had time to play with it. Then I got inspired again and took it back. The point of the GigaPan is to take a large number (like 50, 100, 200 exposures) of images with the camera set on it’s maximum focal length (and therefore it’s highest resolution for a given scene). These are then stitched together, creating images in the 50 Megapixel (at the low end) to the multi gigapixel range. This is great, and I’m sure many photographers are using the GigaPan for it’s intended purpose, so the scientific researcher in me decided to go rogue and mount a wide angle Ricoh GR Digital instead of a normal point-and-shoot digital like a GX200 or Canon G9/G10.

My desire is to eventually use the GigaPan to create automated panoramic images for 360 degree visual environments as one would find at VRMag. As I don’t know how to make these interactive environments just yet, I started by taking more traditional mountain landscape panoramas. There’s an advantage to using a wide angle camera with the GigaPan. If you use a camera with a long focal length (100-200mm) which is continually zoomed to it’s maximum focal length, then it will be difficult to take descent images with foreground objects, since these will most likely be out of focus with respect to the background. With a wide angle lens and small aperture however, it is much easier to get both the foreground and background sharp in focus. Thereby you can create panoramas that better represent the local environment around the GigaPan, instead of just capturing a far-off scene.  For this intended application, the Ricoh GR Digital with it’s fixed 28mm, and add-on 21mm and 40mm lens options seemed like the perfect camera to use with the GigaPan.

My first outing with the GigaPan was to the Jungfraujoch, “the Top of Europe.” My parents were in town and I took them up to the Jungfraujoch, a train stop and observation station at something like 3454m in the Swiss Alps. It’s a “must stop” on numerous Swiss tours and is a fantastic money-maker for the region. Actually, I think the entire tourist economy of the Swiss Alps is tied to the Jungfrau Bahn, and without the train the country would fall into a crippling recession (yes, I exaggerate). Since the GigaPan is realistically too large, bulky, and heavy to take on a climbing trip, the Jungfraujoch provided a painless way to test the GigaPan in the mountains. The weather was as perfect as I have ever seen in the Alps.  I shot with the Ricoh  GRD and the 40mm GT-1 add-on lens.  This allowed me to test how well the GigaPan and panoramic software would work with a moderately wide angle lens, and provide a good technical basis for later projects, which will utilize the 21mm lens.

Jungfraujoch_Gigapan_I.jpg

Setup

Ricoh GR Digital
Ricoh GT-1 40mm lens
Manfrotto 055PROXB
Manfrotto 486RC2 Ballhead
GigaPan Robotic Head

Ease of Use

The GigaPan is easy…I mean, jaw-dropping-drunk-dialing easy to use. There’s some video tutorials on YouTube, but I was able to figure it out before the first video was halfway finished. There’s only a few buttons to push, and all you do is set the top left and bottom right hand corner of your panorama and push the start button. The field of view of your camera can be calibrated, so you can use wide angle or long focal length lens without any fuss. The battery life of the GigaPan is supposed to be an issue, but it outlasts the batteries of my Rioch, so I’d say I haven’t found the battery life to be an issue. I used basic rechargeable AA’s, I imagine battery life would become an issue at low temperatures.

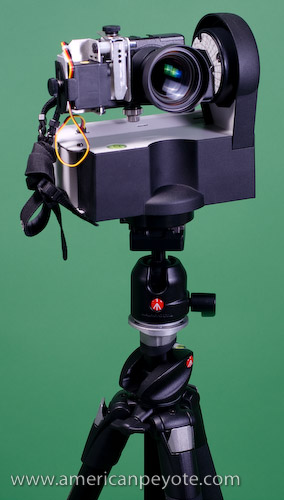
A key to creating good stitched panoramas is accurately centering the camera on your panoramic mount and figuring out things like the nodal point of the lens and other important details I don’t care about. I deal with technical details in my research work, I avoid them with my photography. In this respect the GigaPan rocks, because it has a marker for exactly where the lens should be in relation to the camera mount, so all you have to do is attach your camera with a screw and center it on the mount. I’m under the impression that given the small physical size of a compact camera lens, the exact location of the nodal point of the lens in relation to the rotating base isn’t as critical as with a DSLR. There’s a bubble level on the GigaPan which makes leveling the camera quick and painless, which is also important for creating images which are aligned well and makes the stitching process easier. My Ricoh GRD with the GT-1 40mm lens just barely fits on the GigaPan, but this is because the 40mm add-on lens is wider and physically larger than the GigaPan was designed for. For the automation process, a robotic arm depresses the shutter release on the camera to take a picture, and then moves to a new position and takes another image, and so on till the pano is finished. The camera has to be pre-focused (generally focused to infinity) and the exposure needs to be locked so the images can be accurately stitched together without exposure mismatches between images. In this regard the Ricoh GRD, GX100 and GX200 cameras are perfect, because all those operations are extremely easy to do on those camera models.
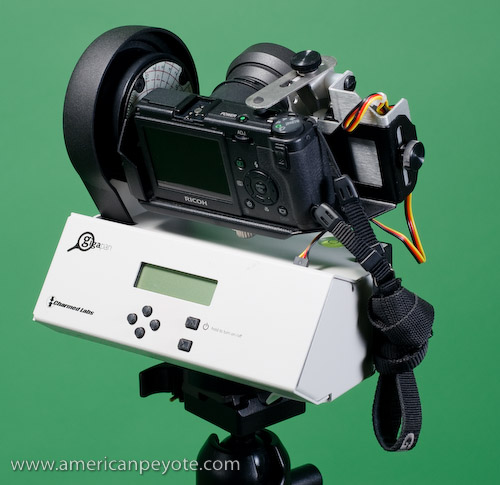
GigaPan-6.jpgDesign

This is element which stands out in my mind. The GigaPan looks like it was designed in a lab because it looks like a piece of boring lab equipment. I say this from the viewpoint of an academic researcher who has spent various nights in front of boring box-like designed lab equipment pieces, and who is now dreaming up designs for his own furniture. I mean, seriously, it’s beige, it’s made of bent metal, and the body is as angular and unsexy as possible. In the future, I highly recommend that the GigaPan design be outsourced to the CMU School of Design as a student project. I had high hopes of being able to take the GigaPan on climbing trips, but my climbing partner nearly flogged me to death with a quickdraw when he saw that I had taken my Fuji GA645w, Rioch GRD, and a small Velbon Sherpa tripod on our last Alpine attempt up the North ridge of the Weissmies. So, tossing the GigaPan and full tripod in my climbing pack is sort of out of the question. As I’ve left the academic research world and become a full-time simulation/optimization engineer, I know for certain that the GigaPan could be redesigned to be lighter and more functional. Future versions are said to include plans for a DSLR GigaPan, and I can’t imagine how large and heavy such a design would be if the current GigaPan were simply scaled up.

Panorama Processing

As part of the GigaPan program, free stitching software is available from the GigaPan website. This is great, except that I use a dual 1 GHz G4 PowerMac and the software only runs on Intel macs. This was fine though, because I purchased PTGui Pro, which is one of the best panoramic stitching programs on the market. I chose PTGui because Hugin, the free Canon stitcher, and Photoshop CS3 all proved inadequate for the job of stitching 20-200 images together. Plus, as I’m using a wide angle lens for my panos, I figured it was better to use software optimized for different panoramic stitching techniques, where I can choose and optimize my control points, image distortion, and exposure of the images. I’m pretty sure that the GigaPan stitcher software was programed with the idea of people shooting with their cameras zoomed in to the maximum focal length, on the order of 100-200mm, which is exactly what I’m not doing. PTGui Pro is as painless to use as the GigaPan, and makes quick work of any number of images which require stitching. It just takes a while to stitch 200 images because my computer is slow by today’s standards.

GigaPan-4.jpgBrass-Tacs

The GigaPan is a fantastic piece of equipment for the lazy panoramic photographer, or those who actually want to make Gigapixel images for research and exploration of our world, or photo geeks in general. It’s painless to use, portable for many applications, and is pretty hard to screw up due to its simple design. I didn’t find battery life to be an issue and it’s pretty cool to shoot with. Everyone stops by to check out what you’re doing when you shoot with a GigaPan. Kids will be amazed that you’re shooting with a camera that looks like a mini anti-aircraft weapons system, their Dads will ask you questions, and in general women will probably be turned off by the fact that you have the least sexy panoramic camera mount a person can buy. But I digress, good design is the combination of form as well as function, and what the GigaPan lacks in style it makes up for in terms of function. In some ways shooting with the GigaPan is like wearing a colorful pair of Onitsuka Tigers on a fine Autumn afternoon. You get noticed wearing Tigers and it’s the same with the GigaPan. Now, Imagine if the GigaPan were designed with a body style other than “as-unsexy-as-possible” and a color other than beige? Imagine the possibilities when I could wear my Onitsuka Tigers and shoot GigaPan Berlin city panoramas in style with an air of well-designed confidence.

Essential Links

GigaPan.org
Global Connection Project
GigaPan Video Tutorials

Panasonic LX3 and Elinchrom Coffee Madness

For the first two years of it’s genre, the Ricoh GRD, GX100, and Canon G7 were the top compact cameras in the marketplace. This has changed as camera companies have realized that yes, photographers do want high quality image making ability in the palms of their hands. Currently, the high quality compact camera field includes the Ricoh GX200, Ricoh GRD (II), the Canon G10, the Nikon P6000, and the Panasonic LX3 (we’ll ignore the Leica clone model). Ah, and the Sigma DP1. Many reviews are out on these tools, but I have a will to be weird, so when Matt emails me and says we should test out his new LX3 in my new home studio, I says “Hell Yes” in my heads.

Matt picked up the Panasonic LX3 for an upcoming bike tour in Asia, I just got a studio background system, Matt has a set of Elinchrom Ranger Rx flashes, and I have a new coffee pot and set of vintage coffee cups. The keen reader might be able to guess what’s coming next, but I’m about to tell you so it’s irrelevant. There’s a shot I’ve been replaying in my head for a while, a person trying to sip a bit of coffee as it flies through the air, just out of reach of their lips. This is easy to imagine, but slightly more complicated to realize. You need good lighting, a fast shutter speed to capture the coffee in the air (with tack sharpness) and you need a place to do it. With Matt’s email, I knew all the elements were now in place.

Now, we had other tools to do this shot, I have a Minolta 7D, Matt shoots his professional jobs with a Nikon D300, and we both have access to excellent rental shops in Zurich, where you can get whatever you need from Canon to Mamiya, from Leaf to Phase One. But we wanted to explore the LX3 and see how it works in the studio. Does it make sense to use a $2000 lighting kit with a pocket camera? Hell Yes I says in my heads.

Technical Details

The Elinchrom Ranger system was fired using the Skyport radio trigger system, as the LX3 has a hot shoe, this worked flawlessly. The Ranger RX system has a flash duration around 1/2250 sec. depending on the power setting (according to the Elinchrom specs). This is one reason to use a top-of-the-line lighting kit like the Ranger system over my Strobist-inspired Contax and Metz flashes for capturing coffee in the air. With such a short flash duration, you can freeze moving liquids with super precision. Additionally, we used Matt’s Elinchrom Octa box, which provided beautiful wrap-around lighting – and makes my small Alzo softboxes look like, well, small, inadequate light modifiers (for this application).

The full setup included an Apple Green background, and me kneeling on the floor with a few towels laid down to protect the paper from the incoming coffee splatter (only partially effective). We had a system, Matt counted one….two….three, and at each number I moved….left…..right…..left, and at the same time propelled the coffee cup in the air and tried to catch the flying liquid with my lips. Then I would wipe up all the coffee splatter that missed the towels and had landed instead on my new wood floor. This took a few shots to get the timing down, but after a few tries and two beers we were getting acceptable results. One main difference between DSLRs and compacts is shutter lag and focusing time. To get around these limitations Matt pre-focused and locked the focus on his LX3. This essentially eliminated the shutter lag problem. He shot with a shutter speed of 1/1000 and an f-stop of f/8. There were no problems syncing the flashes at this speed, the Skyport system worked much better than my Chinese radio triggers in this regard (high speed syncing). This of course highlights one reason to use the LX3 instead of a DSLR or a digital back system, theoretical high-speed syncing on the order of 1/2000. Chase Jarvis did something similar in his Kung Fu water droplet tutorial. But you really don’t need a $40,000 camera system to capture liquid in the air. In fact, you’re a tad limited if you do pick the Hasselblad because if you use a $40,000 Hassy system you’re limited by the sync speed of the camera. To work around the shutter sync limitation one would generally decrease the ambient lighting in the studio, open up the shutter of the camera, and then fire the strobes separately to capture the action, and close the shutter. The exposure is then determined by the flash exposure and aperture setting of the lens. This technique requires a bit of preparation for each shot. With the LX3 and it’s high-speed sync abilities combined with short duration Elinchrom strobes, you just point and shoot, which is the whole point in using a point-and-shoot camera. ?You’ll need to fiddle a bit with the strobe power setting and aperture setting on the camera, but it only takes a few seconds. ?In this setting the shutter speed was around 1/600, but a lower speed could have been used as well, the exposure of the scene being dominated by the strobes.

The Results

The combination of studio lighting and the LX3 really surpassed what I was expecting. The light quality produced with the Octabox combined with the short flash duration of the Rangers made it possible to freeze the flying coffee with a texture and definition I was not expecting. When combined with the resolution of the LX3, and it’s superb Leica lens, you get a tack-sharp image with excellent color and dimension. The combination of a small sensor camera with a small aperture also meant sharpness across the image. As the LX3 RAW format is not widely supported, Matt shot in JPEG, which was fine for this application. We’re not planning on blowing these images up to large sizes and the exposure was perfect, so the difference between a RAW and JPEG image in this shoot was fairly minimal.

There’s one thing I’ve learned since I started shooting with a Ricoh GRD a year ago, and is reinforced here: pocket cameras, like all tools have limitations, but when the right light is used, the resulting images can be as jaw dropping as those taken with DSLRs. Lighting and composition are generally more important than megapixels, and it’s one reason why I’ve added more flashes and modifiers to my toolbox instead of a new DSLR (but the Sony A900 is oh, so, so tempting). Still, if you’re getting a pocket camera, it’s good to know it can be used in a variety of situations. Like the Ricoh GRD, the Panasonic LX3 works great in the studio environment. When Matt emailed me about shooting with the LX3 in the studio I was afraid I would be motivated to pick up an LX3, but the experience was worse, because now my eyes are set on the new BXri 250/500 Elinchrom flashes announced at Photokina.

About the photographers:

Matthew Anderson recently moved to Switzerland and is currently engaged in the art of producing beautiful wedding photography and the precision of imagery for commercial clients.

I technically didn’t do much photography here, and was more of an art director, have little of a life and fill the void with photo gear.

Zoom H4 – Sweet Photo-Audio Fusion

I’m a tech fiend, not from a mad-capped desire to own every little gizmo I see, but rather from the philosophy to collect the tools needed to create whatever creative thing I imagine – or am driven to explore. I’ve been running through film and digital raw files for a many years now – landscape, cityscape, portrait, studio and location lighting, it’s all up there in my head. Creative vision and work flow? It’s all good – but there’s always a way to expand and take things to the next level.

Gorilla Pod neck-mounting of the Zoom H4

Photography only excites the visual areas, but some concepts require – or at least are greatly enhanced by communicating audio elements as well. I love the concept of getting into video, but it’s also another medium to master and a fortune of gadgets to collect. Plus, I love using just one or a series of high-quality images to communicate a concept. Must photography become video in the form of a super video device like the Red One Scarlet? If the story can be told with one high quality image, why use video? Well, I often imagine concepts as videos in my head, combining audio and imagery in one to convie an experience to the viewer. So how can I use current photographic techniques and add elements of audio excitation?

Often I walk dark city streets and bad poetry fills my mind. An image of that dark street doesn’t communicate the poetry I’d like to rap to the viewer. And if you add text, like in a blog, the tone and depth of the voice is lost. Bacially, photography only gets you so far, and the idea of integrating audio with photography has been sticking in my head for a while. But how to do it? How do you collect high-quality audio to effectively complement the visual? With another high-priced gadget, in this case, a studio quality digial audio recorder like the Zoom H4.

The Zoom H4 is a handheld studio quality digital audio recorder. After a not so intensive research look into the different digital audio devices on the market, the Zoom H4 was an easy pick, as it comes with a high-quality microphone and a reasonable pirce tag. There are various extremely well-written reviews of the H4, but the one you are currently reading comes from a film/digital photographer who needed a device to mix well with his other digital capture and expression devices (expensive toys).

I’m not what you would call “knowledgeable” about audio gathering. Bascially I wanted something like the Ricoh GR Digital camera; high quality media capture in a hand-held package. My desires for the H4 were pretty simple: the ability to quickly choose between uncompressed WAV for high quality sound gathering, or mp3 for lower quality when desired. Analogous to choosing .tiff or .jpeg as a digital camera analogy.

The Zoom H4 is crazy easy to operate, there are a few buttons to control microphone gain, file type, and recording. On the left side of the Zoom you choose between mp3, or various uncompressed WAV file sizes. Push the big record button once and it starts flashing, with the headphones on you can hear in real-time how the audio sounds. On the display you can see if the sound levels are being read well. If they’re too low, you just increase the microphone gain (low-medium-high).

This allows you to boost the microphone sensitivity higher or lower (like changing camera exposure) as needed to optimize the recording quality. You know if you need to or not because the input levels are displayed (similar to a histogram in digital cameras), which gives you an idea of which gain sensitivity (low-medium-high) to use.

In general you want the audio input levels to be as high as possible without exceeding the range of the microphone. This is akin to pushing the exposure on your digital camera as far as possible without clipping the highlights (exceeding the exposure limit of your camera). Press the record button a second time and you start recording. Press it a third time and the recording stops and the file is saved. You can easily navigate the recorded files and play them back, delete them, format the card, etc.

The Zoom H4 looks like a taser, but feels more like a Star Trek tricorder. For collecting ambient street and bar music you only have to be sure the microphones are protected from the wind or not bumped/touched during recording. It’s somewhat directional, something akin to using a 28mm wide angle lens on a 35mm camera. Just point in the direction of your audio subject and start recording.

There are a number of more advanced features which I’m not qualified to get into. With the XLR inputs you can hook up fancy microphones and record multiple tracks to use the H4 as a pocketable studio, or record directly to a computer via the USB connection. No doubt this is crazy useful for journalists, podcasters, and people who are really into the home studio thing, but I’m into the high-end hobby photography thing, and recording directly to the solid state SD card is what I bought H4 for.

Recording in uncompressed WAV format can eat up a lot of memory if you’re recording speeches or are out for the whole night doing street poetry. Like with a digital camera, the audio files are easily downloaded to a portable drive like the Hyperdrive Space. For basic recording, a couple of 2GB SD cards will serve your recording needs well. The H4 takes AA batteries, and will last for a couple hours of actual recording time before dying, this and the fact that the SD card is actaully incoviently difficult to access are the only real drawbacks I’ve found so far.

Zoom H4 I

Those of us who got interested in the concept of Gonzo reporting by watching Johnny Depp in Fear and Loathing in Las Vegas walk around a bombed out hotel room with a microphone taped to his head will appreciate the flexiblity of mounting the Zoom. For a throat-to-the-wall night of fast moving action and high qualitiy auido gathering, the H4 can be mounted to a Gorilla Pod and wrapped around the neck of the reporter. If Hunter S. Thompson were just starting out in 2008, I could imagine him picking up a Zoom H4 to do his work. The Gorialla-Pod-around-the-neck mounting system allows hands free continuous recording of events after the record button has been pushed. It can also be easliy mounted to the forearm and the Freak reporter can then run around all night pointing the Zoom H4 at people like a dropout from the X-men school of Gonzo reporting.

Zoom H4 IIZoom H4 III

I imagine I’ll move towards video at some point. But here’s my rational: I love having a high quality image which invokes emotion or tells a story. Doing video just because you can won’t necessarily create a better story telling style. I just feel limited in that many times the environment/subject is not just a still life, but a combination of audio and visual elements. Yes, many point-and-shoot cameras do video and audio recording, but we all know the output is not high quality. The ability to record studio quality audio right along with high quality images is a very powerful combination. Now the challenge is to elegantly combine the photography and audio in one media package. If you combine great photography with cheesy audio you’re just going to turn people off because it will come across as a gimmick. One needs to take the “eye” for creativity from photography and find the creative “ear” for audio recording.

No review is complete without output, so here is a sample from the Zoom H4, of some bad street poetry put together on a warm summer night in New Orleans, somewhere near Burboun Street. The wedding I had just attended was over, but I had no desire for sleep and instead walked through the city collecting ambient sounds and spewing lines into the open air for the H4 to record. It’s not my best work, and is highly reminiscent of my worst photography work, ill-thought-out and laking in focus or direction. The coming challenges include developing a mixed-media workflow to elegantly combine visual and mixed-down audio into one package.

But for now, there’s just this short piece of Bad New Orleans Street Poetry, a combination of spoken word and ambient sounds.

[audio:http://blog.americanpeyote.com/wp-content/uploads/new-orleans-street-mp3.mp3]

What comes next? I don’t know for sure, but if I wanted to describe the Zukunft in an unoriginal and overdone way I’d say, “the Future looks and sounds fantastic.”

Other reviews of the Zoom H4

Mark Nelson at O’Reilly.com

Jeff Towne at transom.org

Ricoh GT-1 40mm – The Sad Clown Portraits

The Ricoh 40mm is one of those fantastic photo accessories which is amazing under certain conditions, and fouls the mind when used in sub-prime environments. The Ricoh GR digital is one of the best digital cameras around, and possibly has the most legacy support of any digital camera I’ve come across. I use an original GR Digital, and bought the 40mm lens for it, what follows is my review of it’s capabilities in a controlled light (studio) environment.

The original GRD (28mm lens) was released as a stand alone small sensor camera, and additionally with a 21mm lens in a creative set. Basically, the GR Digital is the most portable and useable wide angle point and shoot digital every created, which means it’s also the most portable and usable wide able camera ever created. There were limitations of course, one being that the 28mm and 21mm focal lengths are great for city and landscape work, but more difficult to use for portraits. So it was intensely cool when Ricoh released the GR Digital II, an updated version of the GRD, as well as a new 40mm add-on accessory lens. The new 40mm lens is compatible with the “old” Ricoh GR Digital camera. A weak dollar and rampant vacation through Detroit made purchasing the 40mm add-on a no brainer for me.

My main desire in buying the 40mm was to extend the portrait capability of my GRD, by using a more patriot-oriented focal length (40mm). I use my Ricoh for controlled light (studio) portraits, often employing a “strobist” inspired lighting philosophy. One advantage of using the GRD for controlled light portraits, is that it’s so small it can be used in many situations where a DSLR is too bulky to use, like in confined-space conditions.

Wait…why use a point-and-shoot camera when you have a full DSLR setup?

There are many benefits to using a small sensor camera with studio lighting for portraits. In general, one key element of portraiture is ensuring that the eyes remain in Focus. You can have all the diffused areas you want around the subject, blur out the mouth, whatever, but if the eyes aren’t in focus, you don’t get that feeling of being pulled into the image and conversing with the soul of that face staring back at you. This is where small sensor cameras are awesome compared with DSLRs, because with the Ricoh GRD and 40mm lens, the very large depth of field means that the eyes will pretty much always be razor sharp, and you can add all the blur and diffusion you want later in Photoshop.

When you start getting into a serious camera and photography knowledge collection one thing is clear, there’s no end to it. Once you understand cameras you move on to lighting, and once you know how to light for portraits and mood, you generally get into fashion and design, and once you get past basic fashion down, the most logical step is getting into make-up. This is confusing territory for guys who aren’t into drag, so I went to the Source to get a crash-course schooling in eyeliner and foundation.

The makeup was sort of a freak accident you see. I was strolling through the Somerset Collection, an upscale shopping experience a-la-mall in the suburbs of Detroit, and after checking out the Levi’s store I wandered into Sephora. Previously unknown to me, it’s one of the prime makeup stores in the States. I walked in with a vague idea about asking for eyeliner, and a minute later found myself sitting in a chair with a makeup artist named Susan applying foundation to my nose and facial structure. 10 minutes later I was being told by everyone in the store that I looked fresh from a rock stage. I ended up dropping $100 on eyeliner and makeup. With my new look intact I headed to suitable location to make some magic.

Cramped Basement

The perfect cramped studio location presented itself in the form of my parent’s basement in the Detroit suburbs. The place is still cluttered with things like my old G.I. Joe and Star Wars toys. I found a section of wall to work with and setup my lights: one Contax TLA280 and a Sunpak 383, both placed in Alzo digital softboxes. After a wardrobe change plus a few lighting adjustments I had a set of images called:

The Sad Clown

Every photo needs a back-story:

The Sad Clown has little ambition or direction in life, schooled on the streets and usually found sleeping in the gutters of Paris, he sports a stripped sweater, yellow button-down shirt by Ben Sherman, and occasionally a sport coat by “WE” and a tie by the same label.

The Sad Clown smokes 15 year old cigarettes and laments on the laughs he cannot produce due to this wasted life on the stage.

The Sad Clown I

From a tech standpoint, the 40mm Ricoh is a sharp and rather bad-ass piece of glass. The detail from well-exposed portraits is really excellent. However, the lens is also big, and pretty much kills the convert, concealable factor, for which the GRD is known for. The 40mm also flares like a Phoenix farting in your face whenever a light source is pointed even remotely towards the front element. This shouldn’t be a surprise, the main element is massive, and sets the perfect stage for ungodly internal reflections. I had to be sure my softboxes were not directed at the camera, otherwise big red blotches would show up in the images.

The Sad Clown II

You can see in this view that the eyes couldn’t be sharper. This is one reason to use a Ricoh Digital over a massive DSLR with an 85mm f/1.4 lens, the quality of small sensor Ricoh GR portraits include very sharply defined lines – and when properly exposed, excellent subject-background separation. I don’t think it would really even be feasible to produce an image like this using my Minolta 7D, or any other DSLR, unless using a very long lens to compress the image and increase the depth of field by using a very small aperture. With the Ricoh GR and Alzo Digital Softboxes, it took 5 minutes to setup and execute this portrait in a very confined and cluttered space.

Every piece of equipment has it’s limitations, and in total the 40mm is an excellent lens, extending the usability of the GR digital system considerably. With the 21mm and 40mm lenses, you have an excellent small sensor camera system, suitable for travel, landscapes, city, portrait, and the production of unique images with studio lighting techniques. Well, actually, you can use it for whatever your heart desires – go out and make the Sad Clown smile again.

The Sad Clown on Flickr

Joey L Photoshop Tutorial – After the Honeymoon

The worth of any product does not lie in the first impression, but is rather exposed after having used the thing for an extended time period.  Given the turnover in digital camera technology, 4 months is probably a decent time frame to assess the worth of the Joey L Behind the Scenes Photoshop DVD Tutorial.  I purchased the Joey L DVD Photoshop Tutorial just after it was released in October of 2007 and it is now March of 2008.  After having viewed and used the tutorial for an extended period, did it have a lasting, positive impact on my image making abilities?  Am I now a Photoshop Buddha?  Is it time for me to organize my own DVD and start teaching workshops?  Was the Tutorial a wise investment in my education or an overpriced, rash, ill-thought out toss of my money out the digital window?

Relax Hand Hard Shadow

The Back Story

There are few things which I view with a need-it-now mentality, in particular when it comes to education.  It might suck to learn long division as a disgruntled youth, but it pays dividends later in life when you can calculate things fifty times faster than someone who needs a calculator.

Similarly, I didn’t buy the Joey L DVD thinking it would change my Photoshop skills overnight, but rather, over time it would either have a positive, or absent affect.  The purpose of this extended After-the-Honeymoon review is to look at how the material from the Joey L DVD affected my photoshop and photography capabilities – after the initial joy of buying another digital imaging product had worn off.

First: Why Buy a DVD Tutorial?

The main criticism of the Joey L DVD Tutorial in various internet circles is that it’s overpriced, and doesn’t show anything that can’t be learned on the internet, either for free, or via modest monetary costs.  So why buy it?

It’s true, there are countless opportunities to learn Photoshop and Photography on the web.  Sites like Scott Kelby, Layers Magazine, Photoshop User TV, Dr. Brown, and a number of random totally free videos and written tutorials (often with sample files) are sitting there in virtual space, begging to be viewed.  There’s also libraries of books on-hand dealing with every aspect of Photoshop.

I also know from experience that a number of the tutorials are little more than simple near-pointless tips on using curves, the healing brush, and converting to Black and White.  Not all of course, the paid ones have more real value and there are many gems at Layers Magazine.  However, my main experience is that many almost universally use bland uninspiring images for their examples, and often times it feels like I’m watching a copy of a copy of a copy.  I was looking for something more original to supplement my Photoshop education.

One main draw of the Joey L DVD tutorial is that Joey Lawrence is an actual working photographer.  A dynamic beacon of creativity in an industry of imitators.  The draw of learning from an active Pro is unique for me, as I often have the feeling that too many tutorials are done by people who realized it was more profitable to teach Photoshop instead of being a photographer.  This is probably a pessimistic view, and there’s really nothing wrong with that business model, I encourage folks to make money in any legal fashion they wish, and teaching is one of the noblest professions.  Still, I get my science education from world class-researchers.  Why skimp on my Photoshop education?

A tutorial like the Joey L DVD instantly makes me think of photography workshops.  Workshops are popular from a few perspectives; when you get to the point as a photographer that you want to expand your creative consciousness or skills in a certain areas, or you travel to some distant hard-to-organize location.  Workshops are generally considered to be money-well-spent, and in general I would never spend money on a workshop because many just seem like an excuse for people with too much money to pay someone to tell them to use their camera equipment.  There are exceptions, if David Hobby or Don Giannati flew into Zurich for a Strobist or Lighting Essentials workshop, I’d probably be there to welcome them at the airport.  Basically, I wanted a Photoshop tutorial, and the Joey L DVD seemed like a good fit.

Hanging Hand

Playing and Criticism

Another main criticism is that Joey doesn’t teach good Photoshop technique.  From a technical stand-point I’d say this is true – but if I was technically a Photoshop whiz, I wouldn’t have bought the Tutorial in the first place.  The Joey L tutorial is primarily about using destructive editing techniques and just doing what "seems" right for the image – you know, to make it look good.  I don’t really think this is a bad thing.  This is what artistic expression is all about, if you stick to rigid guidelines in books and always listen to your teachers, you’ll always be one step behind your peers and more or less copying from the old Master’s.

If you copy what Joey does point-for-point, you’re not learning anything that a monkey couldn’t learn (yes, it could take a generation or two of breeding and genetic engineering).  Anytime you’re confronted with a large, intimidating construct like biomechanics, quantum physics or Photoshop, playing around isn’t such a bad thing – and should be encouraged.  "Playing around" has brought more ground breaking discoveries than I care to list, including penicillin and bubble wrap.  Playing in Photoshop is an important lesson I’ve taken away from the tutorial, which is also how Dave Hill developed his legendary style that so many geeks try to achieve.  This doesn’t mean I use the techniques Mr. Lawrence has described in his tutorial.  I do Photoshop with my own workflow and so should you.  But it’s not bad to learn from someone who isn’t using Adobe standard practices.

Ah, But the Cost

The Joey L DVD is not cheap, but education is what the student makes of it more so than what the teacher teaches.  This is contrary to many philosophies of modern pedagogy, but after going through three engineering degrees and a few semesters as a teaching assistant, I feel comfortable saying that a motivated student will learn no matter how dimwitted the professor may be.  Ahhh, but inspiration from a teacher, is sometimes priceless.  The Joey L DVD was inspiring for me, and that is hard to put a dollar sign on.  But it might not be for other pupils.

Draw Like the Maple Tree Young Grasshopper

I feel like the DVD has helped open up the horizons of Photoshop.  This doesn’t mean that now I think that every photo needs to emulate Dave Hill and Joey Lawrence, it just means that my mind is more open to what I can do with the raw image – and the DVD Tutorial had a part in that.

I love to draw and do images on paper, but I’ve generally felt constrained in Photoshop, "Hmmmm, I should make layers with correct names and make sure I can go back and change everything."  So, again one of the important lessons from the Joey L DVD is that a desire to play in Photoshop is essential, the program is a tool, not a defined process.  My Photoshop skills are getting more fluid and playful, which opens up more creative directions in photo manipulation – and hence visual expression.

Was the Joey L Tutorial a good buy?

After 4 months, I’m still comfortable with the amount of money I threw down for the Joey L DVD.  I come back to it and replay a lesson here and there when I need to, thinking back to the techniques, imagining how to use and create them differently, and often also disregarding them and doing something different.

I like being able to replay different lessons quickly, and then go back to other projects – something you can’t do with a workshop (unless they include a DVD).  I’ll probably never buy another DVD like this again (ok, maybe one), the exception being the forthcoming Strobist DVDs or the offerings from Lighting Essentials.

Why not go crazy buying more DVDs?  Because I’ve hit the point where all the other fine points of Photoshop can be easily found or discovered, maybe I didn’t need to buy the Joey L DVD to get to this point, but that’s the way I’ve arrived here, and I don’t regret the path I’ve taken.

Brass Tacks

Here’s the thing, with Photoshop I was looking for a spark, something to open the flood gates and broaden my horizons on this subject of digital post-processing.  The Joey L Tutorial DVD did that – exactly that – I see images in layers and masks and color shifts and shadowed hues now.  When I look at setting up a shot, I think about the post-processing, the way the lighting will define how the image can be manipulated later.  This isn’t a certain style, it’s an addition to my digital visualization abilities – the same as visualizing a wide angle effect before taking a picture.  The horizons for communicating a certain message have now been expanded.

Could the Joey L Tutorial DVD have been done better?  The crazy thing about the Joey L Tutorial DVD is that it could have been one of the most fantastic photography-centered Photoshop learning tools ever created – if it had been created with an eye towards integrating the lighting and photoshop techniques.  However, it doesn’t take long to see for yourself which type of images "work" and which ones "don’t" based on their lighting.  No Photoshop action can "fix" images which don’t have the right lighting to start with.  That’s the shortcoming of the Joey L DVD, the lighting-processing connection is mostly missing.  However, playing around with different images and the Joey L actions will quickly reveal how lighting affects the post-processing.

Here’s an example, both of the images shown below were processed using the Joey L Signature Action, and should be slightly representative of how this technique works.  It’s pretty obvious how the first image doesn’t really look all that great.  It’s flat and desaturated, and more or less boring.  This is because the face and torso are turned away from the light source, and all we have is definition of the jacket. However, the second image is better-lit, and renders the deep-grudge shadows much better than the first one.  Once you see which type of images and lighting combinations work it’s easy to draw up in your mind how to design shots specifically for this type of deep-shadow processing.

Floating in the Air Drama in the Air
Poor lighting, only shadow and definition in the jacket Better lighting, good shadow definition of the arms, torso, and face.

Monkey See Monkey Do?

There is a pervading attitude from many dark corners of the web that if you buy his DVD to learn from someone like Joey Lawrence, you’re trying to adopt or steal his look/style instead of developing your own.  If such an attitude existed in the scientific research world, we’d still be riding horses and the telegraph would probably be 200 years from being invented.  In general everything has been done before.  There are very few truly new things.  There was Dragan, people copied him by creating Photoshop actions, Joey Lawrence no doubt learned from these influences, and developed his own style.  He made a DVD, I bought it, and here we are.  That’s how progress and the evolution of style sometimes works in the digital imaging world.

As you move through life you learn things – and the knowledge you retain becomes tools which you can use to do other things: build bridges, take pictures, climb mountains, relax on a beach.  The real mistake is not learning as much as you can and using those tools as desired.  I didn’t set out to imitate Joey Lawrence, or to create iconic art that will stand the test of time.  But if that iconic art thing happens, well – cool.

The Joey L Tutorial DVD is just an addition to my photography digital image making toolset, what comes next no one knows.  Should you buy the Joey L DVD Tutorial, or that Canon 85 mm lens or that Nikon D300?  Will a set of Profoto strobes make you a better photographer?  Figure out what you "need" to accomplish what you’re seeking to accomplish – acquire those tools, and then go write your book, develop your look, live your life, whatever.

No one single piece of knowledge or equipment will improve your skills in life unless you’re motivated to push yourself to the next level, but once you know how things work…well, maybe I’m working on my own tutorial DVD…

JoeyL Tutorial Review – Behind the Scenes

Editor’s Note:
What follows is a Review of JoeyL Behind the Scenes: The Complete Tutorial.  This is an impression of the DVD tutorial provided by the reviewer and nothing else.  There are no financial ties between this review and the photographer Joey Lawrence.

JoeyL: Behind the Scenes Review

I’ve been shooting various cameras and engaged in various amounts of Photoshop for five or six years now.  I think of cameras and computers and hammers in the same way – tools with which to do something, nothing more or less.  In the past year I’ve expanded from mountaineering and landscape and travel photography to using studio lighting techniques, mainly gleamed from www.Strobist.com, where I read an interview by David Hobby with Joey Lawrence and learned about his new DVD tutorial.  He seems to have a cool style and creative philosophy, so I bought his tutorial for $249 (promotion till Oct. 21st, – $299 thereafter).

This is the first Photoshop tutorial I’ve ever bought, and it was purchased for the following reason:  I’ve become comfortable with the basics of Photoshop, using the clone tool for basic corrections, levels and saturation control for various tonal adjustments.  Basically using those tools to enhance the feeling I wanted to communicate with the images taken using my cameras.  I’ve been looking for a learning package to help me take things to the next level and to expand beyond the basics of enhancing an image and start using Photoshop as a tool to create a specific visual impact with my digital images – beyond what can be accomplished with cameras and basic lighting.

Did the JoeyL DVD contribute in the aim of fulfilling my creative desires?  Who is the DVD for?  Will you, as a reader benefit from buying your own copy?  Hopefully you’ll find some answers here.

DVD Contents

The JoeyL DVD is broken up into two sections: Lessons and Videos, a preview is available on the tutorial website.

The Lessons section includes videos showing Joey editing digital images in Photoshop, explaining along the way how and why specific adjustments are made to enhance the photo and his vision for the final image.  The specific lessons are:

Specialized RAW Conversion Techniques (manual HDR)
Levels and Curves
Multiply techniques (“Joey L signature look”)
Dodge/Burn
Soft Light Techniques
Grunge (apply textures, scratches to images)
Rescue (rescue a ‘bad take’ photo)
Tilt/Shift (simulate lens blur effect)
Quick Masks (influence light/dark values)
Cooking Your Own Textures (texture production)

The Videos section includes four production videos, which show Joey working with different bands and models.  The creative process is explained including some lighting diagrams to illustrate how lighting was setup for the shoots.

A set up Photoshop actions and high resolution textures are also included on the DVD.  A set of actions like these would probably set you back a certain amount of money if bought separately.  If you add up the projected cost of the 10 actions and 51 custom textures (by my hand counting), the total price of the DVD becomes more digestible.

So, after going through the DVD various times and working with the techniques and evaluating what I’ve learning and what it means for my future image making process, here are my impressions:

The Impressions

During the lessons Mr. Lawrence talks through his thinking process in adding various layers and how to do different adjustments.  Adding layers and blending and the use of manipulating shadows and adding light to images is well explained.  This is exactly what I was looking for, since it shows you how to enhance lighting effects in Photoshop which were absent or difficult to produce in reality.  A problem though is that the Photoshop techniques are presented as separate from the production process.

Some videos are included which document different shoots and the photos of which are used in the lessons.  This is pretty cool, since you can see how the images were created and then you can go through the editing process in Photoshop to see the evolution of concept to digital final.  However, a link between lighting for the sets and how that lighting was used in the editing process isn’t really presented.  Of course, a specific link may exist, but adding the connection would greatly enhance the learning experience.

There are five videos in the Video section, but really only two videos on the DVD include lighting diagrams and a talk-through about the production process.  I was hoping for a broader amount of material here, including a workflow starting out with planning for the shot, figuring out what lights would be needed and more interaction about what was working and why.  The lighting of course, is key here, many of the Photoshop editing techniques work because the lighting produced the right shadow which would later be enhanced in Photoshop.  Without more background on the lighting, it just feels like something is missing.

I like that videos are included that show the production shoots.  The images from those shoots are later used to illustrate the editing techniques.  So you get a feeling for how one goes from doing the photography to producing the final image.  However, in this sense I feel like the material doesn’t flow as well as it could.  The editing and production videos are separate, and must be viewed separately.  I think it would have been beneficial to integrate the two together.  Of course, this would make it more difficult to organize the lessons in an easily accessible format.  Still, it would be cool it the Photoshop editing could have been added to the production footage to better illustrate the path from initial idea – image capture – digital editing ending with the final image.  Of course, this is my bias and reflects how I would have liked it to have been setup.  It wouldn’t be too hard to import the movie files into Final Cut or iMovie and re-edit the JoeyL Tutorial to a form which better fits with my leaning preferences.

Is It Worth the Price?

The creative process was a main draw when I finally sent my credit card info for the DVD, knowing full well that $249 was just dropped electronically.  In my opinion a description of the creative process is probably the weak point of the tutorials.  The Photoshop techniques are very clearly explained and you can start doing cool things to your own images in the time it takes to open your file in Photoshop.  Now, a critic will say that it’s easy to find all the info one wants on Photoshop on the web – hence, why buy the tutorial?

Numerous web tutorials and people like Russell Brown show you how to do many things in Photoshop.  Of course, this information is generally spread out everywhere across the web, and all without the benefit of a professional photographer explaining their creative process.  Time is valuable, and time wasted scouring the web for into on Photoshop and then taking the time to figure out what enhances what is time not used shooting photos or climbing mountains.

My reason for buying the JoeyL DVD was to see how Photoshop can be used to create an image as a part of the creative production process and to enhance my own creativity.  In this capacity I’m very happy with my decision to drop $249 on the JoeyL DVD tutorial and would do so again.

Beyond Photoshop

Learning about the creative process isn’t just important for photography and Photoshop.  I look at the purchase of the JoeyL DVD as enhancing other areas of my life, both the artistic and in the scientific research realm.  To a certain extent, I expect to see a benefit from using the JoeyL tutorial in my research career.  This could be in any area from designing actuator systems for smart material applications to a new scaffold strategy for bone regeneration implants.

“What!!!  Did he just use his job as a scientist to justify a $249 Photoshop tutorial purchase???”

You’re damn right I did.  When you get to a certain level in engineering you see that the line between art and science is pretty much just a myth perpetrated by those who like categorizing things.

My knowledge of Photoshop and photo printers and the creative process from an artistic viewpoint has only enhanced by ability as a research scientist.  When you engage in a free-creative pastime like photography and enhance your image making abilities with Photoshop you’re training your mind to be more open and flexible than is generally taught in engineering, chemistry and science classes.

In both art and science you characterize the world around you using various tools to translate your vision into something which can be communicated to other people.  The tools can be cameras, physics, Photoshop, ANSYS, mathematical equations, wide angle lenses, whatever tools you need to tell the story you’re interested in.  The story could be the emotions evoked by a portrait or the aerodynamics of a rocket.  Exploring the creative process of other scientists or artists can only enhance you’re own.

Should You Buy It?

Now, that I’ve explained what I liked and what I felt could be improved in the JoeyL DVD – the question then becomes if you, the potential customer should drop the change to buy your own copy.  Here’s what I think…

  • If you’re a Photoshop whiz and already do your own lighting, know what you want to create, have a handle on your creative process and so fourth, you might not find a lot of value in this tutorial.
  • If you have no idea about Photoshop and want to create cool images with a nice gritty Grunge feel to them (the JoeyL look).  Yes, you will get a ton out of this DVD and it could act as a great starting point for jump starting your own vision.  Even if you’re starting from a very low Photoshop level, it wouldn’t be too hard to get to the point where you’ll understand and be able to exploit the techniques in this tutorial.
  • If you’re like me, someone who understands lighting at the mid-intermediate level, knows Photoshop but isn’t a Pro and is interested in the creative process and not just editing details, yes, you’ll probably enjoy the tutorial and find a lot of value in it.
  • If you’re a scientist and wish to enhance your creativity in the technical research world, I would recommend the tutorial only after reading Sparks of Genius.
  • If you’re more interested in camera specs than pictures and enjoy debating the finer points of copying the Dave Hill look than finding your own style and feel a deep resentment towards the fact that a 17 year old guy from Canada is an established photographer while you’re spending your time pouring over photo forums and tutorial reviews…well, I recommend you find a new outlet in your life.


Brass-Tacks

Reviews like this shouldn’t just be about feelings and impressions but also a prelude to action.  I worked with a self-portrait which I like and tried out some of the techniques from the JoeyL DVD and played with the JoeyL Photoshop action.  This entailed the addition of various overlays and a cool texture to give the image a nice gritty feel.  I’ve never used these techniques before and I love the result that 10 minutes of my day coupled with knowledge from the tutorial was able to produce.

JoeyL Tutorial Before JoeyL Tutorial After
If you’d like another opinion check out the Review on Strobist.com
There’s also a discussion at the Flickr Strobist Forum

Infinite Memory Card – Hyperdrive Space Review

In the age of digital cameras, new gimmicks and trinkets are released every week.  Mega-autofocus-crazy-byte products from Canon, Nikon, Sony, Ricoh, Olympus, Leica, Panasocnic, and a multitude in between like Fuji give one the option of any camera one’s heart desires.  Memory card capacities double every couple years or so and the cost of storage is insanely cheap compared to just a few years back.  Still…the management and backup of memory cards is generally a problem, especially when traveling.  You can’t see which pictures are on which card, and backing up to a laptop means physically sitting down, having a computer with you, and the time to download your images.  There are portable hard drives and image viewers like those from Canon, Jobo, etc., but many times these are a tad more expensive and more flash than utilitarian.  Many times the ideal design solution is one thought up on the outside of the large corporations.  In the case of infinite storage, the Hyperdrive line of memory card backup devices really excels at doing what it was designed for. 

Problems arise when traveling and shooting digitally, especially with with multiple cameras.  Adding a laptop to your travel accessories just to backup images is a big waste of space and weight.  Memory cards can fill up incredibly fast, and nothing sucks more than not having free space to get that cool shot that’s happening right this second.  Backup in the field is a primary concern of any digital image maker.  One of the really useful digital gadgets that one can use to store images from SD, MMC, Compact Flash, and pretty much any digital card you can imagine is the Hyperdrive Space – not to be confused with the mythical hyperdrive engine which allows space travel at speeds greater than light.  The Hyperdrive is a bare-bones storage device for backing up images from memory cards.  The Hyperdrive is basically a notebook hard-drive enclosure with a battery, card slots, and LCD screen.

I bought my Hyperdrive just a week before flying to Tokyo for three months.  The Hyperdrive with a 120 GB drive was the perfect solution for backing up images from my Ricoh GRD while traveling.  I have a laptop and am continually trying to free up harddrive space.  With the Hyperdrive I can backup 1 Gigabyte memory cards in a minute or so and not have the added worry of taking my laptop everywhere.  When I need images, they’re right there on the Hyperdrive.

The LCD screen displays basic information.  It allows access to which folders are on the drive, you can assign the name of new folders, check how much harddrive space is available.  So, no, you can’t view stored images on the Hyperdrive Space.  The Space is specifically for backing up images, not viewing them.  I download everything from the card to the Hyperdrive, choosing an appropriate file name for the folder, which helps with Digital Asset Management (DAM).  I now have a portable catalogue of all my images.  Assessing the images is awesome and easy.  For posting to my blog or other things, I just hook up the Hyperdrive to my laptop, open up Photoshop, and work on the photos I want to use.  I save a copy to my laptop and post to the web.  This allows me to back everything up on the drive, copy any originals that I need, and not fill up my laptop harddrive.  When I get back to Zurich I’ll do a full backup on a normal drive, but for travel the Hyperdrive is a super efficient bare-none one of the best accessories for digital photography I have.

The Hyperdrive Space is powered by an internal user-replaceable Lithium Ion battery.  For normal use, if you charge it once and then leave it hooked up to your computer for a while here and there, you won’t have to worry about the batter running out.  A full charge is supposed to last for 100 Gb of data transfer and can be recharged via a normal outlet or by plugging the USB into a computer.

The only thing I would modify in the Hyperdrive design is the addition of doors to the card slots, which are open to the external environment.  For normal day to day things this isn’t an issue.  You get a nice neoprene cover with the Hyperdrive, which protects it during normal travel.  Still, it would be cool to have doors to protect the card slots, or even better, the option of an external armor, like the kind available for iPods.

The Hyperdrive line has been extended since the first models and now includes the Hyperdrive ColorSpace, which was just released.  The Hyperdrive Color sports a high resolution color screen with full playback of stored images.  You can view histogram and exif info on the screen and even access RAW format images from various DSLRs.  Exactly which DSLRs I’m not sure of, the info isn’t specifically posted on the Hyperdrive website.  Since the firmware of the Hyperdrive is updatable, presumably the most popular RAW formats will be supported initially, and new camera models would be supported with new firmware updates.

Even if all my cameras aren’t supported, the addition of a color screen makes the Hyperdrive Colorspace pretty much the perfect backup device for digital photographers.  The Colorspace version without a harddrive is about $200, if I have spare funds later I might pick this up, but really, but I have enough gadgets at the moment.

So, to sum it all up – a review of my impressions: The Hyperdrives are small, download photos really fast, read any memory card and the harddrive is easily replaced.  You get the most value for your money of any of the other portable image drives out there.  The Hyperdrive is an awesome example of the benefits of the digital age for the entrepreneur.  Someone sees a need in the market and has the ability to fill that void at a cost less than the major companies like Canon or Epson or Jobo, who all have their own back up devices which are flashy and expensive.

I’ll use the Hyperdrive when I’m back in Zurich for backing up pictures and not worrying about knowing which photos are on which harddrive.  I’m looking at picking up the Colorspace version, but it’s not an absolute necessity for me at this time.  Now, if the color version had been out three months ago, I probably would have bought it.

Ricoh GRD Awesome Digital Camera Experience

As a prelude to a forth coming stay in Japan and the desire to lower my mountain pack weight, I picked up a Ricoh GRD digital camera creative set with the 21 mm add-on lens.

Rioch GRD

The Ricoh GRD is a point-and-shoot 8 Mega-pixel digital camera with a fixed 28 mm and 21 mm add-on lens (from a 35 mm camera focal length prespective).  I’d been salivating after the GRD since it was released two years ago.  Like every digital camera, it’s value has dropped after being around so long, and with the release of the Ricoh GX100 and forth coming Ricoh GRD2, the price of the GRD Creative set has become very attractive here in Switzerland.

My motivations for getting the GRD were image quality, size/weight and wide angle lens capability.  After years of hauling various cameras through Europe and around the mountains of Bolivia, Colordao, New Mexico, and Switzerland I’ve come to asess the usability of a camera in relation to how much volume it takes up and how much it weighs as compared with the quality of the resulting photos.  The trade-off between performance and weight or volume is critical for travel and mountaineering.  I bought the Ricoh GRD because it offers high image quality with a wide angle lens in a light weight design.

I also bought the GRD because with its macro capabilities, it opens up more options to explore.  Therefore, the Ricoh GRD was pretty much a no-brainer for me.  Wide angle lenses are generally harder to design and implement in any camera platform.  That’s why most digital cameras have focal lengths from about 35 mm onwards.  This posses a problem for a traveler/mountaineer, since the subjects, mountains and buildings are often times too close to be captured effectively using the 35 mm focal length.  When balanced on a razor rock edge, there’s no possiblity of taking a few steps back to get more of that mountain in the picture frame.  Hence, a wide angle lens is essential for my travels.

People tend to get lost in the Mega-pixel debate.  A consumer is liable to check out the price of a Canon Rebel or Nikon D40 and not give a thought to the lenses that would really excel with those bodies.  An 8 Mega-pixel point-and-shoot with a sub-par lens might be on par with a 2 Mega-pixel DSLR (like the Canon D2000) simply because of the lense quality difference between the two cameras.

So it really makes sense to design a camera and lens together, which is basically what one has with the Ricoh GRD.  The lens is tack sharp as can be, and the image quality with the 28 mm or 21 mm lenses is just outstanding.  But no lens-sensor combination is worth anything without kick-ass user control.  The Ricoh GRD and GX100 are the only point-and-shoots with full manual control.  Yes there’s the Fujis and Leicas/Panasonics which claim full manual, but they don’t have adjustment wheels, you have to do it via menus.  The Canon G7 and G9 come close, but you only have one control wheel.  Plus, and this is huge, the Ricoh GRD has the Raw image format.

Now, it does suck that the time required to write a Raw file on the GRD is a tad long, on the order of 10-15 seconds.  Amateur camera critics and professional equipment complainers throughout the internet have decreed the long Raw write time as a "deal breaker" meaning that they’ll feel entitled to not buy the camera and then waste a great deal of their day complaining about the GRD instead of taking photos in the real world.  The Raw write time is an issue, but it hasn’t been an obstacle for me.

The GRD has no built-in viewfinder.  But an external high-quality finder fits into the hotshoe.  I love this combination because it allows me to get the exposure right by monitoring the historgram on the LCD screen and then composing using the viewfinder for excellent framing and stabilization.  The viewfinder is bright and works great with eyeglasses, sunglasses, or no glasses.  In a sense, the GRD actually exceeds the capabilities of my DSLRs because I get exposure information in realtime (via the live historgram) and only need to take one image.  With a DSLR I have to take an image and then review the historgram (chimp the image), then retake the shot if the exposure was off.  It doesn’t matter if your DSLR can take multiple Raw images per second if the exposure isn’t correct.  So, for a landscape shot, I actually waste more time getting the exposure right with a DSLR than with the 10-15 seconds Raw writing time with the GRD.  Hence, the long Raw write time is a non-issue with me.  Now, it’s true that the new crop of DSLRs have live-view, so one can get the exposure right the first time, but it will be a while before I pick one up.

So far the Ricoh GRD has been along on trips through Zurich, the Alps, and now Tokyo.  I love the GRD, I love the image quality, I love the manual control, and I love how easy it is to use.  When you buy a Ricoh, you’re also supporting the camera design efforts of a company which actually listens to it’s users.  Ricoh cameras like the GRD and GX100 will include a number of firmware updates.  Some will say this is proof that the camera was released too soon, and should have gone through more testing before release.  I see it as Ricoh listening to their customers and providing support to improve the funtionality of their product after the sale.  Ricoh is one of the most foreward looking and innovative camera makers today, and I like the idea of supporting them.  If you’re looking for a take everywhere high-quality camera with wide angle lens, manual control, and Raw image capabilities, the GRD might be for you.  The GRD is stealthy and robust.  It can go dressed up in the city or rugged into the mountains and continually retain its cool factor.

Ulysses Awesome Writing Program Review

The thing I hate about the software world is that so many products fall back on their “Legacy”. So, a writing program like MS Word was developed on a certain philosophy, which at the time was constrained by the fact that the operating system and user interface was very limited. Now we have limitless User Interface (UI) capabilities, but programs like Office and Word are as archaic as ever.?

The traditional word processor is basically a listing application. You list your thoughts down, and organize everything in your head while doing it. The program does nothing to aid you. If anything, a writing program like MS Word exudes Computer Inhibited Creativity (CIC), or can be characterized as a Creativity Killer. My first choice for a Computer Aided Creativity (CAC) writing program is Ulysses.

My brain doesn’t work like a listing program, it works like a movie making program. So I searched for a writing program which would work with me instead of me working around the limitations of the program. I looked for a writing program which was actually developed for writing, that allows one to move ideas around and jump between different project documents.

I started using Ulysses about three years ago, and have never stopped loving it.

Ulysses was developed around the idea of making content and writing the main focus of the writing process, and specifically not focusing on formatting. The program is straight forward, you write in the main window, on the right-hand side is a Notes window, on the left are all the individual documents in your project, along with their Notes window. Naturally, the user interface can be customized.

With Ulysses you can easily develop an idea in one document, and then transfer to another. What’s really cool is that you can select a document and display it on the left-hand side of the program. You can select text from there and copy it to the main window. This is where it really excels compared with Word, since it aides you in forming and reforming ideas so quickly, it really accelerates the writing and creativity process.?

How exactly does Ulysses enable CAC?

Well, if you have an idea in your head, then you intuitively understand it. The problem is communicating it to others. The most common form is writing. But once you write something down, you will naturally try to modify it, as opposed to writing down a completely new thought. This is where Ulysses kicks ass.

Since text can be moved between documents so easily, and documents can be displayed so quickly, the program actually helps you organize ideas, as opposed to simply being a processor for words.

I use Ulysses for many different projects including webpages, blog posts, technical papers, a PhD dissertation, letters, the list is endless. Projects and documents can be exported as simple text, MS Word, even in LaTex.

If Ulysses could be better, it would be the ability display the documents in a mindmap layout similar to MyMind. This would allow the user to visually organize ideas, but keep all of the actually writing within that visual representation. I highly recommend Ulysses if you’re looking for a writing program, it can change the way you work and think for the better.