Photography

The David Hobby Free Photography Business Plan?

The blood thirsty photo blog sphere was set ablaze in a napalm storm over a simple post, Four Reasons to Consider Working for Free by David Hobby, the publisher of Strobist. The article was one of those long and well-written posts, the type which people like to read because it’s not a regurgitation of all the other photo blogs on the net. In his post David talks about the benefits of working for free, of offering free photography services to people who he wants to photography, and who wouldn’t have a budget for his services otherwise. Of course, he doesn’t mean shooting for free for people who could pay or giving content away for unrestricted commercial usage. Depending on who you are you’ll see the two words, Photography and Free and Professional and either, become enraged, become inspired, remain unaffected. Nothing is free, a pitch is always given, a sale sometimes made, we’re all in an ever changing economic system.  You just have to know which game you’re playing.

If the idea of free photography from a professional photographer enrages you, there’s probably some underlying feeling that such a statement encourages people to devalue their work, give away a product for free, and depresses the economic value of the entire photography market. Those who are inspired might feel this way because they believe that photography is about art and expression and taking pictures of what you want to photograph despite not earning a direct financial payment is what life is all about.

Both reactions might require a few assumptions on the part of the reader. First, one might suppose that a professional photographer giving away a service for free, in the hopes of future financial returns is no way to run a business. There is an alternate view. When you perform a certain function and receive money for it, and do at a higher level than most of your peers, it’s called a job, a profession, or maybe even a career. If you do something on the side, that you don’t get paid for or doesn’t produce a sizable income but you do it because you find it more interesting than TV, it’s call a…hobby.

So, you could start with the perception that David Hobby is a professional photographer who writes about giving away photography for free. But it’s also true that sometimes people work one job, and work on their hobby in the off hours, and eventually bring their hobby to such a high level, that it becomes their job, a profession, or maybe even a career. Is it an insult to call a professional blogger a measly photographer? Should a newspaper-photographer-turned-blogger use a Web 2.0 business strategy to incubate their photography hobby and turn it into a startup business? If a professional blogger gives away free photography, does it help his/her blogging business model or does it bring their dreams of being a professional photographer closer to reality? What does it mean for a blogger to have to have a career in a Web 2.0, soon to be Web 3.0 world? How does a photographer market themselves in the blogsphere?

If a professional photographer simply gives away photos the case could be made that they’re devaluing the overall creative market of the world. But if a blogger who is also a photographer on the side publishes a post called…Four Reasons to Consider Working for Free, the purpose of the post isn’t necessarily about selling photos and finding future clients, or is it?

The web is a constant production-consumption, an economic system. Surpluses and shortages and the smart management of resources. Veil readers thirsty for blood soaked words to sink their teeth into are constantly hungry for a new topic to debate on blogs and webpages. There are a few ways to have a popular blog, give people what the want to read, develop an emotional connection to your readers, and/or create controversy for discussion.

The David Hobby Free Photography Business Plan could simply be a logical application of Wikinomics to a photo blogging business model and echoes the ethos set down by John Grant in his book “After Image mind altering marketing.”  The best way to market to a smart set of consumers is to teach them something.

In the web industry, producers produce and consumers consume. David Hobby writes about working for free in the hopes that this will bring a return for a future photo business, but Strobist.com reaps the benefits of web traffic and reactions in the present day. Of course, this improves the blog business (and related Strobist workshop spinoff), where any exposure is good exposure. Any reaction positively impacts the Google hits and more links mean more visitors equals more ad revenue (hopefully). It’s just the application of the Wikinomics model to photography. Remove the money from the equation, and the artist should be free to create as they like. Art and design is nothing more than reinterpretations of past ideas. And the David Hobby Free Photography Business Plan is what use to be called doing personal projects. You shoot what you want and organize the projects you want to organize because they interest you.

Some say that nothing which is free has any real value. And something which is useless can never be truly beautiful. Does giving PopPhoto permission to publish my Flickr photo devalue the cumulative impact of the creative industries? Is David Hobby working for free so he can blog about it and cause discussion on the Strobist blog and bring more hits to his page? This is what I did when I reviewed the Joey L Photoshop Tutorial DVD. I bought it to learn photoshop and as a bonus, reviewed it to bring exposure to my blog, to see if I could create – a reaction. I created content for web consumers who were, and still are hungry for info on the Joey L Look. Viewers find my Joey L post and consume that content. I just don’t have anything to sell them. That’s the big web-based circle of life and content distribution. Is giving away free knowledge on my blog providing a suitable career path on my way to being a movie director in Hollywood?

Perhaps, and then I’ll hire David Hobby to photography me.

GigaPan Panorama Camera Review

GigaPan-2.jpgThe GigaPan is one of those, I have to have it gadgets that any no-life photographer salivates after. The concept is simple and perfect, turn a pocket camera into a Gigapixel producing machine. It was developed at Carnegie Mellon University with support by GoogleCMU and the NASA/Ames Intelligent Robotics Group. The term Gigapixel became popular a few years ago in Geek photo circles when people started stitching multiple images together to create extremely high resolution images. This allows the creation of images which could provide for the archiving and exploration of our world in a way never before possible. The super-high resolution image can be zoomed in on, and minute details of the world explored. This is all great, but when I finally received my GigaPan from the Beta program, I sort of lost interest in creating gigapixel images. What was probably one of the first GigaPans in Switzerland sat on my desk for a week, and in the interest of actually using it for something I loaned it out to a photographer who had time to play with it. Then I got inspired again and took it back. The point of the GigaPan is to take a large number (like 50, 100, 200 exposures) of images with the camera set on it’s maximum focal length (and therefore it’s highest resolution for a given scene). These are then stitched together, creating images in the 50 Megapixel (at the low end) to the multi gigapixel range. This is great, and I’m sure many photographers are using the GigaPan for it’s intended purpose, so the scientific researcher in me decided to go rogue and mount a wide angle Ricoh GR Digital instead of a normal point-and-shoot digital like a GX200 or Canon G9/G10.

My desire is to eventually use the GigaPan to create automated panoramic images for 360 degree visual environments as one would find at VRMag. As I don’t know how to make these interactive environments just yet, I started by taking more traditional mountain landscape panoramas. There’s an advantage to using a wide angle camera with the GigaPan. If you use a camera with a long focal length (100-200mm) which is continually zoomed to it’s maximum focal length, then it will be difficult to take descent images with foreground objects, since these will most likely be out of focus with respect to the background. With a wide angle lens and small aperture however, it is much easier to get both the foreground and background sharp in focus. Thereby you can create panoramas that better represent the local environment around the GigaPan, instead of just capturing a far-off scene.  For this intended application, the Ricoh GR Digital with it’s fixed 28mm, and add-on 21mm and 40mm lens options seemed like the perfect camera to use with the GigaPan.

My first outing with the GigaPan was to the Jungfraujoch, “the Top of Europe.” My parents were in town and I took them up to the Jungfraujoch, a train stop and observation station at something like 3454m in the Swiss Alps. It’s a “must stop” on numerous Swiss tours and is a fantastic money-maker for the region. Actually, I think the entire tourist economy of the Swiss Alps is tied to the Jungfrau Bahn, and without the train the country would fall into a crippling recession (yes, I exaggerate). Since the GigaPan is realistically too large, bulky, and heavy to take on a climbing trip, the Jungfraujoch provided a painless way to test the GigaPan in the mountains. The weather was as perfect as I have ever seen in the Alps.  I shot with the Ricoh  GRD and the 40mm GT-1 add-on lens.  This allowed me to test how well the GigaPan and panoramic software would work with a moderately wide angle lens, and provide a good technical basis for later projects, which will utilize the 21mm lens.

Jungfraujoch_Gigapan_I.jpg

Setup

Ricoh GR Digital
Ricoh GT-1 40mm lens
Manfrotto 055PROXB
Manfrotto 486RC2 Ballhead
GigaPan Robotic Head

Ease of Use

The GigaPan is easy…I mean, jaw-dropping-drunk-dialing easy to use. There’s some video tutorials on YouTube, but I was able to figure it out before the first video was halfway finished. There’s only a few buttons to push, and all you do is set the top left and bottom right hand corner of your panorama and push the start button. The field of view of your camera can be calibrated, so you can use wide angle or long focal length lens without any fuss. The battery life of the GigaPan is supposed to be an issue, but it outlasts the batteries of my Rioch, so I’d say I haven’t found the battery life to be an issue. I used basic rechargeable AA’s, I imagine battery life would become an issue at low temperatures.

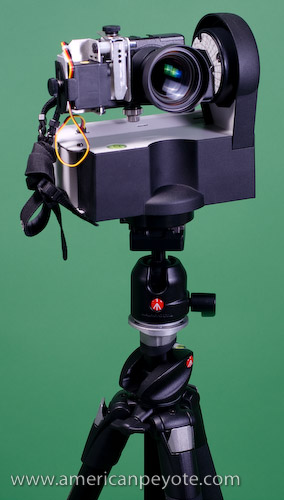
A key to creating good stitched panoramas is accurately centering the camera on your panoramic mount and figuring out things like the nodal point of the lens and other important details I don’t care about. I deal with technical details in my research work, I avoid them with my photography. In this respect the GigaPan rocks, because it has a marker for exactly where the lens should be in relation to the camera mount, so all you have to do is attach your camera with a screw and center it on the mount. I’m under the impression that given the small physical size of a compact camera lens, the exact location of the nodal point of the lens in relation to the rotating base isn’t as critical as with a DSLR. There’s a bubble level on the GigaPan which makes leveling the camera quick and painless, which is also important for creating images which are aligned well and makes the stitching process easier. My Ricoh GRD with the GT-1 40mm lens just barely fits on the GigaPan, but this is because the 40mm add-on lens is wider and physically larger than the GigaPan was designed for. For the automation process, a robotic arm depresses the shutter release on the camera to take a picture, and then moves to a new position and takes another image, and so on till the pano is finished. The camera has to be pre-focused (generally focused to infinity) and the exposure needs to be locked so the images can be accurately stitched together without exposure mismatches between images. In this regard the Ricoh GRD, GX100 and GX200 cameras are perfect, because all those operations are extremely easy to do on those camera models.
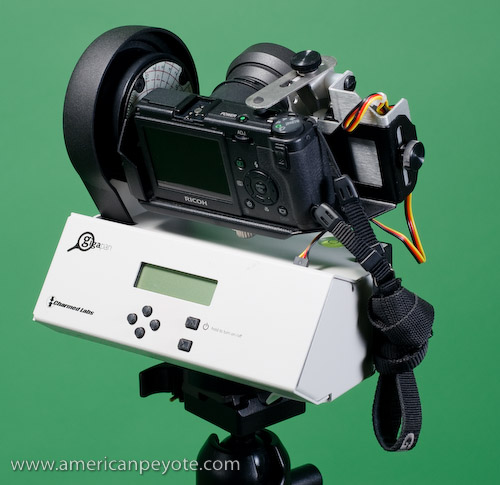
GigaPan-6.jpgDesign

This is element which stands out in my mind. The GigaPan looks like it was designed in a lab because it looks like a piece of boring lab equipment. I say this from the viewpoint of an academic researcher who has spent various nights in front of boring box-like designed lab equipment pieces, and who is now dreaming up designs for his own furniture. I mean, seriously, it’s beige, it’s made of bent metal, and the body is as angular and unsexy as possible. In the future, I highly recommend that the GigaPan design be outsourced to the CMU School of Design as a student project. I had high hopes of being able to take the GigaPan on climbing trips, but my climbing partner nearly flogged me to death with a quickdraw when he saw that I had taken my Fuji GA645w, Rioch GRD, and a small Velbon Sherpa tripod on our last Alpine attempt up the North ridge of the Weissmies. So, tossing the GigaPan and full tripod in my climbing pack is sort of out of the question. As I’ve left the academic research world and become a full-time simulation/optimization engineer, I know for certain that the GigaPan could be redesigned to be lighter and more functional. Future versions are said to include plans for a DSLR GigaPan, and I can’t imagine how large and heavy such a design would be if the current GigaPan were simply scaled up.

Panorama Processing

As part of the GigaPan program, free stitching software is available from the GigaPan website. This is great, except that I use a dual 1 GHz G4 PowerMac and the software only runs on Intel macs. This was fine though, because I purchased PTGui Pro, which is one of the best panoramic stitching programs on the market. I chose PTGui because Hugin, the free Canon stitcher, and Photoshop CS3 all proved inadequate for the job of stitching 20-200 images together. Plus, as I’m using a wide angle lens for my panos, I figured it was better to use software optimized for different panoramic stitching techniques, where I can choose and optimize my control points, image distortion, and exposure of the images. I’m pretty sure that the GigaPan stitcher software was programed with the idea of people shooting with their cameras zoomed in to the maximum focal length, on the order of 100-200mm, which is exactly what I’m not doing. PTGui Pro is as painless to use as the GigaPan, and makes quick work of any number of images which require stitching. It just takes a while to stitch 200 images because my computer is slow by today’s standards.

GigaPan-4.jpgBrass-Tacs

The GigaPan is a fantastic piece of equipment for the lazy panoramic photographer, or those who actually want to make Gigapixel images for research and exploration of our world, or photo geeks in general. It’s painless to use, portable for many applications, and is pretty hard to screw up due to its simple design. I didn’t find battery life to be an issue and it’s pretty cool to shoot with. Everyone stops by to check out what you’re doing when you shoot with a GigaPan. Kids will be amazed that you’re shooting with a camera that looks like a mini anti-aircraft weapons system, their Dads will ask you questions, and in general women will probably be turned off by the fact that you have the least sexy panoramic camera mount a person can buy. But I digress, good design is the combination of form as well as function, and what the GigaPan lacks in style it makes up for in terms of function. In some ways shooting with the GigaPan is like wearing a colorful pair of Onitsuka Tigers on a fine Autumn afternoon. You get noticed wearing Tigers and it’s the same with the GigaPan. Now, Imagine if the GigaPan were designed with a body style other than “as-unsexy-as-possible” and a color other than beige? Imagine the possibilities when I could wear my Onitsuka Tigers and shoot GigaPan Berlin city panoramas in style with an air of well-designed confidence.

Essential Links

GigaPan.org
Global Connection Project
GigaPan Video Tutorials

Concept to Photo – Workflow Tutorial

For some reason the job details between photographers and scientific researchers are dramatically different, but from my perspective the motivation and work-flows are almost indistinguishable. Maybe it’s just my will to be weird, but when I sketch out a photo concept or think up a new research project, the exact same centers of my brain are working at peak capacity. This was the inspiration in developing this article on the creative workflow from concept to realization as applied to photography.

IKEA Dry Tooling

IKEA Dry Tooling

The generic view of artists is that they’re filled with an abundance of talent and drive and create through pure inspiration – bubbling from a magical fountain in their soul.  The generic view of a scientist/engineer is one of a logically cold calculating individual slaving for days and nights and eventually years with a sort of mad-scientist personality detached from reality – characterizing the world in theories and mathematics that normal folks just don’t understand.

The more I started actually doing photography I began to realize some things would go faster and come out better if I actually thought about them – laid them out beforehand you see. It’s not like I need to define the process in a textbook. After all, photography is Art, the result of intuitive inspiration and amazing talent…blah, blah, blah. But the fact is, as an engineer I acutely appreciate the poetry in a well executed project. An elegant well-thought out project map is as beautiful as a fleeting mountain vista or abstract impression. The link between art and science/engineering/design is indistinguishable, so why not integrate them all? Take the analytical themes of science and fuse them with the free out-of-the-box thinking of art and photography.

I like to take the analysis aspects of science, combine with the project management aspects of engineering, mix with the artistic element of design and cap it off with the fool-proof ease of digital photography and computer imaging. We end up with a total process for the concept develop though image execution and output.

I’m not defining the creative process because I feel a need to before producing an image. Yes I can pick up a camera, set up lights, or not use any lights and produce great images. Sure art is supposed to be free-wheeling and off the cuff and pure inspiration and guess what – so is engineering. Even if you don’t think there’s a process going on inside the nicely packaged computer inside your skull, doesn’t mean it’s not happening. So why not exploit it? Why not explore the creative production process and learn how to improve it?

So, for clarity let’s quickly define the photo production process as:


Concept – Production – Shooting – Processing – Deliverables


Concept

Dry Tooling Concept Sketch

This stage probably doesn’t need to include a camera or computer or anything more complicated than a pen and paper and your thoughts. You just think up what you want to do and start putting it down so it doesn’t get erased in your short-term memory banks. Sure this can be done inside your head, visualize a subject with lights and angles and photoshop layers and then try to produce it directly with a camera. Alternatively setting things down on paper usually brings up more questions. Like, what color should the pants of the model be, will I need a grid to highlight the face or will two soft boxes suffice. Of course, all of this can be worked out on the fly as you’re shooting, but if you can visualize everything before you start, you will naturally get more accomplished and probably get closer to realizing of your vision faster than doing it all on the fly. Essentially the concept stage is there for brainstorming: subject, location, colors, lighting, message, mood, etc. These are realized as sketches, mock-ups, whatever you need. Figuring these things out early means not having to screw around with them later.


Production/Logistics

Once everything is set up in your head, you just need to go through the actual process of producing the work. How will lights be set up, what equipment and wardrobe is needed? Do we need to buy a purple velvet jacket? How about some clear makeup to reduce glare on the nose? Where will the shoot will take place, and how do we get equipment and the models together in production. You could even include a subsection purely for logistics. Screwing things up here means you forgot to bring batteries and your cool new flash doesn’t work or that awesome Octabox is useless because you didn’t pack the speedring. And that means not having the elements necessary to get the image you wanted. Developing equipment lists, maintaining an organized lighting kit which can be taken when needed, and knowing how to set everything up and execute the shooting session efficiently means it could take 10 minutes instead of 60 to get the images you originally wanted.


Shooting

With the concept in your head, and all the logistics worked out and the various elements of the production set up, all you have to do now is press the shutter and head to the next step (in theory). We could also call this the execution stage, but that sounds a tad morbid. Probably it won’t go so smoothly as simply depressing the shutter button, but the point is that if you work out the concept and logistics before you actually start shooting, you won’t have to run around looking for random flashes or light modifiers or – trying to come up with a totally new concept on the fly and not have the resources to see it realized. Many people will say they’re in their “element” when running around fiddling with flash position and making models wait because they didn’t prepare beforehand. I’d rather take the least amount of time as needed to do the actual shooting and move on to Processing the images moving on to the Deliverables. The idea is, get the shot and make great exposures that can be successfully processed into the final image you want.


Processing

In the golden ages of darkrooms and chemicals the main essence of your image was produced in-camera, unless you were a real wiz who lived in the darkroom. I now more or less consider the image from a camera to be a nice starting point – or a possible end point. Processing can be as easy as tweaking the levels or a bit more complicated, leading to various layers, filters, and electronic brush strokes in Photoshop. Processing can mean compositing multiple images together or working exclusively on one from the camera. Processing can make an angry man look approachable or a little girl look like a devil. The colors, shadows, image sharpness, it can all be defined and/or modified at this point to realize the final interpretation of your original concept/vision. How you do it is up to you. My processing work-flow starts by loading images in Adobe Lightroom, editing those images to focus on the images I want, the ones which best communicate the original concept I had. Those are further edited down and the finalists are exported to Photoshop for editing and compositing (if needed), whatever is needed before finishing and moving on to Deliverables. The final images are generally exported from Lightroom (even if heavily modified in Photoshop), primarily because last minute exposure tweaks, cropping, and adding watermarks is far easier in Lightroom than in Photoshop. Depending on your output destination color management is either irrelevant (like to the web) or essential (like for printing).


Deliverables

Website, Flickr, print, Flash movie, printed tattoo, however the image gets from your computer to your audience/client is the Deliverable. Here, beyond sizes, formats, and possibly printer and color profiles there’s not much to enhance or to dilute the vision conceived in the Concept stage. If the Concept-Production-Shooting-Processing stages were done well then the output will look great in any media. If you got lost somewhere between Concept and Processing and forgot to pack an extra flash, then the Deliverable might be lacking, it’s the culmination of everything which came before.


The End?

Here it was and now it’s not, a guide to conceptualizing and producing the fantastic images you want out of your digital life. You can be an engineer, naturally untalented Artist or a librarian, or anything else you can imagine to classify yourself, but if you recognize and follow a process or develop your own and stay true to the vision in your head (and pay attention to the details) the images will come out fantastic. Getting down to Brass Tacs, any project, whether scientific or artist can be thought of as the effective management of resources. You have models, locations, lighting equipment, etc. The job is simply to communicate a message/concept based off of those resources in the least painful way.

Fantastic Magazines for Photographers

If you find anything about concept or design in a photography magazine, it’ll most likely be a puff piece about digital workflow or boring model shoots. I don’t need to read about what a softbox is or how putting my flash off my camera will enable better light control. What I’m interested in is advancing and expanding my ability to visualize and create cool-looking photographs. That’s why I’ve compiled a review of the best magazines (as I see it) to read if you’re interested in pushing your photo-making creativity abilities and improve your image-making capabilities.

The Background

What’s Photography without Design? If you go through the trouble of picking out the lens, capture medium, lighting, wardrobe and makeup, are you a designer or a photographer, or the art directory? If you’re trying to improve your photography, does it make sense to read meaningless photo publications with over-written gear reviews, or should you pick up fashion and design magazines instead? Photography magazines are often touted as places to learn about image capture and advancing your in your ability as a photographer – and they generally are if you don’t do much more than take generic pictures of sunsets and cats, but why be mediocre?

When I thumb through magazine racks, the photography-specific magazines are usually filled with little more than the latest meaningless gear reviews and photoshop tips, or the rare technique tutorial. Too often images in photography publications are generally boring and uninspiring because they serve no purpose but being content for selling a magazine which explains how to take generic photos.

The best way to get inspired and expand your conceptual mind is to learn about stuff aside from the easiest art form ever created (digital photography). To do this, I recommend reading a seemingly random combination of design, fashion, and commercial photography publications.

Archive

I always feel weird about buying Archive because it’s really just a giant collection of the best commercial images. So, I’m basically paying good money to look at advertisements. Ahhhh, but high quality ads are more than just good visual input for the brain. Archive shows you the trends and visual markers, which are driving advertising dollars. If nothing else, it’s probably the best place to go if you want exposure to the latest fresh ideas. You don’t have to be into commercial photography to enjoy Archive, because at this level the ads are art and it’s packaged in a form you won’t find anywhere else. One issue is on the order of $15, but it’s not something you buy every month.

Paper

I used to think design was just an abstract marketing tool for high-end Swedish furniture companies and million dollar ad agencies. The cool thing about Paper is that it’s basically easy-to-digest design for non-art people. By reading Paper you get exposed to design concepts in different areas; from high-end art to the coffee maker on your desk, and it’s done in a very unpretentious, inspiring way. A lot of the written content will seem more like a pop-culture magazine, but it’s one of my favorite reads because it really shows you the artistic, design, and style elements in every day life.

CITY

The Destination for Style CITY is a magazine somewhere in between high-end fashion and practically unobtainable design. Some highlights from the iSPY 2008 Design Issue (#56) covers product design in Tokyo, the internal design of a Volkswagen factory, and a photo spread shot by Vincent Skeltis (styled by Julie Ragolia). CITY is great because it gives the reader a wide range of high-end design and style input.

Nylon

The more photography and portraits I make, the more I realize how little I know about fashion and current trends. It’s not like I want to copy every new fashion trend I see, but I like being exposed to new things. Nylon is a great publication because it has a certain street edginess and gives you all the latest fashion trends and insights without reading like an uppity advertisement-filled tome like Cosmo or In Style. Once you learn to translate a certain fashion style to your own work, you basically open up a whole new set of tools for visually communicating your concepts.

Metro.Pop

“A fashion magazine for the rest of us.” Most of the time when you pick up a fashion magazine it’s like 60 percent advertisements, 30 percent boring articles, and the actual fashion content in terms of photography and style can sometimes be very small. That’s why Metro Pop rocks, it’s basically a well-done fashion mag where the total focus is on presenting daring fashion images. Every time I pick up a copy of Glamour, the images are all easy, boring (from my viewpoint) well-lit glamour images. Conversely, the content in Metro Pop is sometimes out of focus, maybe a tad blurred, and the lighting will mostly be non-standard and definitely not flat. Read Metro Pop to get a feeling for how bad your fashion images suck.

Layers Magazine

No progressive list of magazines for photography in the modern day and age is complete without the inclusion of Layers Magazine; the place to learn about all things Adobe. In the mixed-media world into which photography is heading, the image will just be part of the larger story. Layers gives you a feeling for how vast the possibilities are for producing visual content using Photoshop, Flash, Illustrator, InDesign, and any other Adobe product. Photography is often included in one form or another, either in Photoshop articles or in articles like the recent inclusion of a piece by Joe McNally, detailing the use of different modifiers in camera lighting.

What Does It All Mean?

Look, there’s not really anything wrong with reading magazines like Popular Photography, but pretty much all important parts of the content can be found online, so why pay for the hardcopy? Ahhh, yes, they publish all of those cool camera reports. So what, Your Camera Doesn’t Matter, well, at least not as much as most marketing people want you to think it does. For those learning photography, the difference between all DSLRs is pretty much nothing, so use the time and money you would have wasted on dissecting the differences between the Canon 5D and the Nikon D700 and produce some images or get inspired.

In its essence, a photo is just a capsule of concepts and elements of communication. I never buy photography-based magazines because they generally don’t contain engaging imagery or feed my creative mind. Instead, I’ve stared reading design, fashion and commercial photography publications to feed my need for visual exploration. The act of image making is the same as ever before, a lens focuses light on an image capture medium and the exposure is controlled by the shutter and lens aperture. That’s all photography is.

You can get all the near-meaningless (for most photographers) technical gear reviews and puff pieces about taking generic photos on the web, so why pay for the same lame content in magazine form? I love strong content, it drives my imagination, and I love seeing engaging imagery, (not limited to engaging photos).

If you want to push yourself and get exposed to new ideas move beyond the old photography publications, which have become largely redundant in the digital age. Get crazy and expose yourself to new ideas and be daring – otherwise, what’s the point in getting out of bed every morning?

Lazy Sunday – Fun with Flower Photos

After too many days and weeks of rain and snow and late spring sleet the Sun shown bright and strong over Zurich on the second Sunday of April in the year 2008.  I took the opportunity to sun bathe and then set up flashes, picked up my Minolta 7D and Ricoh GRD and set about photographing the excellent garden on the terrace.

Flowers I

One of the coolest things you can do with off-camera lighting is balancing the power of Sunlight with the watt-seconds of your strobe.  Now, with powerful studio flashes from Alien Bees, Elinchrom, Profoto, and many others, this is easy.  But the technique is often overlooked by amateur photographers since normal camera flashes are too weak to balance, or to over-power the exposure from the Sun.

Flowers Setup

I set up two flashes, a Contax TLA280 and Metz MZ40-3i.  Gadget Infinity radio triggers were used to fire them.  I had to use direct flash, with both set to nearly full output, since the high afternoon sun made weaker flash settings and any umbrella diffusers useless.

This meant I could light the main parts of the garden and create a nice blue sky in the background.  The flowers take on a sort of unrealistic shine, a certain texture your eyes can’t perceive in reality.  Ah, but the magic of simple off-camera lighting makes the magic appear with little effort.

A number of photos were taken during this session with the Minolta 7D and 20mm lens, but the best were produced using the Ricoh GR Digital with a 28mm lens.  The near infinite depth of field of the Ricoh GRD coupled with the with wide angle of view of the 21mm and 28mm lenses produced nothing short of perfection for capturing the cool colors of the flowers to contrast against the deep blue sky.  The Ricoh GRD rendered excellent saturation and sharpness of the flower petals and sharp green stems.

Flowers V Flowers IV

The setup for this shot took all of 10 minutes and there was no real concept I was trying to communicate.  The motivation was keenly contained within a desire to play around with my cameras and flashes and produce an image I’d never seen before.

Flowers III

There’s little doubt that flash photography and flowers has been around for decades and countless photographers will produce more countless generic flower photos with deep blue skies and saturated petals.  However, these will stick in my memory for a while, mainly because I was just playing around, and that’s when all the really cool things are done, when we don’t mean to do anything beyond killing the time we find on our hands.

Concept to Photo – Urban Dry Tooling

How was that image created?  What was the workflow from the initial idea to the finished product?  Concept to Photo is a growing collection of articles detailing how various images were produced, starting from the initial concept stage through to the final image.  What worked, what didn’t, could the concept be translated to an image, and how successful was the experiment?  This installment includes the development of the Urban Dry Tooling Concept: the perfect mix of climbing coolness and the industrial edge.
The Concept:

I’ve been moving towards combining climbing and urban concepts for a while.  It’s a natural result when you have little time to climb and too much camera equipment combined with a night of self-portrait experimentation.  Everyone knows what the generic city mountaineer looks like: jeans, fuzzy hat, fleece gloves, cool sport sunglasses, Teva or Chaco sandals in the summer and hiking boots in the winter, all topped off with an expensive Gortex jacket fit for Nepal but mainly used to fend off the wind in front of Starbucks.  I’m not an exception, except that I keep the boots at home in favor of Dr. Martens.  Anyways, I wanted to take the Urban Climber/Mountaineer look a bit further than the coffee shop.

Dry Tool Garage Concept

The concept started with a sketch and was simple, take the best parts of Urban and combine with the edginess of mountaineering.  I wanted something sort of dramatic, I wanted movement (or the sense of it), and I wanted it to look cool (at least to my eyes).  For the Urban part this meant that dark industrial backdrop only available from a circa 1940’s sky scape or an old factory.  It also meant fashion and not just taking a mountaineer and putting them onto the side of a building.

I wanted the coolest elements from mountaineering: ice tools, quickdraws, well-fit jacket, cool hat, and sunglasses – and then combine with a clean hip urban look.  Unless you ice climb you probably know what an ice axe is but don’t have any idea what an “ice tool” is supposed to look like.  Ice tools are short and meant for climbing frozen waterfalls or hanging from rock edges in winter.  They’re curved, wicked and stylish.

The clean hip Urban look was realized by integrating jeans and super-fly Dr. Martens into the mix.  The location was an old industrial area, in conjunction with a zuerichflickrdrinks Flickr group outing.

Urban Dry Tooling Location
The Location:

The old industrial Sulzer-Areal complex in Winterthur, just outside of Zurich, Switzerland.  Originally a manufacturing complex, since transformed into an ultra-chic locale with apartments and one fantastic parking garage which is largely unused on the weekends.

The Wardrobe:

Mountain Hardware Jacket
Levis Jeans
Dr. Martins wing tips
Bolivian Hat
Trango Captain Hook Ice Tools
Random Accessories (quickdraws and ice screws)

The Execution

The original idea was to hang on to the columns of the parking garage with the ice tools and be pulled by a rope attached to the harness.  Then the model could have his legs pulled out into space or jump out.  This actually seemed a lot more dangerous in real life with actual steel and concrete to bash his head into – and hence was scraped as an option.  After killing that notion static posing on the steel column in classic climbing fashion became the main focus.  Assisting with the camera was done by ubiquity_zh.

Urban Dry Tooling Setup

Sometimes the lighting dominates the subject and other times very simple lighting is paired with a subject.  There are a number of things which could have been done better, like lighting the steel column or mixing soft overhead light with some hard lights for contrast, but in the end a simple (somewhat pathetic) one umbrella setup mixed with the natural light filtering through the ceiling was used.  A Contax TLA280 was reflected into an umbrella high camera left and a 20 mm lens was used to get some slight distortion and bring out the Dr. Martens when the feet were properly positioned.

The Processing

Dodging and burning was used on the jeans to bring them out.  Then various curves, high-pass and levels adjustment layers were used to stylize and a deep green color was added with a fill layer.  Layer masking was used where appropriate to bring back facial features lost in the layers.  A grung texture was produced from the concrete in the factory and used as the final step.

The Debrief

The images from the Urban Dry Tooling shoot were ok, more or less what was wanted, but in many ways don’t really pop in the way intended.  On the one hand this is good, it means the photographer is not egotistical to the point where he’s fooled into thinking that crap photography is fabulous because he designed it.  On the other hand it means one can see the road of improvement.

One main problem is the poor separation between the black Mountain Hardware jacket and the background.  A light grey jacket or T-shirt would have absorbed less light, and would’ve rendered better defined shadows.  Furthermore, a diffused light from the right would have illuminated the torso of the model better.  Of course, adding some back-lighting would have helped as well to improve separation, and grid spot to light the ice tools probably would have prevented them being lost in the shadows of the steel framework.  What comes next?  Only the Shadow knows.

Learning Photography Online – A Road Map to Madness

The combination of the web and efficient search engines coupled with the crazy ease of online publishing has made one thing clear: learning photography can be easy and almost essentially free.  What follows is a breakdown and review of some of the best sites on the internet to learn photography and lighting.

Learning Photography Technique

Strobist: In my experience Strobist is one of the best photo lighting-oriented sites on the internet.  Interactivity between readers and author is taken to an extreme level.  Interaction on the internet generally means at best that readers are willing to comment on whatever your write, with Strobist it means readers buying flashes, light modifiers, and producing pro quality images based.  Readers are inspired organize Strobist get-together’s from Germany to Seattle.  The great thing about Strobist is that it teaches lighting – without which there can’t be any photography.  Gear is covered, but only to the minimal extent needed to produce excellent images.  Every type of photographer from portrait to landscape or commercial can benefit from this site, and if you’re a beginner, Strobist will probably take you farther than any other in a given timeframe.  Strobist isn’t just a cool site, David Hobby has started a movement and created his own adjective without even trying.  This movement has grown beyond the simple blog, and Mr. Hobby now teaches sold-out lighting workshops throughout the world.

Lighting Essentials: When David Hobby started Strobist he ignited a movement.  Maybe Lighting Essentials would have been launched without Strobist, but the connections between the sites are evident.  Both focus on lighting, both contain some of the most easily accessible and relevant information on lighting on the net, and both are not only websites, but portals for their owners to organize and lead lighting workshops from coast to coast.  One big difference between Strobist and Lighting Essentials is layout and presentation.  Lighting Essentials is the well-organized website that Strobist could be if organized and designed outside of the anti-CMS (Content Management System) Blogger platform.  Yes, this is a public plea for a redesign of the Strobist site and implementation of a CMS friendly system like WordPress, Joomla, etc.  Lighting Essentials and the partner Magazine site feel like they were built from the ground up to be the best online resource for lighting and photography around.  The author, Don Giannatti is extremely approachable and shares volumes of knowledge on the net, his Flickr (wizwow) account is filled with photos with some of the best lighting setup information around.

The Luminous Landscape: My internet photo education started here.  Published by Michael Reichmann, the Luminous-Landscape is probably one of the most comprehensive photography knowledge sites on the net.  Composition, discussions on perspective, and any technical aspect including Bokeh is included.  The site is so comprehensive that new material is rarely added (as it’s not really needed), the What’s New section is basically an update board for new super-expensive (the locations sometimes worth it) workshops and moderately priced tutorial DVDs.  Otherwise, thoughts of the camera industry sometimes embody the new content along side the occasional mini-dissertations by Alain Briot, which generally make me think he’s harboring some deep subconscious regret about not finishing his PhD.  If you need a good background in photography go through the Understanding Series and you’ll never need to buy a book on photo basics.  But once you get the basics, move on to more interactive sites like Strobist or Lighting Essentials.

StudioLighting.net: When you first visit StudioLighting.net you might be put off by the content-centered Google ads and brush it off as a me-too photo splog.  The format is simple, and the content unique; two guys who are learning about photography have built a lighting-centered site with arguably the best photo-niche podcast on the Net.  Every week or so they do a radio style podcast with a new photographer or similarly notable figure.  The archives include interviews with Michael Grecco, Dave Hill, David Hobby, Chase Jarvis, and a ton of people I’ve never heard of.  The great thing is that StudioLighting.net is run by guys who are developing their skills, and are more or less intermediate shooters, which means they ask questions which the thousands of photographers like me are interested in; like how different photographers work, how their businesses got started and what type of equipment, or lack there of is used in shoots.  There are other attributes to the site like video lighting tutorials and gear reviews, but the reason to visit is the podcast archive.

Learning To Expand

Chase Jarvis: An internet photography icon, Chase Jarvis is a full-time professional commercial photographer with the desire to share his knowledge and inspire the people around him.  His work is fresh and his blog is filled with good stuff to exercise the mental side of a photographic mind.  His commentary on the business and views on the art form mix with his business skills and philosophy university degree to be a unique voice which many photographers can learn from.  Plus, he’s just an all-around inspirational figure, well-spoken and energetic, he embodies the image of how a pro photographer should act.  There are a number of videos on his site, depicting photo shoots with ninjas, REI products, and the gear he uses.  Once you know what you’re doing with a camera, delve into ChaseJarvis.com and get inspired to push yourself further.

Layers Magazine: True it’s technically focused on all things Adobe, why should photographers learning technique care?  What does Dreamweaver and web publishing have to do with making great images?  Given the dominance of Adobe in everything including digital image manipulation, web publishing, Flash, and Lightroom, keeping abreast of the tutorials and random creative insights on Layers Magazine will keep the inquisitive photographer knowledgeable on many aspects of imaging from capture to print and publishing.  You can also buy the print magazine if you like.  The videos and written tutorials are excellent.  When you want to understand the tools of digital image manipulation head to Layers Magazine and delve into all things Adobe.

Photoshop User TV: Sort of a sometimes non-free companion to Layers Magazine, Photoshop User TV is one of the best pay-oriented video sites around for learning photoshop.  If you try do everything in-camera that’s great.  However, not utilizing Photoshop as a tool and learning how to use it well just seems so archaic.  Digital imaging manipulation isn’t just magic for graphic artists, Photoshop is a tool to communicate concepts via visual interpretation.  Of course you can do photography without it, but knowing how to use all of that power in your finger tips opens up worlds of expression.  Current videos are free, while the archived ones require a reasonable fee.

Russell Brown: International Photoshop guru and Mad Scientist-like personality, Doc Brown has one of the best Photoshop podcasts on the net.

Learning the Business

Dan Heller: It’s sometimes said that professional photography is 20% photography and 80% business.  One of the best places on the net to get the business perspective on photography is Dan Heller’s blog.  He writes nice long thorough posts focused on the stock photo industry, and if you’re serious about getting into the industry on any level Dan Heller has content and insight you won’t find anywhere else.

A Photo Editor: If you gravitate towards the business side of the industry the middle-person between the photographer and printed magazine is critical.  Photo editors find and hire photographers based on what the magazines want for visual interpretation of their magazine content.  Originally a blog by an anonymous photo editor at a national magazine, now the premier source on the net for getting inside the head of the person you need to please to get hired to shoot for magazines.  A Photo Editor is fresh and unique in an internet populated by imitators.

Avoid the Gear Craze

Many internet photography junkies either worship or curse Ken Rockwell.  His site is vastly popular and certain people will hang on his every word as gear gospel.  Although his site is basically a giant gear review site, and hence of little value to someone learning photography, he has some very relevant and interesting essays including: Your Camera Doesn’t Matter.

Don’t Feed the Trolls

I won’t mention any photo forums, mainly because their usefulness is defined by the members and active participation and your own motivations.  For example, Photo.net used to be the premier forum center on the net, and now is passé.  Dpreview is filled with thousands of people who are more interested in asking questions than taking pictures, and there are far too many forums to list and review.  If you need answers for specific gear problems, a number of forums will be able to answer your questions.  If you’re looking for ego boosting kudos there’s plenty of forums to post pictures where half the viewers will love and the others will decry your images as a bane on humanity.  If you have the determination to read through this article, your curiosity will no-doubt eventually lead you to the photo forum which is best for you if you search it out.  Experimenting with different lighting setups, locations, and subjects will push your craft farther and faster than any forum will.  In general, once you find one or two forums you really like, never speak of them or promote them to others on the net, lest they become diluted with trolls looking for attention.

Brass Tacks

Photography, like science, is best learned by doing and playing around.  I recommend the following course of internet study:

Learn the basics, just enough to be dangerous and then start photographing (or splitting atoms).  The means checking out the camera technique series on the Luminous Landscape as well as lighting with Strobist and Lighting Essentials.

Learn to Expand, delve into Photoshop, Dreamweaver, and the main Adobe programs.  Photography is basically light painting, and now that pallet exists on digital media more so than printed.  Understanding how images can be created and published on the Net expands how you view subjects and can open doors in your mind.

Never Stop Learning

Explore photo sites and try different techniques.  Listen to StudioLighting.net podcasts and develop your eye.  That’s really all photography is.  Check out blogs like ChaseJarvis and realize that there’s always something new to learn.  Avoid forums unless necessary, because if you need to ask random people on the Net which lens to buy then you don’t need it.  Photography can be very simple and cheap or needlessly complex and expensive, the choice is up to you.

Translating a Vision into a Photo Concept

I’m somehow drawn to photography – not to necessarily document an interesting or unique view of the world, but to get the picture that I didn’t know existed.  That concept, that image in my head which sits there till I try and make it for real.  This is generally means combining bokeh, focus, and wide angle lenses with a subject to get that certain “look” which the eyes don’t intuitively capture.  And few things are harder for the eye-brain connection to interpret than motion.  That’s why the use of off-camera strobe flash was developed by Harold Edgerton in the first place: to capture motion in ways never before possible.  Adding motion to a static subject can add a certain “something” it’s unexpected and generally produces an image that sticks in my head.  So, I took the concept in my head and set about translating it into a viewable form.

Red Tie and Velvet

Creating a Dramatic Motion Image

When you live in a place that doesn’t include a vast studio space, improvising and designing a shoot becomes important.  It’s the best environment to learn in because you’re challenged to make things look “cool.”  Cool is easy when you’re shooting a Swatch Watch commercial with a full staff and art director, but I don’t do these things – and need to organize things like models and locations and wardrobes on my own.

For the concept, I wanted the images to have movement, some sort of dramatic character, and to look “cool.”  “Cool” is at best a meaningless relative term and I don’t profess to having my finger on the pop-culture pulse of the trend setting world…but I went for the concept in my head anyways.

Floating in the Air

Having no budget or creative vision, I decided to go with my only available model, myself – and capture myself in a dramatic fashion: Flight (jumping through the air).  The apartment has wood floors, so first I set about setting up crash pads (guest beds) to land on and then added wardrobe elements and props which would add motion effects to to the final images.

Wardrobe: Shirt (BC Ethic), Tie (H&M), Jeans (Levis), Olive Jacket (We), Messenger Bag (MountainSmith)

Equipment: Crash Pads, 1 Flash w/umbrella, Radio Trigger (Gadget Infinity), Minolta 7D, 20mm lens, Remote Trigger

Crashing in Action

The crash pads were setup in front of a white wall and the camera went on a tripod.  I started out using the 2 sec. shutter delay function on my camera, but coordinating my jump with the delay wasn’t’ working so well.  Instead I opted for using a wired cable release.  My hand was often out of the frame, instinctively trying to break my fall – but the trigger release could eventually be Photoshopped out of the picture.

Jumping with a Trigger

The wardrobe seemed to work, the jacket and tie floated in the air when needed and a stack of paper added another element, a main focus for the eyes to lock onto and juxtapose against the main subject.  The Mountain Smith courier bag was, well, one of those Urban elements, suggesting the subject is “going somewhere” and has “things to do” – people to see.  I love my MountainSmith bags like I love my ice tools, and try to integrate them into shots whenever possible.

MountainSmith in the Air

Post processing of the images was done in Lightroom and Photoshop, sometimes using some processing elements I picked up in the Joey Lawrence Tutorial DVD.

In the end, I fell short of achieving the vision in my head, mainly because I didn’t have a trampoline and the cielings were too low for one anyways. This meant jumping on my own, and since I don’t jump very high I had a very short time to pose while in freefall.  The jump and freefall where rarely timmed correctly to the camera shutter and my head statred hurting from the impacts after a while.  Still, achieving 1/4 of your vision is far more productive than 2 hours of watching TV.

Drama in the Air

Jumping looks easy, and it is twice in a row, but if you’ve spent the previous day ice climbing and every other photo sucks because the timing is off and you’re out of the frame, well…the jumps add up and the photos session quickly turns turns into a workout fast.  I think of Michael Grecco’s book The Dramatic Portrait – he’s shooting Jet Li doing a flying kick at one point, and the translator says, Jet Li doesn’t need a trampoline.

Velvet and Glasses

Zurich Notes – Photo 07 Photography Show

Photo 07 is a photography show in Zurich, held once a year to highlight Swiss photographers and their work from that particular year.  So, actually the name changes every year; Photo06, Photo07, Photo08, etc.  It generally takes place in the Maag Event Hall near Hardbrücke, the cool Zurich club district.  In short, an old factory is rented out and hundreds of photos are put on display by the represented photographers for anyone interested.  A pallet of Faces magazine was sitting unattended for pilfering, the same as you’re likely to find at a Kunsthaus-techno party or other art-type exhibition around Zurich.  You can also grab free literature and promotional cards from the photographers.
There’s no real theme for the iconic Zurich photo show, the only qualification being that the photographs were produced during the year of the show.  This lends a broad subject matter, everything from photos that are “supposed” to be out of focus to tables bleeding black blood, fantastic aerial shots and high fashion.

This also means there’s no pretentiousness about the presentation of the work.  The goal of the night is to exhibit Swiss photography, network, hang-out, basically just chill and have a good inspiring time.  The work of a high-paid fashion photographer can be found next to that of high-adrenaline hobbyist.  It’s all about the images.  Of course, because the show highlights the work more than the artist, I can’t remember a single name of anyone who exhibited at Photo07.  So, it’s fortunate that a list of all of them can be found on the Photo07 site.  There you can find the contact info for Sandor Rozsas, who can produce sharp photos if kindly asked.  You can also find out about Oliver Oettli, who’s glamor works sometimes includes pink plastic dolls from IKEA.

The actual presentation of the works is left up to their owners and might range from well-matted to frame-less prints seemingly freshly removed from the cutting room floor.  The display surface was uniformly white Styrofoam – cut into giant blocks, which fit nicely with the concrete flooring and dark industrial setting.

The coolest and most enjoyable art is the type you can interact with.  And one of the first exhibits was a giant foam column with a permanent marker on hand for every anonymous person to draw or write whatever they felt like.  Naturally I produced a strange looking creature with large Alien-like head and human nose.

After walking through the avant-foam maze of faces of colors you end up near on the other side of the cool-factory ambiance and can chill in the lounge – by the bar.  The perfect setting to sit back and reflect on the experience you’ve just witnessed.

Photo07 was a cool experience, situated conveniently in between Christmas and New Years, the show is an excellent reason to wander into the crisp December Zurich night.  I’m looking forward to Photo 08 in Zurich, and might even submit a portfolio to the show.

PMA 2008 – Sony Digital Junky Live View Nuclear Madness

Now we have come of Age
Descended from the Hills and Caves

This humble year of our Lord called 2008 is set to explode in the mind of this camera-politico-junky dream.  Forces are in motion and old battle scores are set to be replayed on the global stage.  We in the pro-amature photo industry news business take these things very seriously – more intently and at a higher adrenalin level than any fool CNN political commentator War junky journalist on the Net today.

The Photo Marketing Association held it’s yearly show, and among camera announcments from Canon, Nikon, Sigma, Pentax and others, Sony is set to transform the digital camera market.

The stakes are higher than those wars overseas and every online junky comes out of the digital net to blast competitor companies and raise their favorite brand to Buddha like reverence with the crafty spirit of a Sun Tzu trained assassin.

First, let’s set the stage:

For those in the know, the competition between digital single lense reflex (DSLR) camera manufacturers is nothing less than a precision guerrilla war on the global chess board.  In any competition there are those on the top and there are underdogs.  The Goliath of the camera industry is Canon.  Dominant in the pro sports market their lenses and bodies penetrate the consiousness of anyone who has seen a main stream camera in the past 20 years.  Canon was really the first camera maker to develop its own imaging sensors and use full frame (35mm film sized) sensors.  Their pro cameras are always at the top of the performance charts and have dominantly defined the direction of digital camera technology since Kodak dropped the ball in developing DSLR technology.

Canon is the Golaith to knock off, and Nikon started the real assault late in 2007 with the release of the D3, a full frame high ISO DSLR beast which is creating a movement of dollars back to the Nikon brand.  Aside from Nikon, the small companies like Pentax, Olympus, and the now defunct Konica-Minolta released cool technologies like in camera images stabilization, anti-dust, and Live View innovations, which were either capatilized upon, improved, or ignored by Canikon.

Unlike War, the photography battles occur at prearranged places, generally the yearly PMA and biannual Photokina.  This year they’re both going down and the bloody push for market share is fierce.

The stage is set to explode because one last vestiage of the samurai inspired Nihon-Camera tradition has begun to growl and show its silver back.

An 800 lbs Gorilla is in the room – Sony started is mobilizing in the DSLR business about 2 years ago with all the vigor and quiet calm of a Tsunami – after aquiring the camera technology from Minolta.  Now the hurgry beast has declared a desire to capture 10% of the DSLR market in 2008.  At this time in 2007 Sony had one DSLR and a hand full of lenses on sale.  Now the line boasts the A100, A200, A300, A350, and A700.  Partnered with Carl Zeiss, the mystic German lens house to design and oversee high-end lens production – the pieces are coming into place for Sony to make some serious market penetration.  And then, just a few days before PMA opened and other manufacturers finished their announcements, a quiet press release was made:

Sony announces the development of 24.81 Megapixel Full Frame Sensor

The general camera geek consumer has been waiting for a hammer to drop… that full frame DSLRs would be produced is such numbers that they would actually become affordable and Canon would be knocked on its head – and this is one large step closer to reality.

Sony is more or less leap-frogging over Olympus and Pentax, which Minolta was incapatble of doing.  With in-house sensor manufacturing abilities and global marketing reach, Sony has the power to do what Nikon has had trouble with – entering a head-to-head Ram style war for the high resolution Pro-oriented DSLR market.

Let’s Focus…

The combination of Minolta camera technology, Zeiss lenses and a 24.81 megapixel CMOS imaging sensor is the camera industry equivalent of a country aquiring full-blown nuclear capabilities with ICBM cluster delivery systems overnight.  No matter your moral affiliations it means something, and the world will never seem the same again.  Of course, we’re dealing with cameras here, not atomic demons, but the analogy will stick for now.

The hammer is coming children…and it’s set to slam against the ground with the full force of an 800 lbs Japanese Gorilla behind it – and all the camera junkies are laying money down on Sony in announcing their Alpha 9/A900 full frame DSLR at Photokina in September 2008.

Ricoh GRD – Frozen Motion Street Photography

Street photography gets debated a lot in online photo forum elitist groups.  Favorite arguments will revolve around "What is Street Photography" and unknown photographers lavishing praise on figures like Cartier-Bresson – who in certain circles enjoys more mindless devotion than the Gods.

I like the idea of photography being a documentary tool, but documentary according to what?  We all perceive ideas and images in various ways, so it’s pretty hard to set down a specific definition of Street Photography.  Tokyo is probably one of the best places in the World to make street images.  The number and styles of people spread throughout the city is endless and sets an excellent stage for your humble photographer narrator.

My day to day routine in Tokyo involves taking the train from Komaba and changing in Shibuya, one of the busiest stations in Tokyo.  This affords daily opportunities to exercise one of my favorite photography styles – capturing Frozen Motion of folks heading hither and thither.

Cameras are by default used to capture static moments in time.  This often entails sharp, defined images where you can clearly see what the photographer saw.  Or was it only what was recorded by the machine?  My mind doesn’t always percieve street photography as a static scene.  I want to see the unseen image, the one I didn’t know was there – the Motion.  I want to take an image with my camera to see what it will look like.  Capturing motion is pretty easy, you just reduce the shutter speed such that the resulting images capture enough definition so everything isn’t a total blur.

The Ricoh GRD is pretty much the perfect camera for street shooting, save for the long RAW write time – in which case the Ricoh GX100 or the new Ricoh GRD2 is probably the best camera available for these types of boredom deflecting activities.  With the wide angle 21 mm lens attachment you can pull in a very wide scene, with colors and motion from everywhere in front of the lens.

Motion capture can be very cool, but it’s also very easy to make mediocre images this way.  To my eye, if there’s just enough blur to make the image appear unfocused, but not enough for any colors to mix with one another, it’s just a waste of memory card space.

Many Japanese wear conservative suits to the offices, and when mixed together this renders a sea of grey.  The element I look for is something with a bright color, a hand bag, a light colored box, something that will stand out in the sea.

The second element I hunt for is mixed motion.  If you just stand there and shoot, all the motion is in one direction, one or two of these shots are cool if you’ve never used this technique before – but gets old crazy fast.  I like capturing motion from different directions.

In Shibuya, I usually head up the stairs and position myself on the edge of the up and down directions, then I can focus on someone with a non-standard element (color, geometry) and pan on them while I’m walking past.  This means that the image is a combination of them getting closer to me while my camera is rotating, if I’m lucky I can catch one element of their person in reasonable focus – like a hand or bag.  If executed with exacting imprecision this results in an element popping out from the chaos.

The Frozen Motion technique works for me because it’s the scene which I want to capture for Street Photography.  The important element isn’t capturing and documenting the scene exactly as it occurred, I want to paint with the motion, get the random colors mixing – chaos going and freeze it in-camera.

You can try stretching the image and using motion blur filters in Photoshop, but for my taste it’s like using a Lens Baby instead of a Holga, there’s no randomness to the image – it’s all been over-engineered, and hence – boring to my eyes.

Photography and Photoshop – Getting Digital Style

I’m sort of on a Style quest.  This isn’t meant to mean that I’m trying to define a certain photographic style because I read online that I need to do so.  Getting a certain style, or look in my digital images in just an extension of the process that started many years ago.  I started out in photography with mountain photography, documenting trips in Colorado or New Mexico, which eventually shifted to locales like Bolivia, the Swiss Alps, and now to parts of Japan.

Photography is a natural part of travel, and in Europe I took the time four yeas ago to head out with a universal train pass shooting about two rolls of mixed 35 mm and 6×4.5 for a month in places like Austria, Poland, Czech Republic, Hungary, and Germany.  The point was that I wanted to see what I liked shooting and didn’t care much for – to figure things out.  Eventually I moved to off-camera lighting with a Strobist education, and now I’m expanding further into the freedom provided by Photoshop – initially inspired by the work of Joey Lawrence.

Photoshop is one of those crazy amazing programs where anything is possible, but if you just randomly click things without any feeling for the result you’ll never really use the program for anything beyond an amusing supplement for television.

It’s important to remember that Photoshop is just a visual translator, an avenue for the user to express a visual representation of an idea.  Like most computer programs, the actual user-computer interaction sucks.  Many of the elements of Photoshop like the paintbrush tool are traditionally controlled by a computer mouse – one of the least bio-mechancially compatible gadgets ever invented.  It doesn’t matter the shape, number of buttons or color, the mouse was not designed for a person to easily interact with the computer.  It was developed because in the age of post-DOS early Windows programs, it was the most basic component that could be produced to allow user-computer interaction beyond the keyboard.

I’m still waiting for the day when mechanical design and analysis programs like Pro/E and ANSYS are sold with VR-goggles and three-dimensional motion gloves to enable real user-program interaction.  If you really want to start interacting with Photoshop and making it an extension of your imagination and body – drop the standard mouse and pick up a graphic tablet.  Mine is a basic small Wacom from like 8 years ago – superior to any of the latest button-crazy-curved-but-non-ergonomic mouse designs found today.  Plus, it’s small enough to pack along to all corners of the Earth with my dented G4 PowerBook.  I’ve been drawing in class since kindergarten – sketching with a pen or pencil is my natural visual expressive process – so using a mouse with Photoshop is just imposing a handicap.

Once you get a feeling for what Photoshop can do by starting out with some basic online tutorials, buy yourself a sketch book and drawing implements.  My current favorites are a Moleskine sketch book, standard pen, and Japanese ink pen.  The Moleskin has heavyweight pages that soak up excess ink are great for shading.

The Japanese ink pen is essentially like having a paint brush in your pocket.  You can buy different brush lengths, and are generally available in art stores.  As I’m in Tokyo at the moment, I plan on bringing a small bag full back to Zurich.  When you feel like it, draw something, anything, fill in lines, create shadows, contrast, change the feeling from happy bunny to evil man-eating alien with a few pen strokes.  That’s really all Photoshop does, just on a much larger scale.  Get used to doing it with simple sketch books, and you can start opening up the creative flood gates in Photoshop.

Photoshop is great for doing contrast and brightness adjustment, but if that’s all you’re using the program for save yourself the hassle of having all the other features and go with a simpler program like Gimp, Lightroom, Aperture, Light Zone, etc.

The reason I’m exciting about using and abusing Photoshop in the coming year is the amazing possibilities with selective lighting and local image adjustments.  Using a graphic tablet and painter techniques one can really start using the program as an extension of the mind-body and use it as a creative tool to create – as opposed to modifying images.  I always knew these things were possible, I just never took the time to explore them before.

I don’t know where I’m going with Photoshop, but I love the possibilities, I love using the program as an extension of my mind and starting to visualize the creation and evolution of images from the initial image capture to the thing my mind originally envisioned when I tripped the shutter.