I am a gear whore, sort of a bag slut. I have packs and bags for everything from urban adventures to backcountry camping, biking, climbing, painting, photographing, writing, skiing, summit assaults, but nothing I had fit right for mountain running and ultra marathons. Nothing worked until I was able to get my hands on a Salomon XT Advanced Skin S-Lab 5 running pack last year when I signed up to run the SwissAlpine K42 mountain marathon. The S-Lab 5 is now my pack for mountain and trail running in Switzerland. After a nice season of running with it in 2011, here are my thoughts on the S-Lab, let’s call it a user review…
Salomon S-Lab Line
Before we jump in, some background is in order. Salomon is an interesting company. I know them mainly from ski gear, but now they have branched out into serious trail and long distance (ultra) running. From my perspective they’re the only large sports company which is really trying to capitalize on the trail running and ultra-marathon market, in some ways actually pushing the sport forward (and are essentially expanding the market need for their products). Unlike other companies which are now bringing out trail running products in a me too fashion, I have the feeling that Salomon is more committed to creating great products for this growing sport, and they also have the design and distribution capacity to bring innovative products to the market. This lends more confidence in Salomon as a company and I consider their products to be the benchmark by which others are measured by.
 The pinnacle of their effort is the S-Lab line (I guess this stands for Salomon Laboratory). Basically S-Lab means high-end clothing, shoes, and accessories for trail running. There’s an actual S-Lab place (a sort of prototype shop) where they design, build, test, and refine these products (check out this video on YouTube). They have a guy on their running team named Kilian Jornet who is a sort of a trail running God from Spxain. He wins a lot of ultra races (and came in 3rd after Dakota Jones and Andy Symonds at the 2012 Transvulcania) and is setting the pace for the sport. Salomon sponsors and learns from the best runners in the world, but it seems like the relationship with Kilian is very close. So close, that as I understand it, that various products in the S-Lab product line are developed with direct feedback from Kilian like the new Salomon Sense running shoe (and the S-Lab 5 pack). The result is a product line with a high level of design and attention to detail that addresses the needs of people pushing their personal limits on the trail.
The S-Lab products are lean, light, fit close to your body and really move with you. Normally clothing is something that you need to wear for protection, but in an ideal world you would go without, it’s just there because we want to protect our bodies from the elements. But the S-Lab products actually improve your performance in subtle ways (my scientist opinion). Function and design are combined in a beautiful way, and the 5 pack is a wonderful example of designing a product to specifically fulfill the needs of long-distance athletes.
 S-Lab 5 Overview

The S-Lab 5 is made very well with materials that stretch and conform to your body as you move (they call it Sensifit construction). The pack fits very close to your body and the fits like a glove analogy makes sense here. I have a fabulous pair of Mammut gloves that often wear with the pack when the weather is cold, and the two products give me the same sense of perfect form and function. Designed as a hydration pack with space for minimal gear, it’s not the type of pack you can stuff full of gear you might need. It’s a minimalist pack where you need to make sure you only take what you really need. There are two water bottle pockets on the shoulder straps (which also work well for small cameras, food, etc) and a water bladder in the main pocket on the back. The bulk of the pack is composed of a hexagonal mesh material. It’s an elastic 3D weave of hexagons (or you could call it honeycomb) that defines the core function of the pack, to feel like a second skin so that you almost forget that you’re wearing it. The open mesh also lets perspiration move through the material and dry quickly.
If you’re a material scientist (like me) you’ll instantly think of a hexagonal crystallographic lattice when you pick up the pack. The hexagon is a beautiful structure with three main directions and corresponding planes of symmetry that make it ideal for this application. From a mechanics viewpoint, this means the the fabric should stretch with an equal resistance in three directions. Other packs usually have 2D weave like normal nylon (think of the fabric weave of your clothing) which is basically orthotropic. This means it will provide equal stretch in two, the 0 and 90 degree directions, but at 45 degrees you get a different mechanical response. Anyways, I digress, the point is that a hexagonal arrangement isn’t an accident here and if I had designed this from scratch I would have taken a similar design path (the hexagonal crystal structure was inspiration for one of my patents on heat shield technologies).
 The only real thing you need to know is that the design of the pack reduces pressure points over your body. It hugs and maintains contact with the surface of your back and frontal torso, more like a tactical vest than a traditional pack. Due to the multi-directional symmetric planes of the hexagon array the pack material expands as you move in different directions, differentiating from all other pack designs (as I know them).
Breath Easier
A huge problem with non-running packs when used for trail running is compression across the chest. In general, to keep a backpack on your body you need to stabilize the pack by closing down the shoulder and chest straps. As you start to run and the weight of the pack becomes more unstable and you can only counteract this by going slower or tightening the straps to their limit. However, this then constricts the ability of your torso to move, which constricts the volume of air you can take into your body. Basically your breathing ability is impeded and your running performance is reduced by your reduced ability to take in oxygen. Usually the only solution is to not wear a pack, or to reduce the load so that there isn’t as much mass to stabilize.
Traditional packs are designed so that load is carried by the shoulders and via contact with the lower back, generally using materials that are essentially static (don’t stretch). The S-Lab 5 is made of dynamic material that stretches easily in three different directions (thanks to the hexagon array) and maintains contact over your torso. This design greatly reduces and almost eliminates the stabilization problem (from my perspective). Since the pack is more like a vest, it maintains a large surface area in the back and over the shoulders. This essentially reduces the need for a chest closure system, because the pack is almost one with the form of your body. The S-Lab pack uses just two thin elastic bands that cross over your chest to close the pack around your torso. Since the pressure isn’t localized on the chest strap system and shoulders, the expansion of your chest isn’t restricted as much as with other packs. The pack remains stabilized around your body and therefore you can breath more naturally as the pack fabric expands and moves with you, so your breathing rhythm and oxygen flow isn’t restricted. The system makes for a much more natural running experience.
 Detailed Construction

The manufacturing of the S-Lab is really top notch and includes a lot of attention to detail. Seams are sewn correctly, the materials are durable, and the design is streamlined. The main rear pocket has a stretch front, so you can cram in arm warmers, a jacket, water bottle, whatever, and it keeps the mass compressed as close as possible to your spine. I find this is important for running and balance because it means that the moment of inertia of the pack is minimized, and over the length of an ultra marathon this can greatly reduce fatigue as compared with a pack where the mass is positioned out too far from your center gravity (or is off-center from the vertical axis of your spine). Inside the main pocket you have a small magnet to close the opening. There is an adjustment system to pull the pack higher up on your back if needed (to customize the fit). The elastic cords are all high quality as are the plastic clasps which secure the chest compression straps. The front pockets have draw string closures making them super easy to access. I use them for gloves, snacks, cameras, or water bottles. The pack comes with a Source hydration water bladder, and includes a sleeve with reflective backing, which would help keep liquids cool from the heat of your back as you’re running. The drinking tube comes under your arm and then up the shoulder strap, so it isn’t flying around over your shoulder like on other packs. You can secure running sticks to the pack as well, although I haven’t tried this yet. There are small side pockets that are nice for a cell phone, extra snacks (like magnesium sticks) or keys.

Trial By Trails
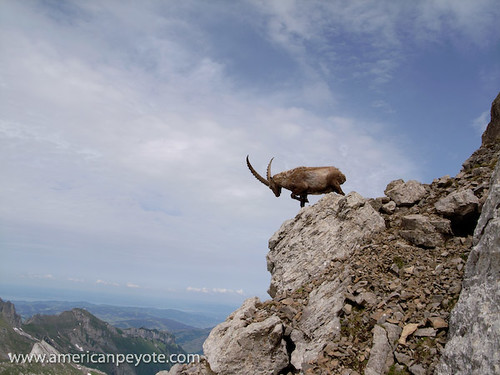
I got into trail running because it combines the elements of speed from ski touring with the technical footwork of climbing and the thrill of mountaineering. I’ve taken my S-Lab 5 on the SwissAlpine K42, the Jungfrau Marathon, and on various mountain runs around Switzerland including Rigi Kulm, Lauterbrunnen – Eiger Rotstock, Braunwald, Elm – Linthal, biking from Winterthur to Bauma, and then running up and down the Hornli. In general I’m not one to count kilometers, but I’ve run with the S-Lab over long distances and terrain variations including asphalt, basic off-road and mountain trails, ascending and descending at high and low velocities, and S-Lab pack have been marvelous. It could also be the most comfortable pack I have for multi-pitch sport climbing, but for storage reasons I take my Lowe Alpine Attack pack. If I carry a normal mountaineering load I will often get a strained shoulder muscle (think it’s connected to cracking my clavicle long ago). I found this happens also if I run with a small pack like the Lowe Alpine Attack, but with the S-Lab I never have this problem. This tells me directly that the pack fits very well and distributes weight better than anything else I own (and biomechanics engineer side of my brain agrees).
 Yes, It’s Worth It

If you’re looking for a casual running pack don’t even bother considering the S-Lab. It retails for 180 USD and you probably won’t use it enough to appreciate it (the true benefit comes when you’re logging lots of km). This is a piece of gear for serious distance and ultra runners, where you want a pack that will minimize your energy expenditure over long distances and will feel like a second skin around your body. The pack comes in two sizes, and this is probably the greatest limitation. If it doesn’t fit you well there isn’t much room to adjust it. I’ve tried mountain running with my Lowe Alpine Attack pack, my minimal Mountain Smith bike pack and other small packs, nothing compares to the S-Lab 5. It is vastly more comfortable and puts less stress on my shoulders than any other pack I have ever tried, and that makes the price totally worth it. I have loved running over the Swiss Alps with the S-Lab 5, and I’m now desperately trying to find the new larger version, the S-Lab 12 to take on the Swiss Irontrail T71 in July 2012.


 I picked up the
  My first experience with the Kacey dish was photographing my bookcase, complete with Bratz dolls, DVDs and an assortment of toys from California because, well – I’m a geek. What was I expecting and why did I want a beauty dish in the first place? Well, I like umbrellas for throwing a very large amount of light with spill going in all directions, I started using reflective and shoot-through umbrellas, and they have their place. When you’re starting out with lighting design, it’s the best way to go. Umbrellas are cheap, you can get a combined reflector-shoot-through design and it’s very easy to do basic lighting with an umbrella. But, they then become very limiting when one wants to start doing more precise lighting. To explore beyond the umbrella I bought some small softboxes in order to increase the precision of my lighting designs, because they are much more versatile than my 44in umbrellas. The softboxes can be placed on a boom, to the side, behind, where ever I desire around whatever it is I’m photographing. Umbrellas (at least the large ones I have) are not as easy to place, and give too much light spillage for my tastes. Softboxes can be gridded to further decrease light spill and sculpt light as one desires. However, the softbox creates a more diffused light source. What I wanted to achieve with a beauty dish is the ability to place harder light in a desired position. I like the look of photos I’ve seen with beauty dishes, and really I wanted the ability to place a large, even light source on a boom arm around models (ummm, and I’m generally the model). The Kacey dish represents a milestone for me, because it’s the first light modifier I’ve purchased which wasn’t made in China and bought because it was the cheapest option.
 So, how has the Kacey Beauty Reflector fulfilled my desires so far? First, I’ll note that this review is user, not scientific based, and focuses on my experiences using the reflector in the controlled studio environment of my apartment. The Kacey reflector was designed for location use in mind, but light is light and I was most interested in getting an excellent light modifier. Naturally, any light modifier is useless without light from a quality strobe. The Kacey dish is designed with the Speedlite in mind, like those standard uber expensive flashes from Nikon and Canon, which a person such as myself with a Minolta 7D finds to be over-kill. This is all well and good to design a dish for small flashes, but beauty dishes were originally designed with studio strobes in mind, those with bare bulbs instead of a fresnel lens to focus the light beam, like nearly all small flashes have. Nearly all, but I happen to love the Sunpak 120J bare-bulb cult-classic flash, and it fits perfectly with the Kacey Beauty Dish. Here’s why, most small flashes are designed to focus light directly forward of the flash head. A bare-bulb design throws light forward as well to the side of the head. So when you use a normal Speedlite in a beauty dish, you generally would also use a diffuser on the flash, to throw light to the side of the center reflector of the dish. This spreads out the light and would logically contribute to the nice uniform quality of light that beauty dishes are known for. Since the bare-bulb 120J already is throwing light in all directions, and the bulb is extending into the dish, it forms the perfect lighting combination.
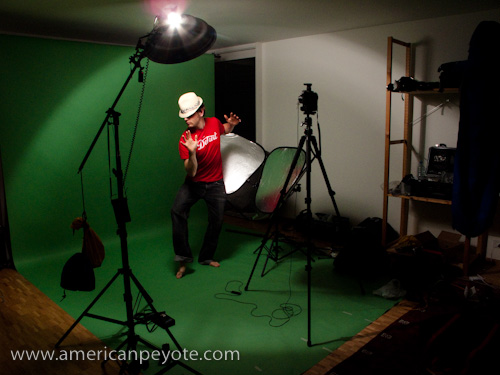 I ran a few test shots with myself playing the role of photographer, model, and art director, which feeds all the different parts of my creative brain. I wanted to get a feeling for the light I could expect from the Kacey Beauty Reflector both from a lighting and post-processing perspective. The setup was pretty basic, the dish went on a boom with the 120J above me and I setup my Lastolite Tri-Lite reflectors to get some fill. I did a few shots with my Minolta 7D and 28mm lens, Gadget Infinity radio triggers were used as well. I wore a shirt which says, “Enjoy Detroit,” because red is my color when shooting on a green background and Detroit is my city of eternal inspiration. I wore a hat I bought on the beach in San Diego and for some reason decided that the Katana would add a much needed element to the mix.
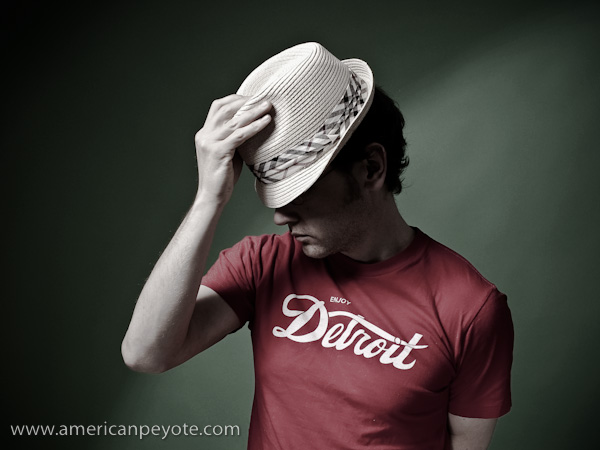

 When one gets deep into photography the inevitable question becomes, what can I store my gear in to keep it organized, accessible, mobile, bombproof and cool when jet-setting across the globe? The default answer is a Pelican case. Although now a cliche – Pelican cases are still the gold standard in photo gear protection. I bought a Pelican 1510 for various reasons, but the primary being that I needed a mobile case to house my gear for locations and for taking whatever wherever I desire without worrying about stuff breaking in-transit. I’ve used my 1510 for over half a year now, on planes, in my apartment, anywhere I decided I needed it to be (mostly my apartment).
 I like the security of Pelican cases and knowing that I never have to worry about the stuff I put inside them. The only time I ever opened a Pelican case to find the contents broken was when the TSA decided they needed to break open every fucking chocolate Easter bunny which I had packed in my 1450 (as checked luggage) as a present for my niece and nephew. Because, obviously if I wanted to smuggle drugs into the country I would do it in chocolate Easter bunnies which were still in the sealed packaging they came in from the store I bought them at in Switzerland. Which brings up another point, the 1450 is the perfect travel companion to the 1510. I can use my 1510 primarily for my lighting kit and then pack my Minolta 7D and assorted prime and zoom lenses into the 1450 (which is paired with a Pelican camera bag). The 1510 counts as the normal carry-on bag, the 1450 can counted as a camera bag. Since the 1510 is bomb-proof, it’s not light, and some people could run into the problem that it’s too heavy to take in the cabin. However, for myself it hasn’t been a problem.