Mark

Mark is a guy from Michigan who lives in Switzerland. He's a photographer, occasional writer and trained research engineer. His free time is sometimes monopolized by mountain touring or travels. On occasion he attends and presents at BarCamps and blogging events.

I’m Not Depressed, I’m An Artist

I’m not depressed, I’m an artist. Remember this, for it is my new motto with which to deal with certain aspects of life. In a book I once wrote, “Now, actually being an alcoholic is an unhealthy way to live, but pretending to be one for the night helps break life up into more manageable chunks.” If you pretend to not be an artist, I don’t think anything good will come of it. If you wake up wondering why you feel depressed and unfulfilled in the morning, it’s possible that you’re simply an artist. This one simple realization can make a large difference in your day to day life.

Accept who you are and always look on the bright side. Pretending to not be an artist will probably make you depressed, but actually being an artist opens up a whole city of plausible excuses and diversions to sensible responsibility. For example, when you’re an artist you can say, “I can’t do math today, my brain patterns are too nonlinear.” This is a no-go statement in the engineering world, you have to do math because that’s how we understand the natural world. “I can’t work today, I’m in a creative void, I’ll stay at the cafe all day drinking espresso.” To be fair, I don’t think this is reality, it’s just what I’ve see from the movies and over-dramatic artistic characters. I imagine myself more like a poor Howard Hughes, who wasn’t an artist in the traditional sense, but had the fantastic ability to run an engineering empire and be a director of photography in the same lifetime. Or maybe like a Paul Verhoeven, who holds degrees in math and physics, but also directed Starship Troopers and Total Recall.

For the longest time I thought I was an engineer who just liked to draw in math class.  I figured it would stop at some point and I’d just use these talents to design car handles or airplane designs or something.  Now I’ve realized that I got it all wrong these first 33 years, and my birthday is just after Marche du Nain Rouge, so there must be some Detroit devil inside me, and I think it’s time to admit defeat and start dealing with being an artist. Understand, I don’t really know what it means to be an artist, I only know the engineer lifestyle. I never attended art school and haven’t a clue how to act or conduct myself. I already wear colorful shoes and carry pens around to write and draw with. There’s a room in my apartment dedicated to painting and I have a pair of jeans stained with colored latex. What else should I be doing?

I don’t have a specific medium that I work in. I was asked once what texture I use when painting – and my first impulse was to ask the woman what the fuck she was talking about. As I understand it, texture is what the surface of your painting looks like (I thought it was just a layering technique in Photoshop). Always a new language to learn. I like to think that I specialize in ideas, and they come out in painting, video, digital photography,  whatever is at hand. The biggest problem is the need for expression, and this is the friction point with traditional engineering persona. Here is where the friction of the situation leads to conflict in the brain. For some personalities it’s easy, or at least normal to just calculate things and to find solutions in a number format and to be done with it. It would be nice if that were enough, but it’s not. I want to hold a thing in my hand. I like to bring something from nothingness into being, from concept to final product. It’s scary to stare down a blank white canvas and it’s a rush to look upon the final work. When you get used to feeling that rush in the studio, you naturally want to feel it elsewhere, it becomes a normal entity in your emotional map. However, it’s difficult to attain in a traditional engineering world. The only sane solution is to find a happy medium. Something which includes design and science, something where the two sides can coexist and benefit one another. I don’t know what the future brings, but hopefully I’ll find out soon enough.

Talenthouse – Inspiration Around the Globe

I live in Switzerland, and here is a picture of Jennifer Chalbaud in Venezuela, holding a picture of my Gonzo Art painting. The internet is a fine and fabulous thing, but I grew up writing things with a pen, and that’s sometimes the best way to send a message. This isn’t always the case, my hand-writing can be horrible and near impossible to read. However, if I take my time the writing is coherent. Sometimes I’ll write a letter on the computer and then write it out by hand to send. In the instant message update world of Facebook and Twitter, I think it’s important to write by hand sometimes. Just like I think it’s important to sometimes paint with real brushes instead of only with the virtual ones in Photoshop. Words are sometimes more meaningful when you know that someone took the time to write them specifically just for you. Sharing words on Facebook and Twitter is fine, it’s fun to do and sometimes contributes to the over-throw of governments. Sharing written words is a dying form of communication, but it’s far more likely that you’ll be able to read a written letter you’ve saved in twenty years than find the random Tweets you’ve sent.

The Background

Sometime in the past I joined a website called Talenthouse.com and added some paintings to my portfolio. This was all fine and good, but then I applied to a Creative Invite competition, I won, and as a result spent a weekend in Copenhagen as a guest at Hotel Fox, doing paintings for (t)here magazine. This was an interesting time, but one of the cooler points of a place like Talenthouse, is that you meet interesting people you wouldn’t have met in any other way. One such person is Jennifer Chalbaud,  a fashion designer from Venezuela. Around Christmas time in 2010 I decided I needed to stop just using Facebook and Twitter to send messages and decided to step back in time and write some cards or letters. To be dramatic, I told people I was protesting the instant update. I decided it would be best to get some of my photos/paintings printed, so I got cards made at moo.com, my favorite place for such things. I had five images printed, including a Bratz doll, an image from my ProtestLove series, and Gonzo Art (my masterpiece to date), produced in Copenhagen. I figured it would be best to send cards to people who want them, and I posted an update to Facebook/Twitter asking if anyone wanted me to send them a card. One of those who responded was Jennifer. She said she liked my Gonzo Art image so naturally I sent her one of those. In the card I basically said that it’s been cool getting to know about her and her work, and that it’s great to get to know people who you feel inspired by.

Sharing is Good

Eventually the Gonzo Art card worked its way through the global mail systems and ended up in her mailbox. Then Jennifer had a dream (this is how she described it). In her dream I was at a beach taking some portraits of a couple, and the couple had done some body paintings done in the style of my Gonzo Art. The idea for Gonzo Art was taken by me from from the writing style of the late Hunter S. Thompson, the idea being that the work is done fast and with a purpose. It should happen in the moment – without thinking, the hand writes what the mind perceives and it’s sent off to the printed without edits (of course, this never happened in reality).  So, Jennifer followed that style for her inspiration and created a design for the Mambo Surfdeluxe contest on Facebook.

I’m a trained scientist and I naturally like to look for patterns in life. Patterns give people a certain reassurance, a slight feeling of being able to sort of tell the future by understanding the rules of the World and the rhythms that operate in the universe. Other people prefer total chaos. One of the surest patterns I know in this life is that sharing leads to good things. It worked when I was five and it works even better now. I shared my art on Talenthouse and had an awesome experience painting in Copenhagen. I shared some thoughts with Jennifer and sent her an image of my art and she was inspired to create something new of her own. She has shared this creation on the Mambo Surfdeluxe Facebook page, and it has been viewed by a number of different people, and I wonder what they have been inspired to do. Be inspired, create, share, repeat.

Check out more of Jennifer Chalbaud on Talenthouse, Facebook, and Twitter (@jennychalbaud)


Ethan Oelman – Dancing with Water Video

I first met Ethan at the Strobist CERN workshop a couple years ago. Since then we’ve both grown our photographic styles and meet up for a coffee in Zurich to bounce ideas off one another from time to time. I’ve been getting into video and short film production, and Ethan was interested in doing a video project on his work. So it was a natural thing to make a video together about his photography. The goal was to do a behind-the-scenes video during a shoot, and then bring that together with the story behind the images. After the Dancing with Water shoot, I dropped by his apartment and filmed him talking about his work and the images from the shoot. During the shoot I also shot some footage of one of the dancers, Alexa, coming in and out of the water and put together a shot film called Birth-Kraft. Basically I just took everything I learned from watching Vincent Laforet on his CreativeLive film workshop, and produced this short video of Ethan Oelman and his photographic vision.

I had a wonderful time producing and shooting this video. I was getting intimidated a bit watching the CreativeLive workshop, but once you break things down to the essentials and put together the essentials of what you need for your project, all you need is to focus on your vision and forget about the rest. To see more of Ethan’s work, check out his website, Ethan Oelman Photography.

Tech Details

For those who are interested, the footage was shot with my Sony NEX-VG10, using a couple of different lenses including a Mamiya 645 80mm f/2.8 both on a tripod and using the Jag35 Field Runner rig. I used a Manfrotto 501 fluid head when on a tripod. The audio was recorded using an old Zoom H4 and was synced to the original footage using the Dual Eyes software. Everything was cut together in Final Cut. I’m looking forward to picking up a lapel microphone and also a shotgun mic to improve my audio gathering capabilities on future projects. The music is from Moby Gratis.

ArtDeath – KunstMord Short Film

Photography is a fun hobby, but it’s been taking a side-seat to short film and video production. My first coherent attempt is called ArtDeath – KunstMord. It’s a bit of a self-reflection piece, centered on the idea that the artists is driven to destroy their work, and in doing so set their spirit free to create again. I don’t know where this came from, but it’s a theme I’ve been building in my brains, and 1 Day of Art Copenhagen put things into context for me. I’m a lover a visual media, and it seems totally natural to present a painting as a concept in a short film instead of just in a gallery. The painting is just a container for the ideas and feelings of the viewer and of the artist. Film gives the artist another pallet to work with in displaying the work. Essentially I want to take the content of paintings, including the background story of how the work was created, and package that together into short films. At the point the term video poetry comes to mind, and I see short films in my head which are a mix a visuals, poetry vocals, and the correct imagery. Of course, implementing this is naturally had to do until you know what you’re doing. My first attempt was Gonzo Art – I: a short film all about my Gonzo Art painting with vocals connected to the writing I added to the painting.

Production

I had had the idea for ArtMord (or KunstDeath) for a while but time was short, so I shot the film with my girlfriend over a few nights time and used such innovative production equipment as a skateboard dolly with my NEX-VG10 attached with a Manfrotto super clamp. This had the nice effect of not being totally stable while rolling on my hardwood floors, and added a nice vibration to the footage, which fit in nicely with the tension I wanted to build in the film. Naturally it’s up to the viewer to decide if this worked or not.

I added my Big Blue Beast chainsaw to the mix, as I like the idea of mass and loud destruction on an artistic scale. I don’t think the machine actually works, but it was irrelevant as I used music to simulate the beast getting fired up. In the future I envision a flamethrower, but I’ll need a real place to work in, like an actual industrial space or studio instead of my apartment. For the soundtrack I used GarageBand with my own vocals, modified of course, to sound like high-pitched youth. It somehow mixes better with the back-beats than my natural voice (or so I thought at the time). It’s like when I do portraits and I want to add a texture layer, somehow it just makes everything mix better together, like baking a cake or cooking an Indian curry for dinner.

ArtDeath-KunstMord Film

Review: Scott & Neil’s Designing Web Interfaces Master Class

Scott & Neil’s Designing Web Interfaces Master Class

The Designing Web Interfaces Master Class by Bill Scott and Theresa Neil is, well, a class about designing web interfaces, discussing the common interaction design elements of successful web pages, and also those dreaded annoying/confusing design elements that designers sometimes use. Watching the class has put a lot of these design elements into perspective for me, and given me a much better grasp of the big picture of interaction design and program interfaces. Overall, the Master Class is worth a look. I’m at a point where I’m interested in learning and absorbing a lot of information about user experience and interaction design, so this is a nice overview of the entire concept of user interface.

When you have these types of talks, it’s important for structure to exist. The class is presented as a class, meaning a lecture format. This is ok, but I think for a video it’s much better when you have more involvement from the class. With this human interaction during the video, the viewer will become more immersed in the topic. You have a pdf copy of the class, which allows you to quickly go through the content, refresh your memory on what was said, it’s nice complement to have with the video.

What I Took Away

The Master Class gives you a technical and philosophical overview of user interface and interaction design. It’s not to show you how to code interfaces, but from a global design perspective, what user interactions exist on different web pages, what works, what’s confusing and difficult for users, etc. This is for people who are designing programs or web apps and want to understand what elements of user interaction are good for the user and what should be avoided for your project. I can imagine coming back to this video over the next year to rewatch certain parts like I do with the Vincent Laforet CreativeLive HDSLR workshop. Now that I know about camera sliders and the basics of getting a move production together I have a whole new appreciation for film, and due to the Master Class, also for interaction design.

Some of the main points I took away are that user interaction means patterns, and anti-patterns, what works within the context of a design interaction problem and what has been used and what works and what doesn’t. So, you can expect to know and understand how to apply different user interaction design principles to solve user interaction problems. Once you get through the video you’ll start to look at webpages with an eye to user interaction design (incase you hadn’t before). You’ll likely start to get pissed off at poor design and prais elegant interaction design on webpages and software you use. You’ll see the user interaction concept from a global perspective.

In Summary

The video is for sure more philosophical and conceptual than practical. If you want to know how to code this or that slider interaction in PHP or iOS, this isn’t the video you’re looking for, that’s another subject. That’s how to implement the design, this video is focused on developing a strategy, and it’s important to mention that it doesn’t matter how well you can code something if you don’t have a strategy for creating a useful product for you users. Many user interaction problems are not new, and it’s important to see what problems have been solved. It’s about removing barriers to common workflows.

VG10: Jag35 Field Runner Rig Review

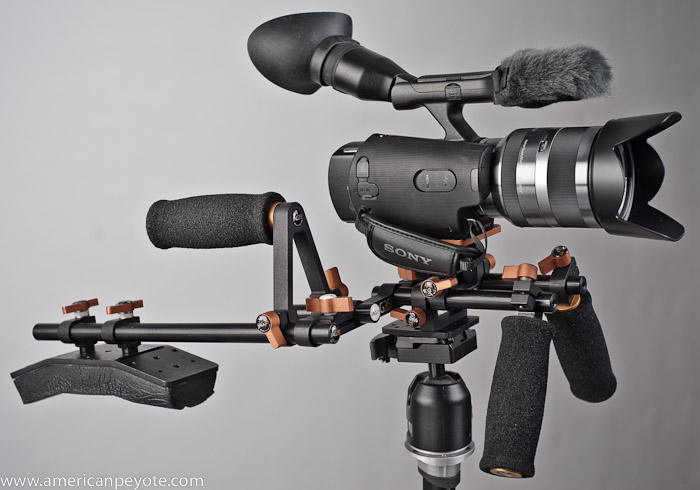
I picked up the Sony NEX-VG10 because it has more of an all-inclusive video camera design than going the DSLR route (Canon 7D, 60D, 550D, etc.). However, as I started using the camera I decided that a shoulder rig would add a lot of functionality to the system to stabilize the camera and to shoot in different situations (and I’ll admit so some gear lust driving my purchase decision). I opted for the Jag35 system because they offer rigs at affordable prices for people in my buying group: folks who are getting into Indy film production but don’t have a huge budget. I decided on the Field Runner because it’s under 300 USD and came with a free handle when I ordered it. I also picked up a tripod baseplate to quickly go from tripod to shoulder mount on shoots.

Shooting with the Field Runner

The Field Runner is fun to shoot with, and that’s an important point. I use the Field Runner with the NEX 18-200mm autofocus lens or something wide like the Sigma 20mm f/1.8 or a Minolta 20mm f/2.8 and stay mobile. Since the NEX is autofocus I don’t yet worry about pulling focus and haven’t added a focus follow to my camera kit just yet. With the 20mm lenses I set the aperture and manual focus as desired. I can then shoot with the rig on my shoulder, or down low from my hip. I’m currently using the Field Runner without any counter weight on the back since the VG10 is pretty light the counter weight isn’t such an issue, but I’ll probably add one in the future to stabilize the system.

On the shoulder the VG10 is very nicely stabilized, and is much better than shooting in the classic Handycam method of just holding the camera in your right hand and putting it up to your face like a tourist or last-rate pornographer. With the Field Runner the VG10 becomes a part of my body. It moves with me, rotates with my torso and feels connected to my center of gravity. In short, it does exactly what I was hoping for when I ordered it. The VG10 now sort of feels naked without the rig. I can imagine shooting without it, but don’t see the point. It’s also nice to cradle the rig in my right arm and hold it to my body, with my left hand on the front handle. I also often shoot from my hip. To do this I make the front handle parallel to the rig and hold that handle with my left hand while holding the raised handle with my right hand and then rest the shoulder pad on my hip and then pan with my body. This is a very secure was to do a low pan when needed and is very comfortable.

Mobility

I like to be mobile as a film maker or photographer (or painter for that matter). I like gear that easily moves me and packs up quickly. I can easily pack up the Field Runner with my VG10 and an assortment of lenses into my Think Tank Airport Acceleration and go without any issues. When on location the Field Runner assembles in a few seconds and I’m ready to shoot. With the optional tripod plate I can mount the rigged camera on my Manfrotto 501HDV fluid head and quickly switch from tripod to hand-held in mere seconds. I just need to swing out the front handles to allow the rig to slide onto the 501 head, but since the handles are locked down with simple twist knobs, this is very easy to do. Then when I go from tripod to shoulder it just takes a second to swing the handle back into position and lock it down and I’m ready to shoot again.

Design Issues

These are a few design issues I’d like to address that may be serious or totally irrelevant to potential buyers. Overall the Jag35 Field Runner is a good value for the money, but there are some areas of the design that need improvement in my opinion. The most serious is related more to the VG10 design than the rig, which is likely irrelevant with any another than the VG10, but needs to be mentioned. The connection of the VG10 tripod plate to the rig is very insecure, this is the heart of the rig system and should be the most well-designed and quality-controlled part. However, this is a design issue with the VG10, and not the Jag35. Now, this is has to have some context. The Field Runner is designed for a DSLR body, and I’m using it with my VG10, which has a long base like most camcorders do, while DSLR bodies are short and wide. For the VG10 you should have a long attachment area like a Manfrotto video plate, which produces a nice secure contact area on the bottom of the camera. This connection system is offered from IndySystem or Cinevate, where you can screw a long Manfrotto plate onto your camera and then just lock that into the baseplate on the rig.

To compare, I also tried the Jag35 camera plate with my Sony A900 just to see how secure it would be with a DSLR body, and it was totally different from the VG10. With a DSLR body the camera sits securely to the Jag35 base plate. With the VG10 it’s ok for basic shooting, but I don’t have faith in the attachment to my camera to forget about it, and is a primary reason I’m looking at adding an IndySystem camera plate to improve my rig setup. I also think the current design would be greatly improved by using a metal knob (similar to those on the rest of the rig) instead of plastic covered screw on the camera plate, as it would be easier to securely tighten the camera plate to the camera tripod socket.

I also found some minor misalignment issues with the connectors which hold the rods together, but this is a smaller issue and doesn’t affect the performance of the system. When the screws are tightened the rig is rigid and secure, and that is the function of the design that matters most. The optional handle could also be improved. The handle needs a lock-off screw to prevent it from rotating. As it is, the off-center handle can easily torque due to the weight of my camera and twist open when held, which is a basic design fix that should be addressed. For this reason, I always need to hold the rig by two hands to prevent unscrewing and rotation. For a rig of this price point and production volume, these design issues are more or less acceptable, and I’m confident they will be ironed out on future rig releases.

Design Update

Jehu Garcia, one of the people behind Jag35 pointed me to an updated design for the camera mounting plate to address the issue of camera-rig connection. There are two key and very welcome design improvements. First, there are a few screws in the base plate which can be screwed to contact with the bottom of the mounted camera. This then counters the tendency of the camera to loosen from the mounting plate. This addresses the torque loading on the rig-camera connection, which can occur when a follow focus is used. It can happen that reaction forces develop at the rig connection point, and these screws help resist those loads by counteracting the torque. From the design, it looks like the new plate will also improve the issue with the VG10 (and the poorly designed Sony tripod mount). The second modification is a nice big aluminum knob. This will make it much easier to tighten the rig to the tripod socket.

Overall I Like It

I’m a mechanical engineer by profession and a scientist by training, so you would expect I’d find and write about any mechanical design issues that I find with the gear I use. However, I can honestly recommend the Jag35 Field Runner, for the price it’s a great rig for new Indyfilm folks and those on a budget. It will be used by weekend warrior film makers and those who don’t mind a few design short-comings. The price difference between the Jag35 offerings and a similar rig from one of the pro-shops like Zacuto or Redrock Micro is nothing short of amazing, and I’m impressed that they have grown so fast and come so far in the short time Jag35 has been selling gear. They’re releasing a motorized follow focus, and they’re even making it wireless. The innovation and price point of their gear is really impressive. At one point I actually was going to start designing my own rig system and get some custom prototypes made, but once I saw what is coming out of Jag35, Habbycam, and IndySystems, I decided the market doesn’t need another rig maker in this category. Of course, the rig system in my head will be designed to be ultra-light using carbon fiber rods with a structural design optimized using Altair Optistruct, so it’s still possible I’ll do something in the future if I’m motivated enough. However, I’m more into spending my time shooting than rig designing.

Tweeting the Gonzo Art Creation

On Monday evening I had lighting strike of inspiration hit my head. First, I turned off 300 on my computer, then I finished reviewing changes to a research paper, and then I decided to Tweet the creation process of a painting. The idea was, I’d take pictures at different intervals and then post them to my social networks including Tumblr, Twitter, and Facebook. Since they’re all tied together, I just send it all to Tumblr and the updates were forwarded to the other accounts. I don’t know if this was a good idea, or if it just seemed like it should have been a good idea at the time, but it seemed like an idea, and so I followed through with the plan. I like Facebook for networking and Twitter is cool to get an overview on trends, but I’d never attempted to harness these things to broadcast a message of creation. However, after downing a red bull, everything seemed possible, so I pulled out a canvas and manga markers and started writing some things and sketching out a large head.

Mortal Lust

I can’t say for sure what was going through my head, but I wanted to start small, and wrote, “all the things you long to forget” on one side of the canvas. After some fun with the manga markers and using a stencil to write out MORTAL LUST – or was it before? Well, at some point early in the process I added the line, “It’s distasteful to think that every day should be special and beautiful. That you must enjoy life just because the sun warms your face with love before giving you skin cancer.” I don’t know where this line came from, possibly from a journal entry or maybe it was the red bull twisting my mind. In any event, I decided that the large head needed some fire coming out of the mouth and that it would also need to be green at some point.

I like using manga markers on canvas. It’s something about the way that the fabric soaks up the ink. With these markers you can go back and blend two colors together, so I’ll start with a base color for the edge of the flame, and then fill and blend it with a lighter color on the interior. It’s like taking all the fun of Photoshop and transplanting the experience to 3D reality. This also gives off a lot of vapor, and possibly this inspired me to write, “Shaman set me free” in the corner of the canvas. This all formed the basis for the painting, and I decided that it was now time to retire to the paint-throwing wing of my apartment, and get to work blending colors together. So I tapped up the plastic that had fallen down in my painting room and setup the canvas on the floor. I was barefoot of course, because that’s the best way to paint.

I made it point, when I moved into my place, to not buy any furniture. People move into places and buy stuff and then the whole space is filled up with useless places to sit and relax. Fuck that I thought, I want a laboratory to create in. So I left a room connecting to the photo studio mainly empty, and eventually covered the floor and walls with plastic to throw paint around in. Now that I’ve ben in to painting for a year or so I’m getting a collection of works. I’ll either need to hang them all up, or sell them, or just destroy the basterds with a chainsaw at some point. But, until that time I’ll stick with creating paintings. I’ll call this piece Gonzo Art II, or maybe Mortal Art, or whatever. Names can be so meaningless without a proper context. As I said, I had the bright idea to tweet the creation process and uploaded the images to my Tumblr account, which then filtered to Facebook and Twitter. I don’t know if this had a positive impact on the world, but it was a fun experiment, and all the images can be enjoyed here below.

The Formers Band Portraits

The Formers are a local Zurich band that I’ve been working with lately. It started with their show at Zak in Rapperswil, and I dropped by their jam session in Zurich to shoot some portraits. The Formers are the type of band I love working with. They’re motivated to play their music and you feel the passion they have just by walking into the same room. I also like their music, this might seem irrelevant for a portrait project, but it’s a powerful motivator for me as a photographer. When you can identify with the people you’re shooting you have a much better base for creating images which combine and communicate all the essential elements of those people.

The Concept

We wanted to go with something that combines the band members and also had a sort of gritty texture. I wanted to start out with individual portraits, because it gives you the ability to relate to each person as an individual, before figuring out a concept for everyone together. I decided to go with a ring flash and post-processing concept, which would give gritty portraits with a certain edginess, but allows each person to be focused on. So my concept was to put the portraits together in a classic square compilation. This is ideal since you can view and relate to each image, but see them together in one image. I like this because each member of the band has distinct features in their face and hair, and it would be a shame if we had highlighted the singer and left the drummer in a shadowed background, or simply lined everyone up in front of a brick wall (the worst cliche in band photos).

On the processing side I went with a high-definition look and desaturated everything a little bit. This makes the features of the face like cheek bones and beards stand out strong and gritty. I used my Sony A900 with a Sigma 24-70mm set on like f/3.5 for the aperture and my Sony F58 flash off-camera in an Orbis ringflash adapter. I then focused on the eyes and this makes the eyes sharp in focus with a nice defocused area around the rest of the face.

I’ve had a fabulous time making images of the Formers at their show and portraits at their jam session. If you’re in Zurich I can highly recommend checking out their next show and their music on  The Formers MySpace. Their next show is at Abart in Zurich on February 27th.

Blankpage Portraits

I was introduced to Blankpage through one of the team members, Lukas, who I met through Web Monday Zurich. Blankpage is an expanding startup in Zurich focused on B2B content distribution solutions. Blankpage was looking to be a part of the web portraits project, and this offered an opportunity to shoot a full startup team. I visited the Blankpage offices in Schlieren to discuss a shooting concept and get a feeling for the startup. Getting to know new people and hear about their startup ideas is one of greatest benefits of being part of the Web Portraits Zurich project. Blankpage is working on stuff I’m working on in the back of my mind, so it was great to see the iPad version of Das Magazine that they’re coding. Essentially, businesses like newspapers and magazines can come to Blankpage, and they offer solutions for getting that content onto mobile devices like iPhones and iPads, but this is better said on their website:

Design, build and customize electronic publishing technology to maximize business and usability impact for our customer solutions.

This was also my first location shoot for the web portraits project. All the previous shoots were done in my studio, and this offered the opportunity to see the company and get mobile with my lights. I brought a few lights to their offices and setup by a wall with enough space for a large softbox, reflectors, and a fill light.

For the concept, we wanted a certain uniformity between the shots (since it’s a team series), with a certain edginess, but not totally overdone with textures (like I normally do). I decided to go with some simple lighting, one large gridded softbox from one side to get some nice structure on the faces, another normal medium box from the other side, and some fill in the front reflectors.

One of the most interesting portraits from the shoot is Bero, the Linux Guru of Blankpage. He came to the set with a box and a sketch of a face tapped to the front. This sort of humor is simply awesome. We shot a few portraits with the box and then pulled it off, Bero has that perfect mix of hippy and high-tech code warrior and I could easily do a whole series with this concept.

http://blankpage.ch

Experiments in Video Production

I’ve had an interesting trip the past two years. I started focusing on photography, turned to painting, and now I’m into the idea of mixing everything in video/film production. I like learning new things, it drives me in life to look back after a year after and see those interesting turning points where I learned something new about my position in life and those around me. In the past I did some experiments with Art Casting, making stop-motion videos of paintings as they’re painted to show the evolution of the work. After I participated in 1 Day of Art Copenhagen I realized there could be something more.

I wanted to create a video that brings together the thoughts in my head and the music that I feel as I paint. So after getting back from Copenhagen I picking up a Sony VG10, started watching the Vincent Laforet film class from CreativeLive, and began learning how to make short films. The first few so far are Birth – Kraft and Gonzo Art. The goal is just to make something, that is going in the right direction. I’m basically a self-learning film student at the moment, and my first goal is to get down the film production workflow and make 1-2 minute films with a message.

Birth – Kraft

Birth – Kraft is a collaboration with Ethan Oelman, a photographer in Zurich. He planned a shoot with a dancer and rented out a pool in Altstetten in Zurich. I came by with my VG10 to shoot footage for a behind-the-scenes video and also to experiment. I shot footage of the dancer coming out of the water and then cut that together with still images that Ethan made during the shoot. I used Abaltat Muse to make the soundtrack. The flow of the film and the transition between themes was my main focus. Abaltat is an interesting program for quickly cutting music for videos, but I need to energize some music skills into the workflow.

Gonzo Art

Gonzo Art is a video of my favorite painting from 1 Day of Art Copenhagen, made for (t)here magazine. It includes a lot of writing inspired by Copenhagen and has many visual elements like fire and a giant head. How do you capture the texture of a painting on video? How do the visual forms need to be presented? I don’t know exactly, and that’s why this is an experiment. I used Garageband with samples from Computer Music magazine to cut the music. I then added voice-over using a helium filter on my vocals in Garageband. The soundtrack sort of sucks, but it’s a starting point for moving forward. Video production is forming the motivation to develop my music creation abilities, something I always wanted to get into.

What’s Next

I don’t know the future, I just know the awesome feeling I have cutting visual and music elements together. It feels right and powerful in an intimate way. It’s important to look back on how you got where you are. This short Gonzo Art video started with Talenthouse and a Creative Invite. I submitted my Lazy Art paintings and (t)here magazine picked my work, allowing me to participate in 1 Day of Art Copenhagen. This opened up a turing point in my creative life, I realized the ability to create is there, it just needs the right motivations and environment. You excel when you have awesome people around you, chilling on your own behind a computer is a recipie for mediocracy. The internet and social media are awesome for connecting people to one another and to new ideas, but you need a healthy creative environment in you life.

NEX-VG10 Mamiya 80mm f2.8

One large draw of buying into the Sony NEX system is the ability to adapt many different lenses to the camera bodies. I picked up a VG10 to shoot video, and to use all my medium format, Contax G, and Minolta lenses on a video camera. One of my favorite lenses to shoot with is the Mamiya M645 80mm f/2.8 N, and here are my initial experiences…

Mamiya Background

The 80mm is the standard lens for the Mamiya M645 medium format camera bodies. The Mamiya 645 system has been used extensively by pro shooters for decades, and the equipment was all built to pro standards, making it a quality purchase if found in good condition. The system started out as all manual, but has since evolved into autoexposure, autofocus, and digital with the introduction of the Mamiya 645AF and 645AFD. Since the introduction of the autofocus Mamiya  cameras, the manual focus lenses have lost most of their value to digital shooters, and till recently, really only made sense to use on the older film bodies. However, a few manufacturers make adapters to mount Mamiya and Hasselblad lenses on DSLR bodies. For this reason I picked up a Cirrius adapter on eBay and some cheap used copies of the Mamiya 80mm and 150mm lenses to mount on my Sony A900. However, manual focusing sort of sucks on the A900, in particular if you shoot with old glasses like I do because you spend all your money on camera/video gear, computers, mountaineering trips, and retirement savings. If I had contacts it would be better, but at the moment I can’t accurately manual focus my A900. However, since all NEX cameras have live-view (like the A950 hopefully will have), the system makes an ideal candidate for use with my Hassy and Mamiya lenses.

Mamiya Lenses on the VG10

When used in conjunction with the LA-EA 1 adapter (Sony Alpha to NEX) I’m able to mount the Cirrius Mamiya to Alpha adapter onto my VG10 body, and thereby the Mamiya glass can be adapted to the NEX. The Mamiya lenses are nice candidates for the VG10 because they are compact and have smooth focusing action. When searching out a manual focus lens you want one with a dampened focusing ring. This means the focusing ring moves in a smooth motion, allowing to comfortable attain the correct focus. This is a big selling point of high-end glass like the Zeiss CP.2 compact primes. It should be easy to access the aperture dial as well. The focusing ring on the M645 80mm is prominent and easy to manipulate with the fingers, or for mounting a focus-follow device if desired (haven’t tried this yet on the VG10). The lens has a switch to allow full manual or automatic control modes on an M645 camera. If you put the lens in A-mode the aperture will stay open at f/2.8 no matter what. If you put it in M-mode you can then change the aperture as desired. On the VG10, you have to go into the menu system and turn on the option to allow the camera to shoot without lens attached (this only has to be once). You can now shoot in P or S mode. In P mode the VG10 can adjust ISO (if set to AutoISO) and shutter speed to attain the desired exposure. In S mode you can set the shutter speed and then allow the camera to set the exposure by automatically changing the ISO setting.

80mm Performance

The M645 80mm is a very nice lens, especially for the price you pay on the used market. The colors are great, it’s sharp, has nice bokeh, is compact, is easy to focus, everything you want in a manual focus lens. It could have more aperture stops, but that’s the only fault I see. On the VG10 it acts like a 120mm lens on a 35mm body but it only extends a couple inches from the body, much more compact than mounting my Minolta 85mm f/1.4 beast.

I’ve been shooting video and stills with the 80mm and am very happy with it so far. One video project at the moment is The Formers, a local band from Zurich that I’ve been working with. I took the VG10-80mm combo to their studio to shoot them in rehearsal (video coming soon). This entailed chilling in the room as they played with combined green and orange fluorescent lighting. I was manual focusing on the fly and shooting some stills here and there to sort of give the feeling of the ambiance of the place. I’ve also used the 80mm as a street lens, shooting grafitti, stickers, and flowers on the streets of Darmstadt. The main drawback so far is in the VG10, not the Mamiya.

The main problem with manual focus lenses on the VG10 is focus confirmation. You can focus with the live-view feed off of the LCD screen, but you can’t zoom in like on other cameras to check critical focus before shooting. This makes it difficult to hit the focus point correctly, and really needs to be addressed in a firmware update. Ideally there should be a little area on the LCD which shows a 5-8x zoom of the scene so you can fine-tune your focus. One way to compensate for this is to use your knowledge of hyperfocal distances and shoot at f/5.6 or f/8, and you can then create properly focused images. The Cirrius adapter is also a weak component of the system. The adapter is ok, it mates the Mamiya mount to the Sony Alpha, but there’s some play in the rotation of the lens when mounted, and images are soft when focused to infinity.

Summary

Overall the 80mm Mamiya 645 works very well on the VG10. The adapter from Cirrius isn’t really up to my standards, but it’s the only Mamiya to Alpha adapter I could find. Another option is to buy a Mamiya to Canon/Nikon and then a Canon/Nikon to NEX adapter, but that’s sort of expensive. I’m hoping that Fotodiox will release a Mamiya to NEX adapter in the future, as their Hasselblad to Alpha adapter is awesome and priced at a nice point. Better yet, if Fotodiox releases a tilt-shift Mamiya-NEX adapter I’d be super stoked. I’ve been lusting after a tilt-shift setup from Mirex to use my Mamiya lenses in that fashion, but that’s like almost 400 Euros. The tilt-shift thing would open up some interesting possibilities however, as I could then modify the focal plane as I want in relation to the people or things I’m shooting. Anyways, when you start lusting after more gear you know it’s time to use the stuff you have.

A Professional Photographer Portrait

I was chilling at my computer the other day when a little project came across the computer screen. Matthew Anderson, the American wedding photographer living in Winterthur, Switzerland was looking for a respectable portrait for his website. Matt and I are neighbors and we do little shoots together from time to time. Previous little projects included portraits of me (the Urban Poet), and doing a little testing of the Panasonic LX3, Elinchrom RX strobes and some Coffee Madness flying through the air. So, naturally I said yes, as he was coming over with some beers.

Plus, what caught my attention is that he wanted, well, a more conservative portrait. The type of portrait that would instill confidence in the mind of perspective wedding clients. The type of portrait, which would instill trust and, possible even encourage people book Matt for weddings or portraits, or other jobs. This was a challenge. This was intriguing for me since it’s totally opposite to what I normally do with photography. I enjoy taking a normal looking person and infusing in a bit of strangeness, just subtle enough and brewing below the facade of a normal life. I want that strangeness to come out in my portrait, and Matt would need a normal, confidence instilling image, it couldn’t be more opposite. So, I said yes as a sort of challenge to myself to see if I could pull off a professional portrait of a fellow photographer, devoid of strangeness.

Portrait Setup

Matt already had an idea in mind of what he wanted for his portrait. Some nice shadows here and there, and including a camera of course. It would need to show his face with nice definition, but also have that Doors feel to it, of a person coming out of the darkness. I started off with a very sharp transition to the shadows, and on request brought out the features of his face in a more even lighting sort of way. The main light was an Elinchrom BxRi 250ws in a small Photoflex octabox. From the back left there was another BxRi in a gridded CreativeLight softbox to add some definition to Matt. The gridded softbox is great for lighting things like cameras since it gives a nice highlight to objects without much need to precisiely flag the light against spilling too much. I added some barn doors to the octabox by putting out the velcro panels from my Think Tank Airport Acceleration bag and putting then on the front of the octa. In the end, we pulled it off nicely, and it took far less time that I had planned for.

Return to Strangeness

In the end Matt was happy with the result of my efforts, and I was amazed that I can take a normal looking portrait. It’s not something I plan to exploit in the future, but it’s nice to know you can pull off things like this if needed. Some people have been living in German-Switzerland for years and can’t speak enough Deutsch to order a beer in a bar. I’ve been into portrait photography for like 3 years now and I hadn’t attempted a normal professional portrait like this before – it just never occurred to me. However, I’m glad Matt contacted me for this little project, it was a fantastic learning experience. Naturally, before Matt even showed up I had done some lighting tests, pulling out my favorite hat and 3D glasses. I love strangeness in mild doses, it makes you look twice and, well, I have to admit that I like looking at myself. And so can you in the gallery below.